Update Data using Windows Form and .NET Data Sets
Contents
1. The ADO.NET Object Model
2. Database Updates from Datasets
3. ExampleMore Information on installing the .Net Framework click here.
Download full Visual Studio C# .NET Example from this Article.
1. The ADO.NET Object Model
Overview
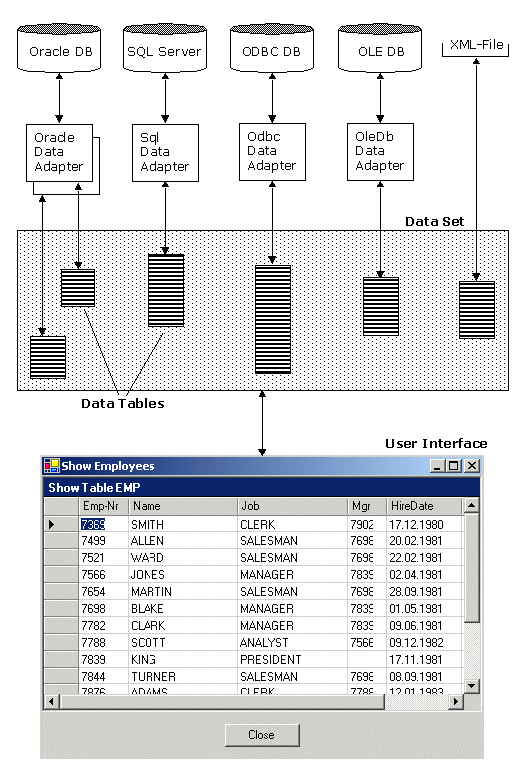
The ADO.NET object model is rich, but at its heart it is a fairly straightforward set of classes. The most important of these is the DataSet. The DataSet represents a subset of the entire database, cached on your machine without a continuous connection to the database.
Periodically, you'll reconnect the DataSet to its parent database, update the database with changes you've made to the DataSet, and update the DataSet with changes in the database made by other processes.
This is highly efficient, but to be effective the DataSet must be a robust subset of the database, capturing not just a few rows from a single table, but also a set of tables with all the metadata necessary to represent the relationships and constraints of the original database. This is, not surprisingly, what ADO.NET provides.
The DataSet is composed of DataTable objects as well as DataRelation objects. These are accessed as properties of the DataSet object. The Tables property returns a DataTableCollection, which in turn contains all the DataTable objects.
DataTables and DataColumns
The DataTable can be created programmatically or as a result of a query against the database. The DataTable has a number of public properties, including the Columns collection, which returns the DataColumnCollection object, which in turn consists of DataColumn objects. Each DataColumn object represents a column in a table.
DataRelations
In addition to the Tables collection, the DataSet has a Relations property, which returns a DataRelationCollection consisting of DataRelation objects. Each DataRelation represents a relationship between two tables through DataColumn objects. For example, in the SQL Server 2000 Northwind database the Customers table is in a relationship with the Orders table through the CustomerID column.
The nature of the relationship is one-to-many, or parent-to-child. For any given order, there will be exactly one customer, but any given customer might be represented in any number of orders.
Rows
DataTable's Rows collection returns a set of rows for any given table. Use this collection to examine the results of queries against the database, iterating through the rows to examine each record in turn. Programmers experienced with ADO are often confused by the absence of the RecordSet with its moveNext and movePrevious commands. With ADO.NET, you do not iterate through the DataSet; instead, access the table you need, and then you can iterate through the Rows collection, typically with a foreach loop. You'll see this in the first example in this chapter.
Data Adapter
The DataSet is an abstraction of a relational database. ADO.NET uses a DataAdapter as a bridge between the DataSet and the data source, which is the underlying database. DataAdapter provides the Fill( ) method to retrieve data from the database and populate the DataSet.
The DBConnection object represents a connection to a data source. This connection can be shared among different command objects. The DBCommand object allows you to send a command (typically a SQL statement or a stored procedure) to the database. Often these objects are implicitly created when you create your DataSet, but you can explicitly access these objects.
Rather than tie the DataSet object too closely to your database architecture, ADO.NET uses a DataAdapter object to mediate between the DataSet object and the database. This decouples the DataSet from the database and allows a single DataSet to represent more than one database or other data source.
2. Database Updates from Datasets
Datasets Datasets are a fundamental part of the ADO.NET architecture, providing both high-performance data access as well as scalability. Datasets store data in a disconnected cache. The structure of a dataset is similar to that of a relational database; it exposes a hierarchical object model of tables, rows, and columns. In addition, it contains constraints and relationships defined for the dataset.
Two Step Process
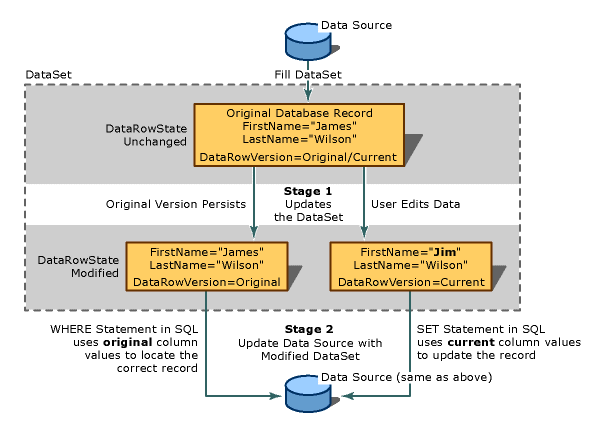
Updating a data source via a dataset is a two-step process. The first step is to update the dataset with new information — new records, changed records, or deleted records.
If you are updating a data source (such as a database), the second step is to send the changes from the dataset to the original data source. That is, the process of updating the dataset does not also write the changes through to an underlying data source; you must explicitly perform this second step.
After changes have been made in a dataset, you can transmit the changes to a data source. Most commonly, you do this by calling the Update method of a data adapter. The method loops through each record in a data table, determines what type of update is required (update, insert, or delete), if any, and then executes the appropriate command.
How an Update Is Transmitted to the Data Source
As an illustration of how updates are made, suppose your application uses a dataset containing a single data table. The application fetches two rows from the database. After the retrieval, the in-memory data table looks like this:
(RowState) FirstName LastName
(Unchanged) Nancy Buchanan
(Unchanged) James WilsonYour application changes "James" to "Jim". As a result of this change, the value of the DataRow.RowState property for that row changes from Unchanged to Modified. The value of the RowState property for the other row remains Unchanged. The data table now looks like this:
(RowState) FirstName LastName
(Unchanged) Nancy Buchanan
(Modified) Jim WilsonYou application now calls the Update method to transmit the dataset to the database. The method inspects each row in turn. For the first row, the method transmits no SQL statement to the database, because that row has not changed since it was originally fetched from the database.
3. Example
In a typical implementation, you might work your way through the following steps:
- Fill the tables for your DataSet using a stored procedure or SQL.
- Display the data in various DataTable objects within your DataSet by either binding to a control or looping through the rows in the tables.
- Change data in individual DataTable objects by adding, modifying, or deleting DataRow objects.
- Invoke the GetChanges( ) method to create a second DataSet that features only the changes to the data.
- Check for errors in the second newly created DataSet by examining the HasErrors property. If there are errors, check the HasErrors property of each DataTable in the DataSet. If the table has errors, invoke the GetErrors( ) method of the DataTable and get back an array of DataRow objects with errors. On each row you can examine the RowError property for specific information about the error, which you can then resolve.
- Merge the second Data Set with the first.
- Call the Update( ) method on the DataAdapter object and pass in the second (changed) DataSet.
- Invoke the AcceptChanges( ) method on the DataSet, or invoke RejectChanges( ) to cancel the changes.
This process gives you very fine control over the update to your data as well as an opportunity to fix any data that would otherwise cause an error.
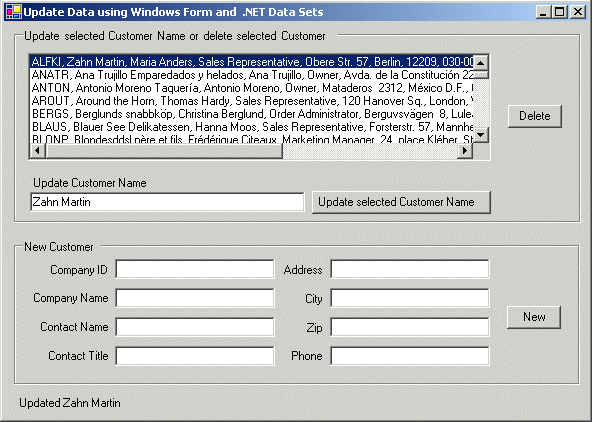
In the following example, we will create a dialog box that displays the contents of the Customer table in Northwinds. The goal is to test updating a record, adding a new record, and deleting a record. The code is as simple as possible, which means eliminating many of the error-checking and exception-handling routines you might expect in a production program.
This form consists of a list box, a button for Update, an associated text box, and a Delete button. There is also a set of eight text fields that are used in conjunction with the New button. These text fields represent eight of the fields in the Customers table in the Northwind database. There is also a label at the bottom that you can use for writing messages to the user.
Accessing the Data
First, create the DataAdapter object and the DataSet as private member variables, along with the DataTable. A DataAdapter may have four SQL commands associated with it. Right now, we have only one: dataAdapter.SelectCommand. The InitializeCommands( ) method creates the remaining three: InsertCommand, UpdateCommand, and DeleteCommand. InitializeCommands( ) uses the AddParms method to associate a column in each SQL command with the columns in the modified rows:
// The DataSet, DataAdapter, and DataTable are members
// so that we can access them from any member method.
private SqlDataAdapter _dataAdapter;
private DataSet _dataSet;
private DataTable _dataTable;
// **** Constructor
public CustTrans()
{
// Create the visual Controls
InitializeComponent();
// Setup DB Connection **** ADJUST IT FOR YOUR USE ****
string connectionString = "server=xeon;" +
"uid=sa; pwd=xxxxxx; database=northwind";
string commandString = "Select * from Customers";
_dataAdapter = new SqlDataAdapter(commandString, connectionString);
// Create INSERT, UPDATE, DELETE "Template" Commands
InitializeCommands();
// Populate DataSet
_dataSet = new DataSet();
_dataAdapter.Fill(_dataSet,"Customers");
// Fill the list box with columns from the Dataset
this.PopulateListBox();
}InitializeCommands( ) creates each SQL command in turn, using placeholders that correspond to the column argument passed to AddParm( ). The DataAdapter uses these three commands to modify the table when you invoke Update( ).
// *** Bind parameters to appropriate columns.
// Note: The params keyword lets you specify a method
// parameter that takes an argument where the number
// of arguments is variable.
private void AddParms(SqlCommand cmd, params string[] cols)
{
// Add each parameter. Note that each colum in
// table "Customers" is of type VARCHAR !
foreach (String column in cols)
{
cmd.Parameters.Add(
"@" + column, SqlDbType.Char, 0, column);
}
}// *** Setup DataAdapter with expicit INSERT, UPDATE,
// DELETE "Template" Commands.
private void InitializeCommands()
{
// Reuse the SelectCommand's Connection.
SqlConnection con =
(SqlConnection) _dataAdapter.SelectCommand.Connection;
// Create an explicit, reusable INSERT command
_dataAdapter.InsertCommand = con.CreateCommand();
_dataAdapter.InsertCommand.CommandText =
"INSERT INTO customers " +
"(CustomerId, CompanyName, ContactName, ContactTitle, " +
"Address, City, PostalCode, Phone) " +
"VALUES(@CustomerId, @CompanyName, @ContactName, " +
"@ContactTitle, @Address, @City, @PostalCode, @Phone)";
// Bind parameters to appropriate columns for INSERT command
this.AddParms(_dataAdapter.InsertCommand,
"CustomerId", "CompanyName", "ContactName", "ContactTitle",
"Address", "City", "PostalCode", "Phone");
// Create an explicit UPDATE command
_dataAdapter.UpdateCommand = con.CreateCommand();
_dataAdapter.UpdateCommand.CommandText =
"UPDATE customers " +
"SET CompanyName = @CompanyName " +
"WHERE CustomerID = @CustomerId";
// Bind parameters to appropriate columns for UPDATE command
this.AddParms(_dataAdapter.UpdateCommand, "CompanyName", "CustomerID");
// Create an explicit DELETE command
_dataAdapter.DeleteCommand = con.CreateCommand();
_dataAdapter.DeleteCommand.CommandText =
"DELETE FROM customers " +
"WHERE customerID = @CustomerId";
// Bind parameters to appropriate columns for DELETE command
AddParms(_dataAdapter.DeleteCommand, "CustomerID");
}// *** Fill the list box with columns from the Dataset
private void PopulateListBox()
{
// Get the only one Table from the Dataset
_dataTable = _dataSet.Tables[0];
listBoxCustomers.Items.Clear();
// Loop through the Dataset and add each Row
// to the ListBox
foreach (DataRow dataRow in _dataTable.Rows)
{
listBoxCustomers.Items.Add(
dataRow["CustomerId"] + ", " +
dataRow["CompanyName"] + ", " +
dataRow["ContactName"] + ", " +
dataRow["ContactTitle"] + ", " +
dataRow["Address"] + ", " +
dataRow["City"] + ", " +
dataRow["PostalCode"] + ", " +
dataRow["Phone"] + ")" );
}
}// *** Set all the text fields to empty strings
private void ClearFields()
{
txtCompanyID.Text = "";
txtCompanyName.Text = "";
txtContactName.Text = "";
txtContactTitle.Text = "";
txtAddress.Text = "";
txtCity.Text = "";
txtZip.Text = "";
txtPhone.Text = "";
}The form is now displayed, and you're ready to update a record. Highlight a record and fill in a new customer name in the topmost text field. When you press Update, read the resulting name and put it into the chosen record.
Updating a Record
First you must get the specific row the user wants to change.
Declare a new object of type DataRow and initialize it with a reference to the specific row in the DataTable's Rows collection that corresponds to the selected item in the list box. Remember that DataTable was declared as a member variable and initialized in the PopulateListBox( ) method shown in the previous section.
The call to the static method DoEvents( ) of the Application class causes the application to process Windows messages and paint the screen with the message. If you were to leave this line out, the current thread would dominate the processor and the messages would not be printed until the button handler completes its work.
Call BeginEdit( ) on the DataRow to put the row into editing mode. This suspends events on the row so that you could, if you chose, edit a number of rows at once without triggering validation rules (there are no validation rules in this example). It is good form to bracket changes on DataRows with calls to BeginEdit( ) and EndEdit( ).
The actual edit is to the column CompanyName within the targetRow object, which is set to the text value of the text control txtCustomerName. The net effect is that the CompanyName field in the row is set to whatever the user put into that text box.
Notice that the column you want is indexed within the row by the name of that column. In this case, the name will match the name that is used in the database, but this is not required. When you created the DataSet, you could have used the TableMappings( ) method to change the names of the columns.
Having edited the column, you are ready to check to make sure there are no errors. First, extract all the changes made to the DataSet (in this case, there will be only one change) using the GetChanges( ) method, passing in a DataRowState enumeration to indicate that you want only those rows that have been modified. GetChanges( ) returns a new DataSet object.
// **** Handle the UPDATE button click
protected void btnUpdate_Click (object sender, System.EventArgs e)
{
int index;
// Get the selected row from the ListBox
index = listBoxCustomers.SelectedIndex;
if (index == (-1))
{
lblMessage.Text = "Please select a Customer";
return;
}
else
{
lblMessage.Text = "";
}
DataRow targetRow = _dataTable.Rows[index];
// Inform the user
lblMessage.Text = "Updating: " + targetRow["CompanyName"];
Application.DoEvents();
// Edit the row, no validation is fired between
// BeginEdit() and EndEdit(). The underlying Dataset
// will no mark the Row as an UPDATE!
targetRow.BeginEdit();
targetRow["CompanyName"] = txtCustomerName.Text;
targetRow.EndEdit();
// Use the GetChanges method to create a second DataSet
// object that is then used to update a data source.
DataSet dataSetChanged =
_dataSet.GetChanges(DataRowState.Modified);
// Test to make sure all the changed rows are without errors
bool okayFlag = true;
if (dataSetChanged.HasErrors)
{
okayFlag = false;
string msg = "Error in row with customer ID ";
// Examine each table in the changed DataSet
foreach (DataTable theTable in dataSetChanged.Tables)
{
// If any table has errors, find out which rows
if (theTable.HasErrors)
{
// Get the rows with errors
DataRow[] errorRows = theTable.GetErrors();
// iterate through the errors and correct
// (in our case, just identify)
foreach (DataRow theRow in errorRows)
{
msg = msg + theRow["CustomerID"];
}
}
}
lblMessage.Text = msg;
}
// If we have no errors
if (okayFlag)
{
// Update the database on second dataset
_dataAdapter.Update(dataSetChanged,"Customers");
// Inform the user
lblMessage.Text = "Updated " + targetRow["CompanyName"];
Application.DoEvents();
// Accept the changes and repopulate the list box
_dataSet.AcceptChanges();
PopulateListBox();
}
else
{ // If we had errors, reject the changes
_dataSet.RejectChanges();
}
}
Deleting a Record
The code for handling the Delete button is even simpler. First, get the target row and form the delete message. You don't want to show the message until the row is deleted, but you need to get it now because after you delete the row it will be too late.
Calling AcceptChanges( ) on the DataSet causes AcceptChanges( ) to be called on each table within the DataSet. This in turn causes AcceptChanges( ) to be called on each row in those tables. Thus the one call to dataSet.AcceptChanges( ) cascades down through all the contained tables and rows.
Next, you need to call Update() and AcceptChanges( ), and then refresh the list box. However, if this operation fails, the row will still be marked for deletion. If you then try to issue a legitimate command, such as an insertion, update, or another deletion, the DataAdapter will try to commit the erroneous deletion again, and the whole batch will fail because of that delete. In order to avert this situation, wrap the remaining operations in a try block and call RejectChanges( ) if they fail.
Deleting records from the Customers database might cause an exception if the record deleted is constrained by database integrity rules. For example, if a customer has orders in the Orders table, you cannot delete the customer until you delete the orders. To solve this, the following example will create new Customer records that you can then delete at will.
// **** Handle the DELETE button click
protected void btnDelete_Click (object sender, System.EventArgs e)
{
    // Get the selected row
    DataRow targetRow  = _dataTable.Rows[listBoxCustomers.SelectedIndex];
    // Prepare message for user
    string msg = targetRow["CompanyName"] + " deleted. ";
    // Delete the selected row
    targetRow.Delete();
    // Update the database
    try
    {
        _dataAdapter.Update(_dataSet,"Customers");
        _dataSet.AcceptChanges();
        // Repopulate the list box without the deleted record
        PopulateListBox();
        // Inform the user
        lblMessage.Text = msg;
        Application.DoEvents();
    }
    catch (SqlException ex)
    {
        _dataSet.RejectChanges();
        MessageBox.Show(ex.Message);
    }
}
Creating New Records
To create a new record, the user will fill in the fields and press the New button. This will fire the btnNew_Click event, which is tied to the btnNew_Click event handling method. In the event handler, call DataTable.NewRow( ), which asks the table for a new DataRow object. This is very elegant because the new row that the DataTable produces has all the necessary DataColumns for this table. You can just fill in the columns you care about, taking the text from the user interface (UI). Now that the row is fully populated, just add it back to the table. The table resides within the DataSet, so all you have to do is tell the DataAdapter object to update the database with the DataSet and accept the changes. Next, update the user interface, you can now repopulate the list box with your new added row and clear the text fields so that you're ready for another new record.
// **** Handle the NEW button click
protected void btnNew_Click (object sender, System.EventArgs e)
{
// Create a new row, populate it with entered
// Data from the ListBox
DataRow newRow = _dataTable.NewRow();
newRow["CustomerID"] = txtCompanyID.Text;
newRow["CompanyName"] = txtCompanyName.Text;
newRow["ContactName"] = txtContactName.Text;
newRow["ContactTitle"] = txtContactTitle.Text;
newRow["Address"] = txtAddress.Text;
newRow["City"] = txtCity.Text;
newRow["PostalCode"] = txtZip.Text;
newRow["Phone"] = txtPhone.Text;
// Add the new row to the table in the dataset
_dataTable.Rows.Add(newRow);
// Update the database, any Error is catched in catch block
try
{
// Prepared UPDATE Command is executed
_dataAdapter.Update(_dataSet,"Customers");
_dataSet.AcceptChanges();
// Inform the user and repaint Form
lblMessage.Text = "Updated!";
Application.DoEvents();
// Repopulate the list box
PopulateListBox();
// Clear all the text fields
ClearFields();
}
catch (SqlException ex)
{
_dataSet.RejectChanges();
MessageBox.Show(ex.Message);
}
}