The Secrets of Oracle Row Chaining and Migration
Martin Zahn, Akadia AG, Information Technology, CH-3672
Oberdiessbach
EMail: martin dot zahn at akadia dot ch
12.09.2007: Updated for Oracle 10.2
Overview
If you notice poor performance in your Oracle database Row Chaining and Migration may be one of several reasons, but we can prevent some of them by properly designing and/or diagnosing the database.
Row Migration & Row Chaining are two potential problems that can be prevented. By suitably diagnosing, we can improve database performance. The main considerations are:
- What is Row Migration & Row Chaining ?
- How to identify Row Migration & Row Chaining ?
- How to avoid Row Migration & Row Chaining ?
Migrated rows affect OLTP systems which use indexed reads to read singleton rows. In the worst case, you can add an extra I/O to all reads which would be really bad. Truly chained rows affect index reads and full table scans.
Oracle Block
The Operating System Block size is the minimum unit of operation (read /write) by the OS and is a property of the OS file system. While creating an Oracle database we have to choose the «Data Base Block Size» as a multiple of the Operating System Block size. The minimum unit of operation (read /write) by the Oracle database would be this «Oracle block», and not the OS block. Once set, the «Data Base Block Size» cannot be changed during the life of the database (except in case of Oracle 9i). To decide on a suitable block size for the database, we take into consideration factors like the size of the database and the concurrent number of transactions expected.
The database block has the following structure (within the whole database structure)
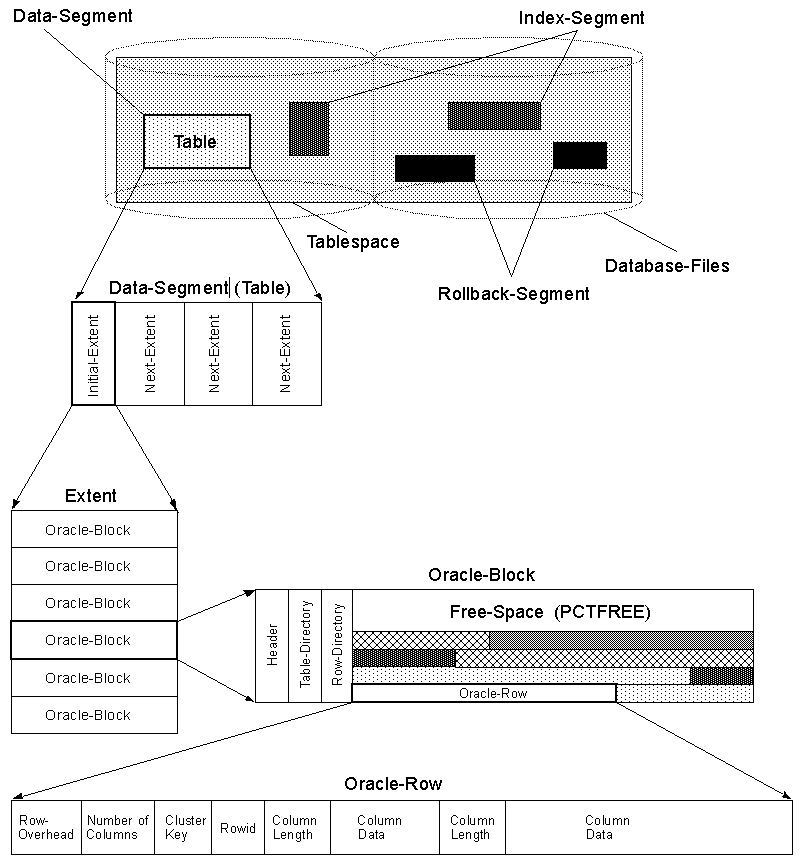
Header
Header contains the general information about the data i.e. block address, and type of segments (table, index etc). It Also contains the information about table and the actual row (address) which that holds the data.
Free Space
Space allocated for future update/insert operations. Generally affected by the values of PCTFREE and PCTUSED parameters.
Data
Actual row data.
FREELIST, PCTFREE and PCTUSED
While creating / altering any table/index, Oracle used two storage parameters for space control.
- PCTFREE - The percentage of space reserved for future update of existing data.
- PCTUSED - The percentage of minimum space used for insertion of new row data.
This value determines when the block gets back into the FREELISTS structure.
- FREELIST - Structure where Oracle maintains a list of all free available blocks.
Oracle will first search for a free block in the FREELIST and then the data is inserted into that block. The availability of the block in the FREELIST is decided by the PCTFREE value. Initially an empty block will be listed in the FREELIST structure, and it will continue to remain there until the free space reaches the PCTFREE value.
When the free space reach the PCTFREE value the block is removed from the FREELIST, and it is re-listed in the FREELIST table when the volume of data in the block comes below the PCTUSED value.
Oracle use FREELIST to increase the performance. So for every insert operation, oracle needs to search for the free blocks only from the FREELIST structure instead of searching all blocks.
Row Migration
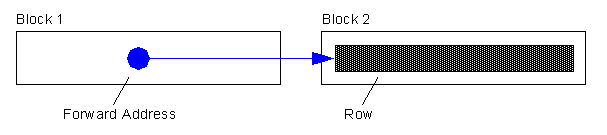
We will migrate a row when an update to that row would cause it to not fit on the block anymore (with all of the other data that exists there currently). A migration means that the entire row will move and we just leave behind the «forwarding address». So, the original block just has the rowid of the new block and the entire row is moved.
Full Table Scans are not affected by migrated rows
The forwarding addresses are ignored. We know that as we continue the full scan, we'll eventually get to that row so we can ignore the forwarding address and just process the row when we get there. Hence, in a full scan migrated rows don't cause us to really do any extra work -- they are meaningless.
Index Read will cause additional IO's on migrated rows
When we Index Read into a table, then a migrated row will cause additional IO's. That is because the index will tell us «goto file X, block Y, slot Z to find this row». But when we get there we find a message that says «well, really goto file A, block B, slot C to find this row». We have to do another IO (logical or physical) to find the row.
Row Chaining
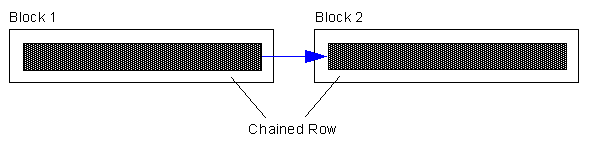
A row is too large to fit into a single database block. For example, if you use a 4KB blocksize for your database, and you need to insert a row of 8KB into it, Oracle will use 3 blocks and store the row in pieces. Some conditions that will cause row chaining are: Tables whose rowsize exceeds the blocksize. Tables with LONG and LONG RAW columns are prone to having chained rows. Tables with more then 255 columns will have chained rows as Oracle break wide tables up into pieces. So, instead of just having a forwarding address on one block and the data on another we have data on two or more blocks.
Chained rows affect us differently. Here, it depends on the data we need. If we had a row with two columns that was spread over two blocks, the query:
SELECT column1 FROM table
where column1 is in Block 1, would not cause any «table fetch continued row». It would not actually have to get column2, it would not follow the chained row all of the way out. On the other hand, if we ask for:
SELECT column2 FROM table
and column2 is in Block 2 due to row chaining, then you would in fact see a «table fetch continued row»
Example
The following example was published by Tom Kyte, it will show row migration and chaining. We are using an 4k block size:
SELECT name,value
FROM v$parameter
WHERE name = 'db_block_size';
NAME VALUE
-------------- ------
db_block_size 4096Create the following table with CHAR fixed columns:
CREATE TABLE row_mig_chain_demo (
x int PRIMARY KEY,
a CHAR(1000),
b CHAR(1000),
c CHAR(1000),
d CHAR(1000),
e CHAR(1000)
);That is our table. The CHAR(1000)'s will let us easily cause rows to migrate or chain. We used 5 columns a,b,c,d,e so that the total rowsize can grow to about 5K, bigger than one block, ensuring we can truly chain a row.
INSERT INTO row_mig_chain_demo (x) VALUES (1);
INSERT INTO row_mig_chain_demo (x) VALUES (2);
INSERT INTO row_mig_chain_demo (x) VALUES (3);
COMMIT;We are not interested about seeing a,b,c,d,e - just fetching them. They are really wide so we'll surpress their display.
column a noprint
column b noprint
column c noprint
column d noprint
column e noprintSELECT * FROM row_mig_chain_demo;
X
----------
1
2
3Check for chained rows:
SELECT a.name, b.value
  FROM v$statname a, v$mystat b
 WHERE a.statistic# = b.statistic#
   AND lower(a.name) = 'table fetch continued row';
NAME VALUE ---------------------------------------------------------------- ---------- table fetch continued row 0Now that is to be expected, the rows came out in the order we put them in (Oracle full scanned this query, it processed the data as it found it). Also expected is the table fetch continued row is zero. This data is so small right now, we know that all three rows fit on a single block. No chaining.
Demonstration of the Row Migration
Now, lets do some updates in a specific way. We want to demonstrate the row migration issue and how it affects the full scan:
UPDATE row_mig_chain_demo SET a = 'z1', b = 'z2', c = 'z3' WHERE x = 3;
COMMIT;
UPDATE row_mig_chain_demo SET a = 'y1', b = 'y2', c = 'y3' WHERE x = 2;
COMMIT;
UPDATE row_mig_chain_demo SET a = 'w1', b = 'w2', c = 'w3' WHERE x = 1;
COMMIT;Note the order of updates, we did last row first, first row last.
SELECT * FROM row_mig_chain_demo;
X
----------
3
2
1SELECT a.name, b.value
FROM v$statname a, v$mystat b
WHERE a.statistic# = b.statistic#
AND lower(a.name) = 'table fetch continued row';NAME VALUE
---------------------------------------------------------------- ----------
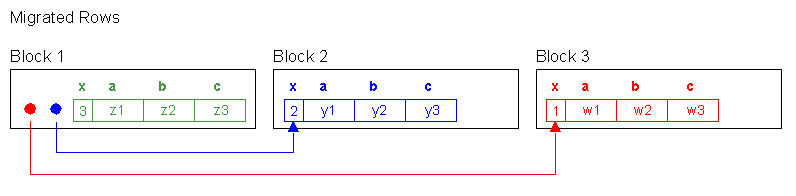
table fetch continued row 0Interesting, the rows came out «backwards» now. That is because we updated row 3 first. It did not have to migrate, but it filled up block 1. We then updated row 2. It migrated to block 2 with row 3 hogging all of the space, it had to. We then updated row 1, it migrated to block 3. We migrated rows 2 and 1, leaving 3 where it started.
So, when Oracle full scanned the table, it found row 3 on block 1 first, row 2 on block 2 second and row 1 on block 3 third. It ignored the head rowid piece on block 1 for rows 1 and 2 and just found the rows as it scanned the table. That is why the table fetch continued row is still zero. No chaining.
So, lets see a migrated row affecting the «table fetch continued row»:
SELECT * FROM row_mig_chain_demo WHERE x = 3;
X
----------
3SELECT a.name, b.value
FROM v$statname a, v$mystat b
WHERE a.statistic# = b.statistic#
AND lower(a.name) = 'table fetch continued row';NAME VALUE
---------------------------------------------------------------- ----------
table fetch continued row 0This was an index range scan / table access by rowid using the primary key. We didn't increment the «table fetch continued row» yet since row 3 isn't migrated.
SELECT * FROM row_mig_chain_demo WHERE x = 1;
X
----------
1SELECT a.name, b.value
FROM v$statname a, v$mystat b
WHERE a.statistic# = b.statistic#
AND lower(a.name) = 'table fetch continued row';NAME VALUE
---------------------------------------------------------------- ----------
table fetch continued row 1Row 1 is migrated, using the primary key index, we forced a «table fetch continued row».
Demonstration of the Row Chaining
UPDATE row_mig_chain_demo SET d = 'z4', e = 'z5' WHERE x = 3;
COMMIT;Row 3 no longer fits on block 1. With d and e set, the rowsize is about 5k, it is truly chained.
SELECT x,a FROM row_mig_chain_demo WHERE x = 3;
X
----------
3SELECT a.name, b.value
FROM v$statname a, v$mystat b
WHERE a.statistic# = b.statistic#
AND lower(a.name) = 'table fetch continued row';NAME VALUE
---------------------------------------------------------------- ----------
table fetch continued row 1We fetched column «x» and «a» from row 3 which are located on the «head» of the row, it will not cause a «table fetch continued row». No extra I/O to get it.
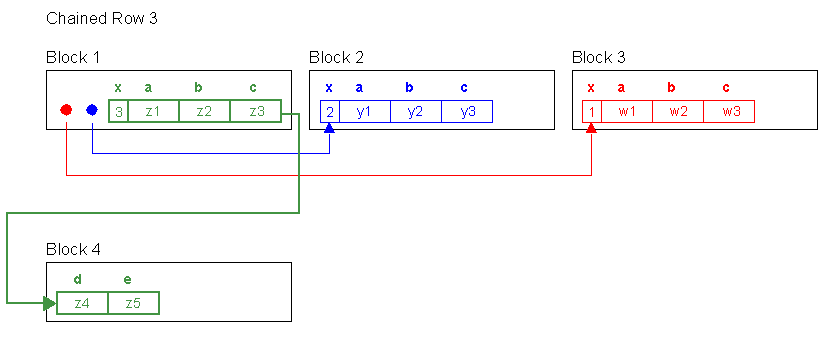
SELECT x,d,e FROM row_mig_chain_demo WHERE x = 3;
SELECT a.name, b.value
FROM v$statname a, v$mystat b
WHERE a.statistic# = b.statistic#
AND lower(a.name) = 'table fetch continued row';NAME VALUE
---------------------------------------------------------------- ----------
table fetch continued row 2Now we fetch from the «tail» of the row via the primary key index. This increments the «table fetch continued row» by one to put the row back together from its head to its tail to get that data.
Now let's see a full table scan - it is affected as well:
SELECT * FROM row_mig_chain_demo;
X
----------
3
2
1SELECT a.name, b.value
FROM v$statname a, v$mystat b
WHERE a.statistic# = b.statistic#
AND lower(a.name) = 'table fetch continued row';NAME VALUE
---------------------------------------------------------------- ----------
table fetch continued row 3The «table fetch continued row» was incremented here because of Row 3, we had to assemble it to get the trailing columns. Rows 1 and 2, even though they are migrated don't increment the «table fetch continued row» since we full scanned.
SELECT x,a FROM row_mig_chain_demo;
X
----------
3
2
1SELECT a.name, b.value
FROM v$statname a, v$mystat b
WHERE a.statistic# = b.statistic#
AND lower(a.name) = 'table fetch continued row';NAME VALUE
---------------------------------------------------------------- ----------
table fetch continued row 3No «table fetch continued row» since we didn't have to assemble Row 3, we just needed the first two columns.
SELECT x,e FROM row_mig_chain_demo;
X
----------
3
2
1SELECT a.name, b.value
FROM v$statname a, v$mystat b
WHERE a.statistic# = b.statistic#
AND lower(a.name) = 'table fetch continued row';NAME VALUE
---------------------------------------------------------------- ----------
table fetch continued row 4But by fetching for d and e, we incemented the «table fetch continued row». We most likely have only migrated rows but even if they are truly chained, the columns you are selecting are at the front of the table.
So, how can you decide if you have migrated or truly chained?
Count the last column in that table. That'll force to construct the entire row.
SELECT count(e) FROM row_mig_chain_demo;
COUNT(E)
----------
1SELECT a.name, b.value
FROM v$statname a, v$mystat b
WHERE a.statistic# = b.statistic#
AND lower(a.name) = 'table fetch continued row';NAME VALUE
---------------------------------------------------------------- ----------
table fetch continued row 5Analyse the table to verify the chain count of the table:
ANALYZE TABLE row_mig_chain_demo COMPUTE STATISTICS;
SELECT chain_cnt
FROM user_tables
WHERE table_name = 'ROW_MIG_CHAIN_DEMO';CHAIN_CNT
----------
3Three rows that are chained. Apparently, 2 of them are migrated (Rows 1 and 2) and one is truly chained (Row 3).
Total Number of «table fetch continued row» since instance startup?
The V$SYSSTAT view tells you how many times, since the system (database) was started you did a «table fetch continued row» over all tables.
sqlplus system/<password>
SELECT 'Chained or Migrated Rows = '||value
FROM v$sysstat
WHERE name = 'table fetch continued row';Chained or Migrated Rows = 31637
You could have 1 table with 1 chained row that was fetched 31'637 times. You could have 31'637 tables, each with a chained row, each of which was fetched once. You could have any combination of the above -- any combo.
Also, 31'637 - maybe that's good, maybe that's bad. it is a function of
- how long has the database has been up
- how many rows is this as a percentage of total fetched rows.
For example if 0.001% of your fetched are table fetch continued row, who cares!Therefore, always compare the total fetched rows against the continued rows.
SELECT name,value FROM v$sysstat WHERE name like '%table%';
NAME VALUE
---------------------------------------------------------------- ----------
table scans (short tables) 124338
table scans (long tables) 1485
table scans (rowid ranges) 0
table scans (cache partitions) 10
table scans (direct read) 0
table scan rows gotten 20164484
table scan blocks gotten 1658293
table fetch by rowid 1883112
table fetch continued row 31637
table lookup prefetch client count 0
How many Rows in a Table are chained?
The USER_TABLES tells you immediately after an ANALYZE (will be null otherwise) how many rows in the table are chained.
ANALYZE TABLE row_mig_chain_demo COMPUTE STATISTICS;
SELECT chain_cnt,
round(chain_cnt/num_rows*100,2) pct_chained,
avg_row_len, pct_free , pct_used
FROM user_tables
WHERE table_name = 'ROW_MIG_CHAIN_DEMO';
CHAIN_CNT PCT_CHAINED AVG_ROW_LEN PCT_FREE PCT_USED
---------- ----------- ----------- ---------- ----------
3 100 3691 10 40PCT_CHAINED shows 100% which means all rows are chained or migrated.
List Chained Rows
You can look at the chained and migrated rows of a table using the ANALYZE statement with the LIST CHAINED ROWS clause. The results of this statement are stored in a specified table created explicitly to accept the information returned by the LIST CHAINED ROWS clause. These results are useful in determining whether you have enough room for updates to rows.
Creating a CHAINED_ROWS Table
To create the table to accept data returned by an ANALYZE ... LIST CHAINED ROWS statement, execute the UTLCHAIN.SQL or UTLCHN1.SQL script in $ORACLE_HOME/rdbms/admin. These scripts are provided by the database. They create a table named CHAINED_ROWS in the schema of the user submitting the script.
create table CHAINED_ROWS (
owner_name varchar2(30),
table_name varchar2(30),
cluster_name varchar2(30),
partition_name varchar2(30),
subpartition_name varchar2(30),
head_rowid rowid,
analyze_timestamp date
);After a CHAINED_ROWS table is created, you specify it in the INTO clause of the ANALYZE statement.
ANALYZE TABLE row_mig_chain_demo LIST CHAINED ROWS;
SELECT owner_name,
       table_name,
       head_rowid
 FROM chained_rows
OWNER_NAME                     TABLE_NAME                     HEAD_ROWID
------------------------------ ------------------------------ ------------------
SCOTT                          ROW_MIG_CHAIN_DEMO             AAAPVIAAFAAAAkiAAA
SCOTT                          ROW_MIG_CHAIN_DEMO             AAAPVIAAFAAAAkiAAB
How to avoid Chained and Migrated Rows?
Increasing PCTFREE can help to avoid migrated rows. If you leave more free space available in the block, then the row has room to grow. You can also reorganize or re-create tables and indexes that have high deletion rates. If tables frequently have rows deleted, then data blocks can have partially free space in them. If rows are inserted and later expanded, then the inserted rows might land in blocks with deleted rows but still not have enough room to expand. Reorganizing the table ensures that the main free space is totally empty blocks.
The ALTER TABLE ... MOVE statement enables you to relocate data of a nonpartitioned table or of a partition of a partitioned table into a new segment, and optionally into a different tablespace for which you have quota. This statement also lets you modify any of the storage attributes of the table or partition, including those which cannot be modified using ALTER TABLE. You can also use the ALTER TABLE ... MOVE statement with the COMPRESS keyword to store the new segment using table compression.
- ALTER TABLE MOVE
First count the number of Rows per Block before the ALTER TABLE MOVE
SELECT dbms_rowid.rowid_block_number(rowid) "Block-Nr", count(*) "Rows"
FROM row_mig_chain_demo
GROUP BY dbms_rowid.rowid_block_number(rowid) order by 1;
Block-Nr Rows
---------- ----------
2066 3
Now, de-chain the table, the ALTER TABLE MOVE rebuilds the row_mig_chain_demo table in a new segment, specifying new storage parameters:
ALTER TABLE row_mig_chain_demo MOVE
PCTFREE 20
PCTUSED 40
STORAGE (INITIAL 20K
NEXT 40K
MINEXTENTS 2
MAXEXTENTS 20
PCTINCREASE 0);
Table altered.
Again count the number of Rows per Block after the ALTER TABLE MOVE
SELECT dbms_rowid.rowid_block_number(rowid) "Block-Nr", count(*) "Rows"
FROM row_mig_chain_demo
GROUP BY dbms_rowid.rowid_block_number(rowid) order by 1;
Block-Nr Rows
---------- ----------
2322 1
2324 1
2325 1
- Rebuild the Indexes for the Table
Moving a table changes the rowids of the rows in the table. This causes indexes on the table to be marked UNUSABLE, and DML accessing the table using these indexes will receive an ORA-01502 error. The indexes on the table must be dropped or rebuilt. Likewise, any statistics for the table become invalid and new statistics should be collected after moving the table.
ANALYZE TABLE row_mig_chain_demo COMPUTE STATISTICS;
ERROR at line 1:
ORA-01502: index 'SCOTT.SYS_C003228' or partition of such index is in unusable
state
This is the primary key of the table which must be rebuilt.
ALTER INDEX SYS_C003228 REBUILD;
Index altered.
ANALYZE TABLE row_mig_chain_demo COMPUTE STATISTICS;
Table analyzed.
SELECT chain_cnt,
round(chain_cnt/num_rows*100,2) pct_chained,
avg_row_len, pct_free , pct_used
FROM user_tables
WHERE table_name = 'ROW_MIG_CHAIN_DEMO';
CHAIN_CNT PCT_CHAINED AVG_ROW_LEN PCT_FREE PCT_USED
---------- ----------- ----------- ---------- ----------
1 33.33 3687 20 40If the table includes LOB column(s), this statement can be used to move the table along with LOB data and LOB index segments (associated with this table) which the user explicitly specifies. If not specified, the default is to not move the LOB data and LOB index segments.
Detect all Tables with Chained and Migrated Rows
Using the CHAINED_ROWS table, you can find out the tables with chained or migrated rows.
- Create the CHAINED_ROWS table
cd $ORACLE_HOME/rdbms/admin
sqlplus scott/tiger
@utlchain.sql
- Analyse all or only your Tables
SELECT 'ANALYZE TABLE '||table_name||' LIST CHAINED ROWS INTO CHAINED_ROWS;'
FROM user_tables
/
ANALYZE TABLE ROW_MIG_CHAIN_DEMO LIST CHAINED ROWS INTO CHAINED_ROWS;
ANALYZE TABLE DEPT LIST CHAINED ROWS INTO CHAINED_ROWS;
ANALYZE TABLE EMP LIST CHAINED ROWS INTO CHAINED_ROWS;
ANALYZE TABLE BONUS LIST CHAINED ROWS INTO CHAINED_ROWS;
ANALYZE TABLE SALGRADE LIST CHAINED ROWS INTO CHAINED_ROWS;
ANALYZE TABLE DUMMY LIST CHAINED ROWS INTO CHAINED_ROWS;
Table analyzed.
Show the RowIDs for all chained rows
This will allow you to quickly see how much of a problem chaining is in each table. If chaining is prevalent in a table, then that table should be rebuild with a higher value for PCTFREE
SELECT owner_name,
table_name,
count(head_rowid) row_count
FROM chained_rows
GROUP BY owner_name,table_name
/
OWNER_NAME TABLE_NAME ROW_COUNT
------------------------------ ------------------------------ ----------
SCOTT ROW_MIG_CHAIN_DEMO 1
Conclusion
Migrated rows affect OLTP systems which use indexed reads to read singleton rows. In the worst case, you can add an extra I/O to all reads which would be really bad. Truly chained rows affect index reads and full table scans.
Row migration is typically caused by UPDATE operation
Row chaining is typically caused by INSERT operation.
SQL statements which are creating/querying these chained/migrated rows will degrade the performance due to more I/O work.
To diagnose chained/migrated rows use ANALYZE command , query V$SYSSTAT view
To remove chained/migrated rows use higher PCTFREE using ALTER TABLE MOVE.