![]() Unattended Batch Jobs using SSH
Agent
Unattended Batch Jobs using SSH
Agent ![]()
Overview
SSH isn't only a great interactive tool but also a resource for automation. Batch scripts, cron jobs, and other automated tasks can benefit from the security provided by SSH, but only if implemented properly. The major challenge is authentication: how can a client prove its identity when no human is available to type a password? You must carefully select an authentication method, and then equally carefully make it work. Once this infrastructure is established, you must invoke SSH properly to avoid prompting the user.
Note that all kind of unattended authentication presents a security problem and requires compromise, and SSH is no exception. Without a human present when needed to provide credentials (type a password, provide a thumbprint, etc.), those credentials must be stored persistently somewhere on the host system. Therefore, an attacker who compromises the system badly enough can use those credentials to impersonate the program and gain whatever access it has. Selecting a technique is a matter of understanding the pros and cons of the available methods, and picking your preferred poison. If you can't live with this fact, you shouldn't expect strong security of unattended remote jobs.
Example
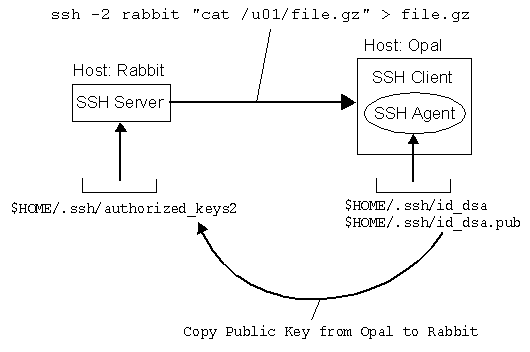
In this example, we show how to use the Public Key Authentication together with an SSH Agent to backup files from a remote SSH Server (Rabbit) to a local SSH client (Opal), fully automated and driven by cron. In this example we use OpenSSH.
The following Tasks have to be setup:
- Create Cryptographic Keys with SSH-KEYGEN on the SSH Client
- Install the generated Public Key on the SSH Server
- Activate Public Key Authentication in both SSH Client and SSH Server
- Start the SSH Agent and load the Private Keys on the SSH Client
- Start the Backup (e.g. ssh -2 rabbit "cat /u01/file.gz" > file.gz
We will now show the needed steps in more detail.
1. Create Cryptographic Keys with SSH-KEYGEN on the SSH Client
A key is a digital identity. It's a unique string of binary data that means, "This is me, honestly, I swear." And with a little cryptographic magic, your SSH client can prove to a server that its key is genuine, and you are really you.
An SSH identity uses a pair of keys, one private and one public. The private key is a closely guarded secret only you have. Your SSH clients use it to prove your identity to servers. The public key is, like the name says, public. You place it freely into your accounts on SSH server machines. During authentication, the SSH client and server have a little conversation about your private and public key. If they match (according to a cryptographic test), your identity is proven, and authentication succeeds.
Generating Key Pairs with ssh-keygen
To use cryptographic authentication, you must first generate a key pair for yourself, consisting of a private key (your digital identity that sits on the client machine) and a public key (that sits on the server machine). To do this, use the ssh-keygen program. In this example we use
Go to the SSH Client and generate the RSA and DSA Keys. In the example we only use the DSA Key Pairs (~/.ssh/id_dsa and ~/.ssh/id_dsa.pub). In the example we used an empty passphrase.
zahn@opal:~/.ssh> ssh-keygen
Generating public/private rsa1 key pair.
Enter file in which to save the key (~/.ssh/identity):
Enter passphrase (empty for no passphrase):
Enter same passphrase again:
Your identification has been saved in ~/.ssh/identity.
Your public key has been saved in ~/.ssh/identity.pub.zahn@opal:~/.ssh> ssh-keygen -t dsa
Generating public/private dsa key pair.
Enter file in which to save the key (~/.ssh/id_dsa):
Enter passphrase (empty for no passphrase):
Enter same passphrase again:
Your identification has been saved in ~/.ssh/id_dsa.
Your public key has been saved in ~/.ssh/id_dsa.pub.zahn@opal:~/.ssh> ls -l
-rw-------    1 zahn     dba           668 Mar 15 19:16 id_dsa
-rw-r--r--    1 zahn     dba           610 Mar 15 19:16 id_dsa.pub
-rw-------    1 zahn     dba           535 Mar 15 19:15 identity
-rw-r--r--    1 zahn     dba           339 Mar 15 19:15 identity.pub
2. Install the generated Public Key on the SSH Server
After creating the key pair on the SSH Client, you must install your public key in your account on the SSH Server. A remote account may have many public keys installed for accessing it in various ways. Copy the keys from Opal to Rabbit using scp and Password Authentication.
zahn@opal:~/.ssh> scp id_dsa.pub rabbit:/home/zahn/.ssh
zahn@rabbit's password:
zahn@opal:~/.ssh> scp identity.pub rabbit:/home/zahn/.ssh
zahn@rabbit's password:
zahn@opal:~/.ssh> ssh rabbit
zahn@rabbit's password:
zahn@rabbit:~/.ssh> cat identity.pub >> authorized_keys
zahn@rabbit:~/.ssh> cat id_dsa.pub >> authorized_keys2
zahn@rabbit:~/.ssh> rm id_dsa.pub identity.pub
zahn@rabbit:~/.ssh> chmod 644 *
3. Activate Public Key Authentication in both SSH Client and SSH Server
Public Key Authentication is enabled in the SSH Server Configuration File /etc/ssh/sshd_config for Red Hat Linux. This have to be done as user root. After editing this file, restart your SSH Server.
PubkeyAuthentication yes
root@opal: /etc/rc.d/init.d/sshd restart
root@rabbit: /etc/rc.d/init.d/sshd restart
4. Start the SSH Agent and load the Private Keys on the SSH Client
In public-key authentication, a private key is the client's credentials. Therefore the batch job needs access to the key, which must be stored where the job can access it. Store the key in an agent, which keeps secrets out of the filesystem but requires a human to decrypt the key at system boot time.
The ssh-agent provides another, somewhat less vulnerable method of key storage for batch jobs. A human invokes an agent and loads the needed keys from passphrase-protected key files, just once. Thereafter, unattended jobs use this long-running agent for authentication.
In this case, the keys are still in plaintext but within the memory space of the running agent rather than in a file on disk. As a matter of practical cracking, it is more difficult to extract a data structure from the address space of a running process than to gain illicit access to a file. Also, this solution avoids the problem of an intruder's walking off with a backup tape containing the plaintext key.
Security can still be compromised by overriding filesystem permissions, though. The agent provides access to its services via a Unix-domain socket, which appears as a node in the filesystem. Anyone who can read and write that socket can instruct the agent to sign authentication requests and thus gain use of the keys. But this compromise isn't quite so devastating since the attacker can't get the keys themselves through the agent socket. She merely gains use of the keys for as long as the agent is running and as long as she can maintain her compromise of the host.
Another bit of complication with the agent method is that you must arrange for the batch jobs to find the agent. SSH clients locate an agent via an environment variable pointing to the agent socket, such as SSH_AUTH_SOCK. When you start the agent for batch jobs, you need to record its output where the jobs can find it. For instance, if the job is a shell script you can store the environment values in a file.
Generally, you run a single ssh-agent in your local login session, before running any SSH clients. You can run the agent by hand, but people usually edit their login files to run the agent automatically. SSH Clients communicate with the agent via the process environment, so all clients within your login session have access to the agent.
Start the Agent from your $HOME/.bash_profile on the SSH Client (Opal)
# Start ssh-agent if not already running
# The ssh-agent environment is setup by
# ~/.bashrc after ~/.bash_profile
if [ $LOGNAME = "zahn" ]
then
pid=`ps | grep ssh-agent | grep -v grep`
if [ "$pid" = "" ]
then
echo "Starting SSH Agent: ssh-agent"
exec ssh-agent $SHELL
else
echo "Setup Env for SSH Agent from ~/.agent_info"
. ./.agent_info
fi
fiThe line exec ssh-agent $SHELL runs the agent and then invokes the given shell in $SHELL as a child process. The visual effect is simply that another shell prompt appers, but this shell has access to the agent. If an agent is already running, the environment is stored in a file for all other SSH clients.
Setup SSH Agent Environment and load the Keys in $HOME/.bashrc
Once the agent is running, it's time to load the private keys into it using the ssh-add program. By default, ssh-add loads the keys from your default identity files.
# Setup Environment for ssh-agent
test -n "$SSH_AGENT_PID" && echo \
"SSH_AGENT_PID=$SSH_AGENT_PID; \
export SSH_AGENT_PID" > ~/.agent_infotest -n "$SSH_AUTH_SOCK" && echo \
"SSH_AUTH_SOCK=$SSH_AUTH_SOCK; \
export SSH_AUTH_SOCK" >> ~/.agent_info
# Load the Private Keys into the running SSH Agent
if [ $LOGNAME = "zahn" ]
then
pid=`ps | grep ssh-agent | grep -v grep`
if [ "$pid" != "" ]
then
if /usr/bin/tty 1> /dev/null 2>&1
then
ssh-add 1> /dev/null 2>&1
fi
fi
fi
5. Start the Backup on the SSH Client
You can now use the running SSH Agent from any Backup Script. You have to read the SSH Agent Environment from your ~/.agent_info file. No password or passphrase is needed.
This is an example of the Backup Script started by cron on the SSH Client Opal (No error handling is show here).
#!/bin/sh
# Backup Script using unattended SSH
AGENT_INFO=/home/zahn/.agent_info; export AGENT_INFO
# Fetch saved Files from RABBIT
cd ~/backup
# Source Environment for SSH Agent
. $AGENT_INFO
# Copy Data from Rabbit
ssh -2 rabbit "cat /u01/file.gz" > file.gzIf you have any troubles use the SSH Option "-v" to display the debug output:
ssh -v -2 rabbit "cat /u01/file.gz" > file.gz
Other useful commands
Here are some other useful commands
$ ssh-add -l
List the keys the agent currently holds $ ssh-add _D
Delete all keys from the agent $ ssh-agent -k
Kill the current agent