Terminal Services - Remote Control your W2K Server
Overview
Looking for a way to remote control your Windows 2000 Server without actually sitting in front of it? If you have one of the Server editions of Windows then you're in luck. You can use Terminal Services which works quite well and it's free!
Terminal Services runs in two modes:
- Remote Administration
- Application Server Mode
We're interested in the Remote Administration mode because it is what we want to do and because the Application Server mode requires additional licensing.
Here is an overview of how Terminal Services works. You have Terminal Services run on your Server and it sits there and waits for a remote computer to connect to it. This will be referred to as "Terminal Services Server". How does a remote computer connect to Terminal Services? There are two ways.
How Terminal Services works
The first way is to install a Terminal Services client on each of the computers you will use to remotely administer the server. This will be referred to as "Terminal Services Client". You will have to create client disks using a built-in program. This method works well, but you have to install the Terminal Services Client software on each computer you use to administer the server. This could be a problem if you want to have the freedom to remotely control your server from a variety of places such as school, the library, or from a friends computer. We don't think you want to install the client in all of those places. However, this method is fairly secure because the only people who can administer your server also need the Terminal Services Client.
The second way requires that you install a special module called the Terminal Services Advanced Client which can be downloaded from Microsoft.com. This will be called the "Terminal Services Advanced Client". We have no idea what Microsoft decided to call it "Advanced Client" because there is really nothing advanced about it. This module allows you to log into Terminal Services via any computer that has a web browser and Active X. Of course there are still passwords required, but you get the convenience of administering your server from any computer connected to the Internet.
These two methods of connecting to Terminal Services will be covered in different articles. Which of the two methods you use to access Terminal Services is your choice
Terminal Services Server Configuration
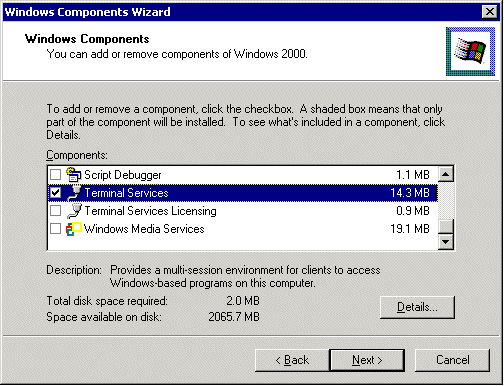
Install Terminal Service
Start -> Settings -> Control Panel -> Add/Remove Programs ->
Add/Remove Windows Components.Scroll down until you see the Terminal Services listing.
Check the box that is labeled "Terminal Services". For remote administration, you DO NOT need to check the box labeled "Terminal Services Licensing".
The next window allows you to choose between "Remote Administration Mode" and "Application Server Mode". We are interested in the Remote Administration Mode so that we can manage the server from across the Internet.
Configure Terminal Service
Start -> Settings -> Control Panel -> Administrative Tools
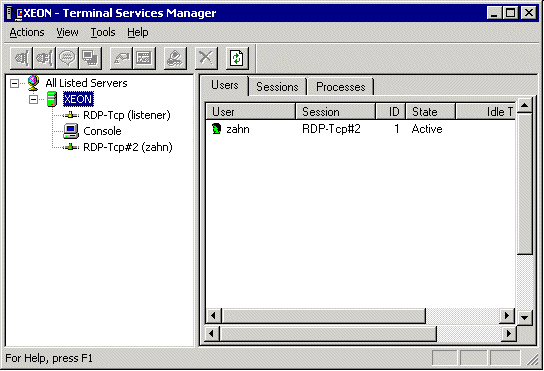
Let's take a look at the Terminal Services Manager. Double click on the "Terminal Services Manager" icon.
Here we can see who is connected to the Terminal Services and other monitoring information. Nothing to really do here. Just to keep tabs on who is remotely administering your server.
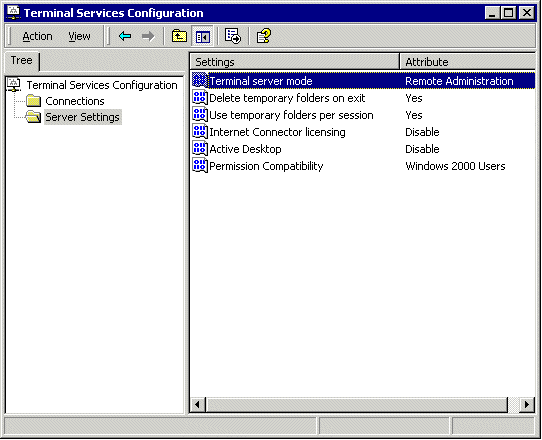
Next, we'll look at the Terminal Services Configuration. Double click on the "Terminal Services Configuration" icon. Click on "Server Settings". Here you can change the settings of how Terminal Services runs. Everything can be safely left at the default settings. By default, Terminal Services Server and Client talk to each other over port 3389.
Now, your Terminal Service is up and running and you are ready to allow client devices to access a virtual Windows 2000 Professional desktop session and Windows-based programs running on the Server.
Terminal Services Client Configuration
On your Terminal Services Server, there is an icon labeled "Terminal Services Client Creator" which creates disks that are used to install the Terminal Services Client program on the computer you plan to use to remote administer the server. You must install this client program on each computer you plan on using to remote administer the server.
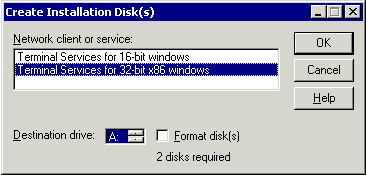
Double click on the "Terminal Services Client Creator" icon. You will see the following screen. You must choose which version of windows (16-bit or 32-bit) the client disks should support. As a gross simplification, windows 3.1 is 16-bit while windows 95 and later are 32-bit. The 16 bit version of the Terminal Services Client requires 4 disks while the 32 bit version of TS Client requires only 2 disks.
Choose which version of the client you require and follow the directions. After you are done making the Terminal Services Client disks, you can now install the Terminal Services Client on any computer you will use to remotely administer your server.
Port Forwading
The client computer that you use to remote administer your server can be on the external WAN or the internal LAN. If you are using a LAN computer to access Terminal Services on your server, then you do not need to do anything with your router. However, if you are planning on accessing Terminal Services from a computer across the Internet, you will need to forward port 3389 to your server. This is very important since Terminal Services listens on port 3389.
Install Terminal Services Client
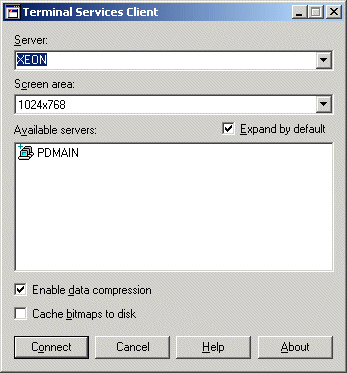
Let's install the Terminal Services Client on a computer that you will use to remote administer your server. Insert the first Terminal Services Client floppy disk into your disk drive and click setup.exe. After this you are ready to connect using Terminal Services Client.
Once you connect to you server through Terminal Services, you have full control over the server. However, the desktop you see is not exactly the one that is open on the server itself. The Terminal Services logs in separately, so technically, it is a different session. However, everything you do in the Terminal Services session will be executed on the server.
Once you are done working with terminal services, how do you get out?
Go to "Start -> Shut Down". You'll see four options.
Log off This shuts down all applications and terminates your Terminal Services session. Shut down This physically shuts down the computer and does not give you a way to restart the computer. Be careful. Restart This physically restarts the computer and in the process breaks your Terminal Services connection. However, you will be able to reconnect once the server reboots. Disconnect This is like logging off, but leaves your applications and open so you can reconnect and pick up work where you left off.
Download Terminal Services Client
If you do not have a Windows 2000 Server machine, you can download the two disks from here.