Web Database Access with Apache / Tomcat
Martin Zahn / Rafael Wampfler, Akadia AG,
Information Technology, CH-3604 Thun
Phone: +41 33 335 86 21 / Fax:
+41 33 335 86 25 /
EMail: martin.zahn@akadia.com / rafael.wampfler@akadia.com
Content
Overview
Technologies
Java Servlets
JavaServer Pages
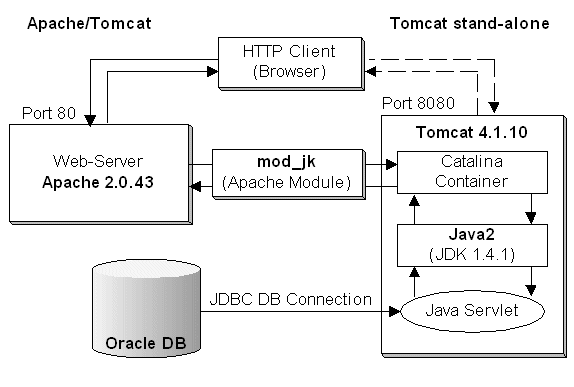
Architecture
Apache
Tomcat
Java 2
Mod_Jk
Required software
Installation and Configuration
Apache 2.0.43
Java 2
Tomcat
How to integrate Tomcat in Apache
Tomcat Configuration
Deploying Web Applications to Tomcat
Creating the Web Application Directory Structure
Creating the Web Application Context
Add a servlet entry into the web application's web.xml file
Deploying JSPs
Feedback Form
File Upload JSP using a Java Bean
JSP for Oracle Database Access
Deploying Servlets
HelloAkadia Servlet
Servlet for Oracle Database Access
Further Documentation
More Online Examples
Nowadays
various web sites are able to deal with dynamic HTML and database access. This article shows an easy and powerful way to access an Oracle database with Java Servlets and JavaServer Pages.
The Java structure offers a technique to develop fast, large and independent web applications. We especially have a look at the Apache and Tomcat server which can handle Java Servlets and JavaServer Pages.
Servlets are completely written in Java and are executed server-side. Only the first request invokes the init() method, all requests call the service() method which returns plain HTML code. Servlets stay in memory and are quickly executed.
Servlets can apply the full power of Java, for example a Servlet can process HTML forms, use own Java classes, send an email, access a database or something else you could do with Java.
JavaServer Pages (JSP) is a new technology to integrate server-side code into static HTML code. JSPs are common to Active Server Pages (ASP), but have the advance that they run with Java and therefore on almost every operating system. JSPs are related to Java Servlets, more exact: JSPs are translated into a Java Servlet when they are called the first time. With every request of a JSP, the generated Java Servlet runs the service() method.
The main difference between Servlets and JSP is:
In JSPs you insert dynamic Java code into static HTML
In Java Servlets you insert static HTML into Java code.
Apache or any other common web server can’t handle Servlets nor JSP. So we use the Tomcat server from the Apache sub-project named Jakarta. Tomcat is the official reference implementation for the Servlet 2.3 and JSP 1.2 specification. Tomcat is a Java based web application container, is open source and entire free to use (Tomcat is released under the Apache software license). Tomcat is developed by a group of voluntary programmers. Tomcat is the advancement of JServ (JServ is an Apache module which can serve Java Servlets, but is not under development anymore).
The Apache HTTPD server
- is a powerful, flexible, HTTP/1.1 compliant web server
- implements the latest protocols, including HTTP/1.1 (RFC2616)
- is highly configurable and extensible with third-party modules
- can be customised by writing 'modules' using the Apache module API
- provides full source code and comes with an unrestrictive license
- runs on Windows NT/9x, Netware 5.x and above, OS/2, and most versions of Unix
Tomcat is the servlet container that is used in the official Reference Implementation for the Java Servlet and JavaServer Pages technologies. The Java Servlet and JavaServer Pages specifications are developed by Sun under the Java Community Process. Tomcat is developed in an open and participatory environment and released under the Apache Software License.
The essential Java 2 SDK, tools, runtimes, and APIs for developers writing, deploying, and running applets and applications in the Java programming language. Also includes Java Development Kit release 1.1 and Java Runtime Environment 1.1.
It is the Tomcat-Apache plug-in that handles the communication between Tomcat and Apache.
- Termed “Web Server Adapter” or “Connector”
- Implemented as library (mod_jk.so)
- Uses/manages TCP connections using Port 8007
- Uses the AJPV12/AJPV13 communication protocol
We tested the installation on the following environment:
- RedHat Linux 7.2 / Apache 1.3.22
- RedHat Linux 8.0 / Apache 2.0.43
- Java Development Kit (JDK) 1.3 or 1.4
- Tomcat 4.0.4 or Tomcat 4.1.10
Component
Version
Apache
1.3.22
Apache
2.0.43
J2SE (Java 2)
1.4.1
Tomcat
4.1.10
ModJk
2.0.43
Installation and Configuration
RedHat Linux 8.0 delivers Apache 2.0.40 - this Release should not be used. However it's very easy to build Apache on RedHat Linux 8.0.
Unpack the Distribution for 2.0.43 from http://www.apache.org/dist/httpd an build it with:
./configure --prefix=/usr/local/apache \
--enable-mods-shared=most \
--enable-ssl=shared \
--enable-mime-magic \
--enable-cern-meta \
--enable-proxy \
--enable-proxy-connect \
--enable-proxy-ftp \
--enable-proxy-http \
--enable-usertrack \
--enable-unique-id \
--enable-deflatemake
make installcd /usr/local/apache
rm -rf logs
ln -s /var/log/httpd logs
cd /var/log
chown root:tomcat httpd
chmod 775 httpd
Download the Linux self-extracting file: j2sdk-1_4_0_01-linux-i586.bin and copy it to e.g. /usr/local. From this location unpack it with: ./j2sdk-1_4_0_01-linux-i586.bin and create the following symbolic link.
lrwxrwxrwx root root java -> /usr/local/j2sdk1.4.0_01
1. Download the Tomcat binary: jakarta-tomcat-4.1.10.tar.gz and copy it to e.g. /usr/local.
From this location unpack it and create the following symbolic link.lrwxrwxrwx root root tomcat -> /usr/local/jakarta-tomcat-4.1.10
2. Create a user "tomcat" with a unique user id and group id. The account needs an executable
login shell, and an existing home directory.tomcat:x:411:405:Tomcat Owner:/home/tomcat:/bin/bash
3. Set the following Environment Variables:
export CATALINA_HOME=/usr/local/tomcat
export JAVA_HOME=/usr/local/java4. Change the ownership for the conf, temp, webapps and work directory to "tomcat".
# cd /usr/local/tomcat
# chown -R tomcat:tomcat conf temp webapps work5. Create the following startup script for tomcat
6. When you start Tomcat, it runs stand-alone on port 8080. Check the examples on http://host:8080.
How to integrate Tomcat in Apache
The Question The Answer Tomcat can handle Java Servlets, JSP, pictures and static HTML. So why use Apache any longer ?
Using Apache, the application server is more stable, more configurable and handle HTML faster !
1. Copy the connector module mod_jk-2.0.43.so to Apache and create the following link.
# cp mod_jk-2.0.43.so /usr/local/apache/modules
# ln -s mod_jk-2.0.43.so mod_jk.solrwxrwxrwx 1 root root mod_jk.so -> mod_jk-2.0.43.so
2. Add the following line at the end of the Apache Configuration file: /usr/local/apache/conf/httpd.conf
Include /usr/local/tomcat/conf/mod_jk.conf
3. Setup the Apache - Tomcat configuration file: mod_jk.conf
This file instructs Apache:
- how to load the JK module (LoadModule)
- which URLs must be forwarded to Tomcat (JkMount)
For example, all URLs including "/jsp/" or "/servlet" are automatically forwarded to Tomcat with the following directives.
JkMount /jsp/*.jsp ajp13
JkMount /servlet/* ajp134. Setup the worker configuration file: workers.properties
Usually you only have to setup the location of Tomcat and Java and the character for the file separator.
workers.tomcat_home=/usr/local/tomcat
workers.java_home=/usr/local/java
ps=/5. Start Tomcat / Apache
First start Tomcat then Apache, the order is important:
# /etc/rc.d/init.d/tomcat start
# /etc/rc.d/init.d/httpd startYou can now run the Tomcat examples on http://host/examples through Apache. The Tomcat Server runs now in the so called "out-of-process add-on" mode.
The Tomcat
server.xmlfile allows you to configure Tomcat using a simple XML descriptor. This XML file is at the heart of Tomcat.The
<Context>element is the most commonly used element in theserver.xmlfile. It represents an individual Web Application that is running within a defined<Host>. There is no limit to the number of contexts that can be defined within a<Host>element. Each<Context>definition must have a unique context path, which is defined by the path attribute.1. Creating the Web Application Context (Location of the Web Application):
<!-- Tomcat Root Context -->
<Context path="/jsp" docBase="/www/webapp/jsp" debug="0" reloadable="false" />
docBase: Defines the directory for the Web application associated with this
<Context>. This is the pathname of a directory that contains the resources for the Web application.
path: Defines the context path for this Web application. This value must be unique for each
<Context>defined in a given<Host>.
reloadable: If set to true, causes Tomcat to check for class changes in the
WEB-INF/classes/andWEB-INF/libdirectories. If these classes have changed, the application owning these classes will automatically be reloaded. This feature should only be used during development. This setting will cause severe performance degradation, and therefore should be set to false when in a production environment.2. Disable Port 8080 (Port 8080 is only used in stand-alone mode)
<!-- Define a non-SSL Coyote HTTP/1.1 Connector on port 8080 -->
<!-- (Uncommented for Productive Environment)
<Connector className="org.apache.coyote.tomcat4.CoyoteConnector"
           port="8080" minProcessors="5" maxProcessors="75"
           enableLookups="true" redirectPort="8443"
           acceptCount="10" debug="0" connectionTimeout="20000"
           useURIValidationHack="false" />
-->
Deploying Web Applications to Tomcat
With the release of the Java Servlet Specification 2.2, the concept of a web application was introduced. According to this specification, a "Web Application is a collection of servlets, html pages, classes, and other resources that can be bundled and run on multiple containers from multiple vendors."
The following items can exist in a web application:
- Servlets
- JavaServer Pages
- Utility Classes
- Static Documents including, XHTML, images, etc.
- Client side classes
- Meta information that describes the web application
Creating the Web Application Directory Structure
The container that holds the components of a web application is the directory structure in which it exists. The first step in creating a web application is creating this structure. The following table contains the sample web application and what each of its directories should contain.
The Web Application Directory Structure (Example)
Directory
Contains
/www/webapp/jsp
This is the root directory of the web application. All JSP and XHTML files are stored here.
/www/webapp/jsp/WEB-INF
This directory contains all resources related to the application that are not in the document root of the application. This is where your web application deployment descriptor is located. Note that the WEB-INF directory is not part of the public document. No files contained in this directory can be served directly to a client.
/www/webapp/jsp/WEB-INF/classes
This directory is where servlet and utility classes are located.
/www/webapp/jsp/WEB-INF/lib
This directory contains Java Archive files that the web application depends upon. For example, this is where you would place a JAR file that contained a JDBC driver.
Creating the Web Application Context
After you've created the web application directory structure, you must add a new Context to Tomcat. The Context defines a set of methods that are used by components of a web application to communicate with the servlet container. The Context acts as a container for the web application. There is only one Context per web application.
We have already done this in the Tomcat Configuration, Step 1
Add a servlet entry into the web application's web.xml file
If you are deploying a servlet, then you have to add a servlet entry into the web application's web.xml file. An example <servlet> element can be found in the following code snippet.
<servlet>
<servlet-name>MyServlet</servlet-name>
<servlet-class>packagename.MyServlet</servlet-class>
<init-param>
<param-name>parameter</param-name>
<param-value>value</param-value>
</init-param>
<load-on-startup>1</load-on-startup>
</servlet>It isn't necessary to add all servlets to the web.xml file; it's only necessary when the servlet requires additional information, such as initialization parameters.
The Sub-elements of a <servlet>
Sub-element
Description
<servlet-name>
The <servlet-name> element is simply the canonical name of the deployed servlet.
<servlet-class>
The <servlet-class> sub-element references the fully qualified class name of the servlet.
<init-param>
The <init-parameter> sub-element is an optional parameter containing a name-value pair that is passed to the servlet on initialization. It contains two sub-elements, <param-name> and <param-value>, which contain the name and value, respectively, to be passed to the servlet.
<load-on-startup>
The <load-on-startup> sub-element indicates the order in which each servlet should be loaded. Lower positive values are loaded first. If the value is negative or unspecified, then the container can load the servlet at anytime during startup.
Now that we have created the web application directories and added the ServletContext, you can add server-side Java components. The first components we are going to add are JSPs.
To deploy a JSP as part of a web application you have to copy it to the public directory of your web application, which in this case is /www/webapp/jsp.
The first JSP will include a simple feedback screen. Add the following line in the HTML code:
<form action="https://www.akadia.com/jsp/sendmail.jsp" method="post">
Please give us your feedback regarding our website, our services, our organization ...
We are happy to read your comments and suggestions.
The JSP sendmail.jsp reads the entered values in the HTML form and sends an email to the company administrator. You can customize the Mail Host and desired Mail Recipient:props.put("mail.smtp.host", "Enter Mail Host here");
InternetAddress to = new InternetAddress("Enter Mail Recipient here");
File Upload JSP using a Java Bean
The second JSP uploads a local file to an upload directory on the web application host.
You can browse your local drive and then load the selected file to the web application host.
(Due to security reasons, this example cannot be used online ... sorry).

JSP for Oracle Database Access
The JSP database.jsp reads the well known EMP table from the schema SCOTT. The database access is performed by JDBC, therefore you have to copy the JDBC driver to the Web Application:
# cd $ORACLE_HOME/jdbc/lib
# cp *.jar /www/webapp/jsp/WEB-INF/libTo see this JSP in action, open the following URL in a browser:
https://www.akadia.com/jsp/database.jsp
The browser requests a JavaServer Page. Apache notice that the requested file has a .jsp suffix
(e.g. https://www.akadia.com/jsp/database.jsp) and forwards the request via the connector to Tomcat. Tomcat searchs the JavaServer Page in /www/webapp/jsp and compile it to a Java Servlet. Then the service() method is executed which contains the connection and query on the Oracle database. The result of the database is written in a HTML file and sent back to the requesting browser.
The next component to add is a servlet. To deploy a servlet as part of a web application you first need to compile the servlet and move it into the web application's
/WEB-INF/classesdirectory. For this example, you should compile this servlet and move it to the /www/webapp/jsp/WEB-INF/classes/directory.After compiling you have to add the servlet entries to the /www/webapp/jsp/WEB-INF/web.xml file.
<?xml version="1.0" encoding="ISO-8859-1"?>
<!DOCTYPE web-app
PUBLIC "-//Sun Microsystems, Inc.//DTD Web Application 2.3//EN"
"http://java.sun.com/j2ee/dtds/web-app_2_3.dtd">
<web-app>
<servlet>
<servlet-name>HelloAkadia</servlet-name>
<servlet-class>HelloAkadia</servlet-class>
</servlet>
<servlet>
<servlet-name>JdbcTest</servlet-name>
<servlet-class>JdbcTest</servlet-class>
</servlet>
</web-app>
The HelloAkadia simply echos back the request line and headers that were sent by the client, plus any HTTPS information which is accessible.
To see this Servlet in action, open the following URL in a browser:
Servlet for Oracle Database Access
The JdbcTest Servlet reads the well known EMP table from the schema SCOTT. The database access is performed by JDBC, therefore you have to copy the JDBC driver to the Web Application.
To see this Servlet in action, open the following URL in a browser: