Application Design for .NET / C# Projects
Martin Zahn, 30.03.2003
Contents
Database bound Business Rules
Application bound Business RulesStructure of Namespaces
Fully Qualified Names
Namespace Level StatementsThe MDI (Multiple Document Interface) Approach
MDI-Frame
MDI-Sheets
Windows Forms Panel
Creating an MDI Application
Child Window Activation
Overview
To efficiently manage the items that are required by your development effort, such as references, data connections, folders, and files, Visual Studio .NET provides two containers: solutions and projects. An interface for viewing and managing these containers and their associated items, Solution Explorer, is provided as part of the integrated development environment (IDE).
Solutions and Projects
Solutions and projects contain items that represent the references, data connections, folders, and files that you need to create your application. A solution container can contain multiple projects and a project container typically contains multiple items.
Normally solutions and projects are created in the same directory, it is a good idea to create a solution folder and subfolders to contain the individual projects. It gets confusing when you have a solution file and one or more project files in the same directory.
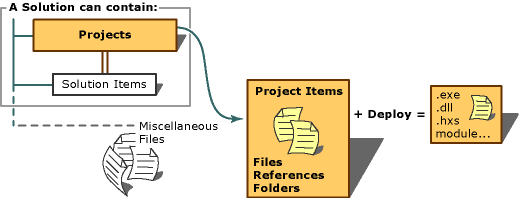
Conceptually, a solution is a container for the projects and solution items that can be built into an application. A solution usually contains one or more related projects.
Visual Studio .NET stores the definition for a solution in two files: .sln and .suo.
The solution definition file (.sln) stores the meta-data that defines your solution:
- Projects that are associated with the solution
- Items that you want available at the solution level and not associated with a particular project.
- Any build configurations you created at the solution level
The .suo file stores the meta-data that customizes the IDE, based on options you select. For example, Solution Explorer offers a Miscellaneous Files folder that appears only if the option to display it is enabled.
To help you to organize and perform common tasks on the items that you are developing, Visual Studio .NET projects are used as containers within a solution to logically manage, build, and debug the items that comprise you application. The output of a project is usually an executable program (.exe), a dynamic-link library (.dll) file or a module, among others.
Project Templates
All Visual Studio .NET development products provide a number of pre-defined project templates. You can use one of the many project templates to create the basic project container and a preliminary set of items that you might need to develop your application, class, control, or library. For example, if you chose to create a Windows application, the project offers a Windows form item for you to customize.
The Windows Application project template lays the groundwork for a standard Windows application. The template automatically adds the essential project references and files to use as a starting point for your application:
- AssemblyInfo - Used to describe the assembly and specify versioning information.
- Form (.cs for Visual C#) - Contains the Windows Form.
- References to .NET Framework namespaces.
You can use the Class Library template to quickly create reusable classes and components that can be shared with other projects. The template automatically adds the essential project references and files:
- AssemblyInfo - Used to describe the assembly and specify versioning information.
- Class (.cs for Visual C#) - Contains the empty class module.
- References to .NET Framework namespaces.
The Windows Control Library project template is used to create custom controls to use on Windows Forms. The template automatically adds the essential project references and files to use as a starting point for your application:
- AssemblyInfo (.cs file for Visual C#) - Used to describe the assembly and specify versioning information.
- UserControl file (.cs file for Visual C#) - Contains a class that derives from System.Windows.Forms.UserControl and implements a user control.
Implementing Business Rules
Broadly speaking, business rules are constraints: They define conditions that must hold true in specified situations. Sometimes called invariants, business rules are not descriptions of a process or processing. Rather, they define the conditions under which a process is carried out or the new conditions that will exist after a process has been completed.
Implementing business rules within a database system is a challenging task. Traditionally, this has been handled by placing a small subset of the business rules into the database using a variety of techniques:
- Referential integrity
- Check constraints
- Data types
- Stored Procedures
- Triggers
We have no illusion that all data-related business rules are easily supported within a data model. For example, there is no easy way to prevent loops in recursive structures when you are modeling hierarchical information.
There is a whole other class of business rules that we traditionally handle through application logic.
Application bound Business Rules
There is a whole other class of business rules that we traditionally handle through application logic. Create non visual classes in the Class Library to handle this kind of business rules.
Application Configuration
The .NET Framework gives developers and administrators control and flexibility over the way applications run. An administrator can control which protected resources an application can access, which versions of assemblies an application will use, and where remote applications and objects are located. Developers can put settings in XML configuration files, eliminating the need to recompile an application every time a setting changes. This section describes what can be configured and why configuring an application might be useful. Within a .NET Application the traditional Windows Registry should no more be used.
Configuration files are XML files that can be changed as needed. Developers can use configuration files to change settings without recompiling applications. Administrators can use configuration files to set policies that affect how applications run on their computers.
The following example shows how to use an application setting in a configuration file using the built-in appSettings section:
<configuration>
<!-- The following code uses the predefined appSettings section. -->
<appSettings>
<add key="Application Name" value="MyApplication" />
</appSettings>
</configuration>ConfigurationSettings.AppSettings is a special property that provides a shortcut to application settings defined in the <appSettings> section of the configuration file. The following example shows how to retrieve the application name defined in the previous configuration file example.
public void ReadMyAppSettings()
{
string appName = ConfigurationSettings.AppSettings["Application Name"];
Console.WriteLine();
Console.WriteLine("Reading AppSettings");
Console.WriteLine("Application Name: " + appName);
}
Namespaces
Namespaces organize the objects defined in an assembly. Assemblies can contain multiple namespaces, which can in turn contain other namespaces. Namespaces prevent ambiguity and simplify references when using large groups of objects such as class libraries.
.NET namespaces address a problem sometimes known as name collisions, in which the developer of a class library is hampered by the use of similar names in another library.
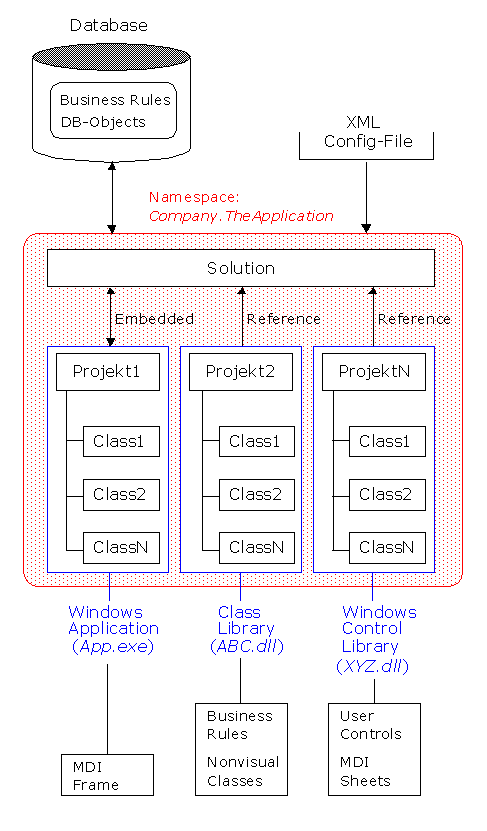
As a helpful starting point, each namespace that you assign to a unit of source code should begin with a company identifier e.g. "Akadia". The next section of your namespace depends on the intended scope for the code. If the code is business logic–specific to a project, then the next section of your namespace could be the name of your project, e.g. "Traffic".
namespace Akadia
{
namespace Traffic
{
....
....
}
}
Fully qualified names are object references that are prefixed with the name of the namespace where the object is defined. You can use objects defined in other projects if you create a reference to the class (by choosing Add Reference from the Project menu) and then use the fully qualified name for the object in your code. The following code fragment shows how to use the fully qualified name for an object from the above project's namespace:
Akadia.Traffic.TheClass theClass = new Akadia.Traffic.TheClass();
Within a namespace, you can define items such as modules, interfaces, classes, delegates, enumerations, structures, and other namespaces. You cannot define items such as properties, procedures, variables and events at the namespace level, these items must be declared within containers such as modules, structures, or classes.
The MDI (Multiple Document Interface) Approach
During the development process you will notice a problem: How to work with all the controls within a form? Many of these controls will overlap or are located at the same position, so how to access them? One solution for this problem is to use .NET Panels (Layers) and an MDI Application. An MDI application consists of an MDI Parent Frame and one or more MDI Child Sheets. So a MDI program gives you (or your program user) the ability to open more than one Window (Form, Sheet) at a time. Many programs have been written to the MDI standard like text editors, and some database programs. The MDI Child Forms (windows) cannot extend beyond the main MDI Parent Forms border.
MDI was used a lot with versions of Windows prior to Windows 95. However, Microsoft researchers discovered that users found this split artificial and confusing. So from Windows 95, Microsoft announced that MDI would be deprecated and it should not be used for Windows applications ... well, Microsoft's story on MDI has never been consistent; legacy support has continued to be included with windows and the .NET Framework supports the MDI Approach in an excellent manner.
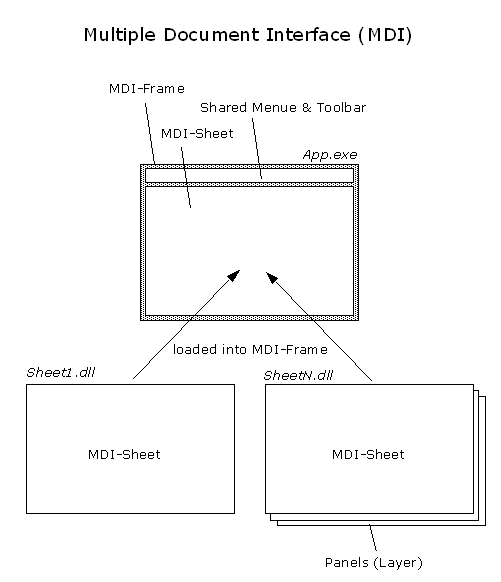
The MDI-Frame represents the entry point for the application, it is compiled as a Windows Executable (.EXE). Usually the MDI-Frame has a Menue and a Toolbar which is shared by all MDI-Sheets. When the Application is started, you can load the Main-Sheet into the Frame. If the size of each Sheets is exactly the same as the size of the MDI-Container, you can avoid the "artificial" view, the user can see only one sheet at the same time.
Each MDI-Sheet represents a logical part of the Application (Module), that means: different views can be compiled into different DLL's in an MDI application.
There are many advantages using this approach:
- Depending on the DLL's (containing views) registered in a system the application loads & shows the views.
- Need not reship the entire application in case of any bugs detected.
- Can add views at later stage with out modifying the exe.
- The development of the whole application can be easily distributed between several developers.
Windows Forms Panel controls are used to provide an identifiable grouping for other controls. Typically, you use panels to subdivide a form by function. For example, you may have an order form that specifies mailing options such as which overnight carrier to use. Grouping all options in a panel gives the user a logical visual cue. At design time all the controls can be moved easily — when you move the Panel control, all its contained controls move, too.
There are many reasons to group controls such as:
- Create Layers of Controls which otherwise overlap. Using these Layers during the development phase it's very easy to work with overlapping controls. Use the "Bring to Front" and "Send to Back" Functions in the Visual Studio IDE.
- Grouping of related form elements for a clear user interface.
- Programmatic grouping, of radio buttons for example.
- Moving the controls as a unit at design time.
- Set the desired Panel visible or invisible during the runtime of the Application.
You can create an MDI application by following these steps:
Create a Form (MDIFrame) that represents the MDI parent window and set its IsMdiContainer property to true. The following code demonstrates how to set this property.
this.IsMdiContainer = true;
Create child forms and set the MdiParent property of each form to reference the parent form. The following code demonstrates setting the MDI parent for an instance of a child form.
doc.MdiParent = this;
If you want your parent form to be notified when a child window is activated by the user, you can register an event-handling method for the MdiChildActivate event. You can determine which child window is active by using the ActiveMdiChild property of the Form class. For example, the following code updates a StatusBar control on the parent form with the name of the child window.
....
this.MdiChildActivate += new EventHandler(this.MdiChildActivated);
....
protected void MdiChildActivated(object sender, System.EventArgs e) {
statusBar1.Text = this.ActiveMdiChild.Text;
}
....