Logical Volume Manager Survival Guide
Martin Zahn, 05.03.2010
Overview
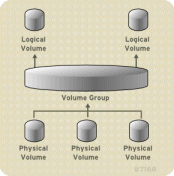
Logical volume management is a widely-used technique for deploying logical rather than physical storage. With LVM, «logical» partitions can span across physical hard drives and can be resized. A physical disk is divided into one or more physical volumes (PVs), and logical volume groups (VGs) are created by combining PVs. Notice the VGs can be an aggregate of PVs from multiple physical disks.
Example Configuration
This article describes a Linux logical volume manager by showing an example of configuration and usage. We use RedHat Linux for this example.
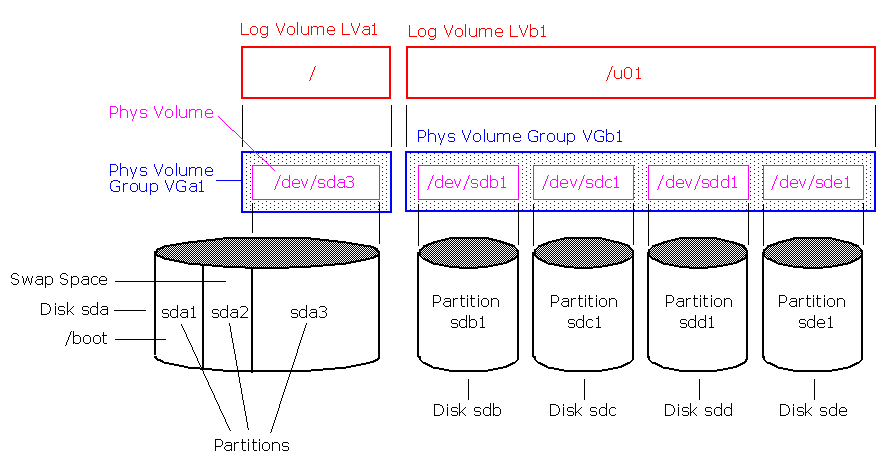
Physical Volumes PV
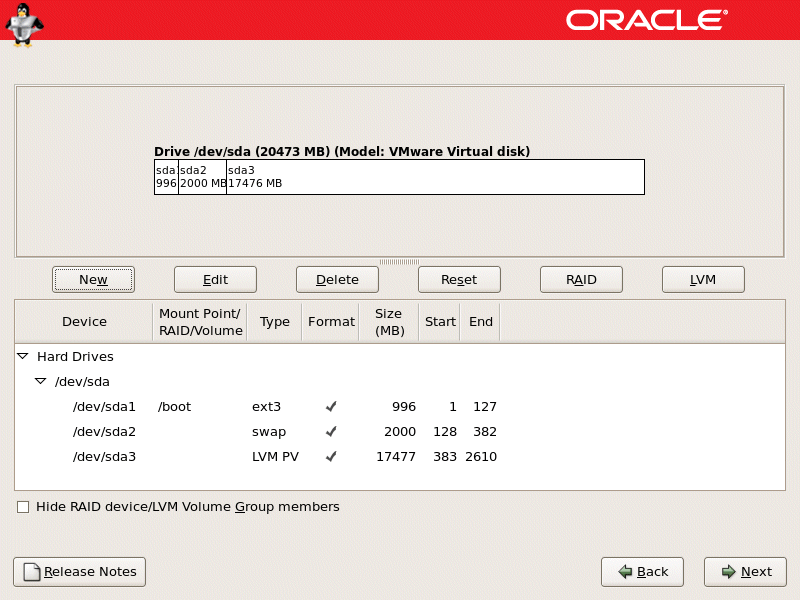
With LVM, physical partitions are simply called «physical volumes» or «PVs». These PVs are usually entire disks but may be disk partitions, for example /dev/sda3 in the above figure. PVs are created with pvcreate to initialize a disk or partition.
Command
Remarks pvcreate
Initialize a disk or partition for use by LVM pvchange
Change attributes of a physical volume pvdisplay
Display attributes of a physical volume pvmove
Move physical extents pvremove
Remove a physical volume pvresize
Resize a disk or partition in use by LVM2 pvs
Report information about physical volumes pvscan Scan all disks for physical volumes Example: pvcreate /dev/sdb1 /dev/sdc1 /dev/sdd1 /dev/sde1
Physical Volume Groups VG
The PVs in turn are combined to create one or more large virtual disks called «volume groups» or «VGs». While you can create many VGs, one may be sufficient. A VG can grow or shrink by adding or removing PVs from it.
The command vgcreate creates a new volume using the block special device previously configured with pvcreate.
Command
Remarks vgcreate
Create a volume group vgchange
Change attributes of a volume group vgdisplay
Display attributes of volume groups vgcfgbackup
Backup volume group descriptor area vgcfgrestore
Restore volume group descriptor area vgck
Check volume group metadata vgconvert
Convert volume group metadata format vgexport
Make volume groups unknown to the system vgextend
Add physical volumes to a volume group vgimport
Make exported volume groups known to the system vgmerge
Merge two volume groups vgmknodes
Recreate volume group directory and logical volume special files vgreduce
Reduce a volume group vgremove
Remove a volume group vgrename
Rename a volume group vgs
Report information about volume groups vgscan
Scan all disks for volume groups and rebuild caches vgsplit
Split a volume group into two Example: vgcreate VGb1 /dev/sdb1 /dev/sdc1 /dev/sdd1 /dev/sde1
Logical Volumes LV
Once you have one or more physical volume groups you can create one or more virtual partitions called «logical volumes» or «LVs». Note each LV must fit entirely within a single VG.
The command lvcreate creates a new logical volume by allocating logical extents from the free physical extent pool of that volume group.
Command
Remarks lvcreate
Create a logical volume in an existing volume group lvchange
Change attributes of a logical volume lvdisplay
Display attributes of a logical volume lvextend
Extend the size of a logical volume lvmchange
Change attributes of the logical volume manager lvmdiskscan
Scan for all devices visible to LVM2 lvreduce
Reduce the size of a logical volume lvremove
Remove a logical volume lvrename
Rename a logical volume lvresize
Resize a logical volume lvs
Report information about logical volumes lvscan
Scan (all disks) for logical volumes Example: lvcreate -L 400 -n LVb1 VGb1
This creates a logical volume, named «LVb1», with a size of 400 MB from the virtual group «VGb1».
Filesystems
Finally, you can create any type of filesystem you wish on the logical volume, including as swap space. Note that some filesystems are more useful with LVM than others. For example not all filesystems support growing and shrinking. ext2, ext3, xfs, and reiserfs do support such operations and would be good choices.
Creating the Root Logical Volume «LVa1» during Installation
The physical volumes are combined into logical volume groups, with the exception of the /boot partition. The /boot partition (/dev/sda1) cannot be on a logical volume group because the boot loader cannot read it. If the root partition is on a logical volume, create a separate /boot partition which is not a part of a volume group. In this example the swap space (/dev/sda2) is also created on a normal ext3 partition. The setup of the LVM for the root filesystem (/dev/sda3) is done during the installation of RedHat Linux.
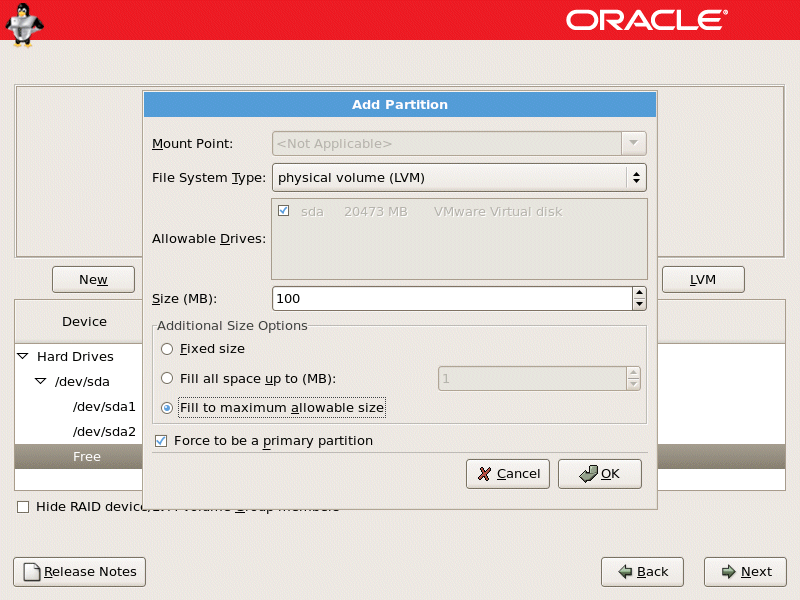
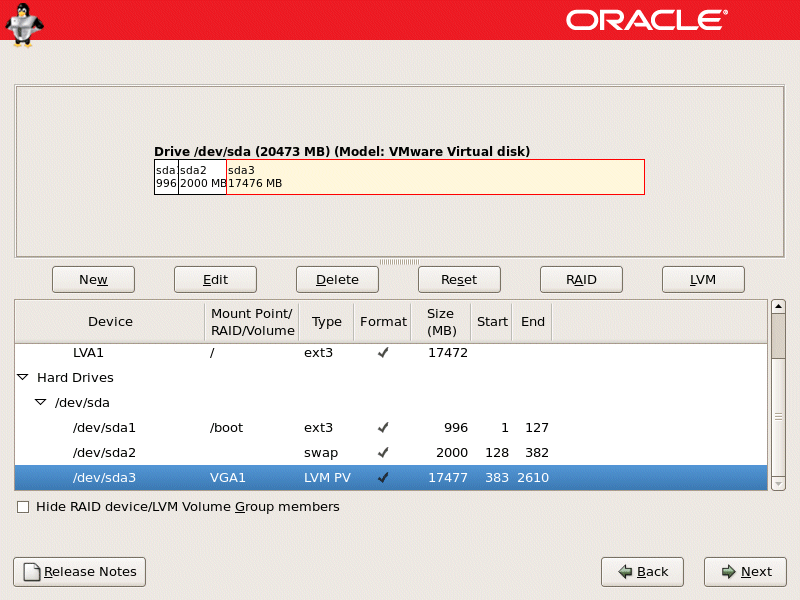
After creating the /boot filesystem and the swap space, select the free space and create the physical volume for /dev/sda3 as shown in the next figure.
Select New.
Select physical volume (LVM) from the File System Type pulldown menu.
You cannot enter a mount point yet.
A physical volume must be constrained to one drive.
Enter the size that you want the physical volume to be.
Select Fixed size to make the physical volume the specified size, select Fill all space up to (MB) and enter a size in MBs to give range for the physical volume size, or select Fill to maximum allowable size to make it grow to fill all available space on the hard disk.
Select Force to be a primary partition if you want the partition to be a primary partition.
Click OK to return to the main screen.
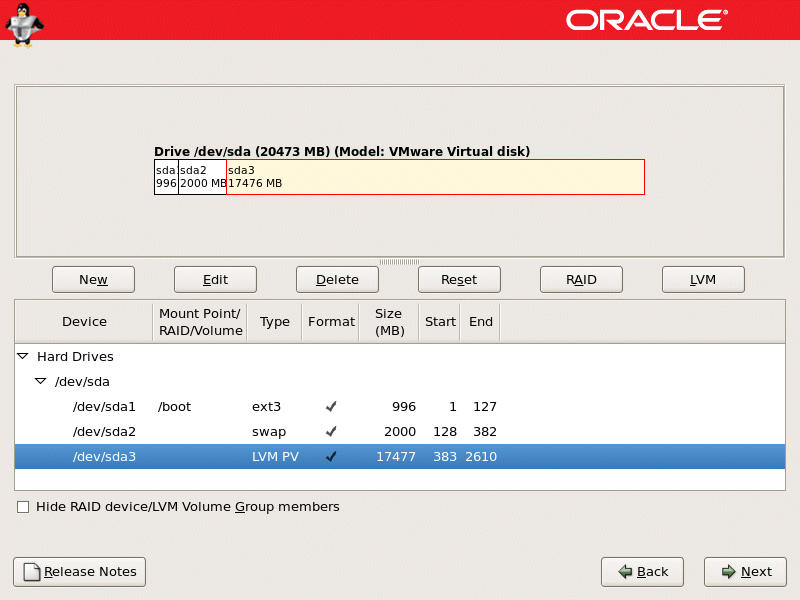
The result is shown in the next figure, the physical volume PV is located on /dev/sda3.
Once all the physical volumes are created, the volume groups can be created.
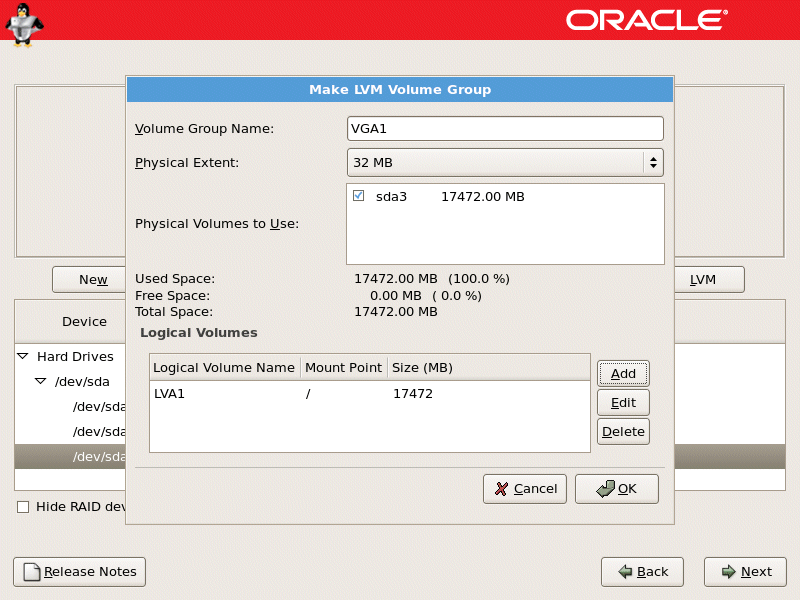
Click the LVM button to collect the physical volumes into volume groups. A volume group is basically a collection of physical volumes. You can have multiple logical volumes, but a physical volume can only be in one volume group.
Change the Volume Group Name if desired.
Select which physical volumes to use for the volume group.
Enter the name for the logical volume group as shown in the next figure.
The result is the logical volume group VGa1 located on the physical volume /dev/sda3.
Creating the Logical Volume «LVb1» manually
Create Partitions
For this LVM example you need an unpartitioned hard disk /dev/sdb. First you need to create physical volumes. To do this you need partitions or a whole disk. It is possible to run pvcreate command on /dev/sdb, but I prefer to use partitions and from partitions I later create physical volumes.
fdisk -l
....
Device Boot Start End Blocks Id System
/dev/sda1 * 1 127 1020096 83 Linux
/dev/sda2 128 382 2048287+ 82 Linux swap / Solaris
/dev/sda3 383 2610 17896410 8e Linux LVM
....The partition type for LVM is 8e.
fdisk /dev/sdb
Command (m for help): n
Command action
e extended
p primary partition (1-4)
p
Partition number (1-4): 1
First cylinder (1-2136, default 1):
Using default value 1
Last cylinder or +size or +sizeM or +sizeK (1-2136, default 2136):
Using default value 2136
Command (m for help): t
Selected partition 1
Hex code (type L to list codes): 8e
Changed system type of partition 1 to 8e (Linux LVM)
Command (m for help): w
The partition table has been altered!
Calling ioctl() to re-read partition table.
Syncing disks.This is done for all other disks as well.
Create physical volumes
Use the pvcreate command to create physical volumes.
pvcreate /dev/sdb1 /dev/sdc1 /dev/sdd1 /dev/sde1
Physical volume "/dev/sdb1" successfully created
Physical volume "/dev/sdc1" successfully created
Physical volume "/dev/sdd1" successfully created
Physical volume "/dev/sde1" successfully created
Create physical volume group VGb1
At this stage you need to create a physical volume group which will serve as a container for your physical volumes. To create a virtual group with the name «VGb1» which will include all partitions, you can issue the following command.
vgcreate VGb1 /dev/sdb1 /dev/sdc1 /dev/sdd1 /dev/sde1
Volume group "VGb1" successfully created
vgdisplay
--- Volume group ---
VG Name VGb1
System ID
Format lvm2
Metadata Areas 4
Metadata Sequence No 2
VG Access read/write
VG Status resizable
MAX LV 0
Cur LV 1
Open LV 0
Max PV 0
Cur PV 4
Act PV 4
VG Size 65.44 GB
PE Size 4.00 MB
Total PE 16752
Alloc PE / Size 16717 / 65.30 GB
Free PE / Size 35 / 140.00 MB
VG UUID 2iSIeo-dw0Q-NA07-HUt0-Pjxq-m3gh-f33lAh
Create Logical Volume Group LVb1
To create a logical volume, named «LVb1», with a size of 400 MB from the virtual group «VGb1» use the following command.
lvcreate -L 65.3G -n LVb1 VGb1
Rounding up size to full physical extent 65.30 GB
Logical volume "LVb1" created
Create File system on logical volumes
The logical volume is almost ready to use. All you need to do is to create a filesystem.
mke2fs -j /dev/VGb1/LVb1
mke2fs 1.39 (29-May-2006)
Filesystem label=
OS type: Linux
Block size=4096 (log=2)
Fragment size=4096 (log=2)
8568832 inodes, 17118208 blocks
855910 blocks (5.00%) reserved for the super user
First data block=0
Maximum filesystem blocks=0
523 block groups
32768 blocks per group, 32768 fragments per group
16384 inodes per group
Superblock backups stored on blocks:
32768, 98304, 163840, 229376, 294912, 819200, 884736, 1605632, 2654208,
4096000, 7962624, 11239424
Writing inode tables: done
Creating journal (32768 blocks): done
Writing superblocks and filesystem accounting information: done
This filesystem will be automatically checked every 35 mounts or
180 days, whichever comes first. Use tune2fs -c or -i to override.
Edit /etc/fstab
Add an entry for your newly created logical volume into /etc/fstab
/dev/VGa1/LVa1          /                       ext3    defaults        1 1
/dev/sda1               /boot                   ext3    defaults        1 2
devpts                  /dev/pts                devpts  gid=5,mode=620  0 0
tmpfs                   /dev/shm                tmpfs   defaults        0 0
proc                    /proc                   proc    defaults        0 0
sysfs                   /sys                    sysfs   defaults        0 0
/dev/sda2               swap                    swap    defaults        0 0
/dev/VGb1/LVb1          /u01                    ext3    defaults        1 3
mount -a
You can now use the filesystem, for the maintenance use one of the above LVM commands.
