|
 TRIM instead of RTRIM und LTRIM TRIM instead of RTRIM und LTRIM
SELECT TRIM(' One Word ') FROM dual;
TRIM('
------
One Word
TO_LOB (Converting LONG to CLOB)
In Oracle 8.1.5, there is a new simple way to convert LONG's to CLOB's
and ONG RAW's ind BLOB's.
INSERT INTO tab_new SELECT TO_LOB(long_value) FROM tab_old;
SYS_CONTEXT (Schema Environment)
A Context is a set of application-defined attributes that validates and
secures an application. You can even create your own contexts with CREATE CONTEXT. Oracle
have defined the following pre-built Contexts.
'NLS_TERRITORY' returns the territory
'NLS_CURRENCY' returns the currency symbol
'NLS_CALENDAR' returns the NLS calendar used for dates
'NLS_DATE_FORMAT' returns the current date format
'NLS_DATE_LANGUAGE' returns the language used for days of the week, months, and so
forth, in dates
'NLS_SORT' indicates whether the sort base is binary or linguistic
'SESSION_USER' returns the name of the user who logged on
'CURRENT_USER' returns the current session user name.
'CURRENT_SCHEMA' returns the current schema name
'CURRENT SCHEMAID' returns the current schema ID
'SESSION_USERID returns the logged on user ID
'CURRENT_USERID' returns the current session user ID
'IP_ADDRESS' IP-address of the client, if the client is connected to Oracle using the TCP
protocol.
The following query will retun the IP-Address of the connect client
computer.
SELECT sys_context('USERENV','IP_ADDRESS') FROM dual;
SYS_GUID (Generate 16-Byte Unique
Identifier)
Generate global unique Identifier, which takes care of host, process,
sid.
INSERT INTO my_table VALUES ('BOB', SYS_GUID());
SELECT SYS_GUID() FROM DUAL;
Temporary Tables (Session and
Transactionlevel)
If you need a temporary storage to save some results, temporary tables
are a good feature, because they doesn't need a cleanup job. You have two options: ON
COMMIT DELETE ROWS (Transactionlevel) or ON COMMIT PRESERVE ROWS (Sessionlevel). Each
session can only see his/her own data.
CREATE GLOBAL TEMPORARY TABLE my_temp (
t1 NUMBER(5) PRIMARY KEY,
v1 NUMBER(2),
v2 VARCHAR(10))
ON COMMIT DELETE ROWS;
INSERT INTO MY_TEMP VALUES (1,4,'z');
1 row created.
SELECT * FROM my_temp;
T1 V1
V2
--------- --------- ----------
1 4
z
COMMIT;
Commit complete.
SELECT * FROM my_temp;
no rows selected
Autonomous Transactions
At times, you may want to commit or roll back some changes to a table
independently of a primary transaction's final outcome:
DROP PACKAGE Banking;
CREATE OR REPLACE PACKAGE Banking AS
PROCEDURE SetSal (Id INTEGER, Amount NUMBER);
PROCEDURE ErrHandler (Id INTEGER);
END Banking;
/
CREATE OR REPLACE PACKAGE BODY Banking AS
PROCEDURE ErrHandler (ID INTEGER) IS
PRAGMA AUTONOMOUS_TRANSACTION;
BEGIN
INSERT INTO errlog VALUES (Id,SYSDATE,USER);
COMMIT;
END;
PROCEDURE SetSal (Id INTEGER, Amount NUMBER) IS
BEGIN
UPDATE emp SET sal = sal + Amount
WHERE empno = Id;
IF (SQL%NOTFOUND) THEN
ErrHandler(Id);
END IF;
COMMIT;
END;
END Banking;
/
The COMMIT of ErrHandler() doesn't commit SetSal() COMMIT.
Bulk Binds (FORALL)
Bulk binds improve performance by minimizing the number of context
switches between the PL/SQL and SQL engines, it reduces network I/O.
Example without Bulk-Binds:
DECLARE
TYPE Numlist IS VARRAY (100) OF NUMBER;
Id NUMLIST := NUMLIST(7902, 7698, 7839);
BEGIN
FOR i IN Id.FIRST..Id.LAST LOOP
UPDATE emp SET Sal = 1.1 * Sal
WHERE mgr = Id(i);
END LOOP;
END;
/
The same with Bulk Bind (no more looping)
DECLARE
TYPE Numlist IS VARRAY (100) OF NUMBER;
Id NUMLIST := NUMLIST(7902, 7698, 7839);
BEGIN
FORALL i IN Id.FIRST..Id.LAST
UPDATE emp SET Sal = 1.1 * Sal
WHERE mgr = Id(i);
END;
/
Bulk Collects (BULK COLLECT INTO)
In the example above (Bulk Binds),
the list with empno's was statically built. With Bulk Collect you can dynamically
build the entire list using BULK COLLECT INTO.
DECLARE
TYPE Numlist IS TABLE OF emp.empno%TYPE;
Id Numlist;
BEGIN
SELECT empno BULK COLLECT INTO Id
FROM emp
WHERE sal < 2000;
FORALL i IN Id.FIRST..Id.LAST
UPDATE emp SET Sal = 1.1 * Sal
WHERE mgr = Id(i);
END;
/
Bulk Collects with RETURNING INTO
You can even use Bulk Collects with DML-Commands to return a value to the
calling procedure using RETURNING without an additional fetch.
DECLARE
TYPE Numlist IS TABLE OF emp.empno%TYPE;
TYPE Bonlist IS TABLE OF emp.sal%TYPE;
Id Numlist;
Bl Bonlist;
BEGIN
SELECT empno BULK COLLECT INTO Id
FROM emp
WHERE deptno = 10;
FORALL i IN Id.FIRST..Id.LAST
UPDATE emp SET Sal = 1.1 * Sal
WHERE mgr = Id(i)
RETURNING Sal BULK COLLECT INTO Bl;
END;
/
In the PL/SQL table "Bonlist" you can now find the updated salaries.
Call by Reference (NOCOPY)
When the parameters hold large data structures, all this copying slows
down execution and uses up memory. To prevent that, you can specify the
NOCOPY hint, which allows the PL/SQL compiler to pass
OUT and IN OUT parameters by reference. Remember,
NOCOPY is a hint, not a directive.
DECLARE
TYPE Numlist IS TABLE OF emp.empno%TYPE;
Id Numlist;
PROCEDURE GetEmp (pDeptNo IN NUMBER, pId OUT NOCOPY Numlist) IS
BEGIN
SELECT empno BULK COLLECT INTO pId
FROM emp
WHERE deptno = pDeptNo;
END;
BEGIN
GetEmp(10,Id);
FOR i IN Id.FIRST..Id.LAST LOOP
dbms_output.put_line(Id(i));
END LOOP;
END;
/
Dynamic SQL to
reference database objects that do not exist at compilation ?
Dynamic SQL can solve this problem, because dynamic SQL allows you to
wait until runtime to specify the table names you need to access. For example, in the next
sample you might allow a user to specify the name of the table at runtime
with a dynamic SQL query.
CREATE OR REPLACE PROCEDURE ShowSal (TabName VARCHAR2) IS
TYPE CurType IS REF CURSOR;
cEmp CurType;
sQuery VARCHAR2(200);
nId NUMBER := 7369;
nSal emp.sal%TYPE;
BEGIN
sQuery := 'SELECT sal FROM ' || TabName || ' WHERE empno = :Id';
OPEN cEmp FOR sQuery USING nId;
LOOP
FETCH cEmp INTO nSal;
EXIT WHEN cEmp%NOTFOUND;
DBMS_OUTPUT.PUT_LINE(TO_CHAR(nSal));
END LOOP;
CLOSE cEmp;
END;
/
EXECUTE IMMEDIATE to execute dynamic SQL
(Very good new feature)
The EXECUTE IMMEDIATE statement prepares (parses) and immediately
executes a dynamic SQL statement or an anonymous PL/SQL block. The following examples are
from the Oracle Manual.
DECLARE
SqlStmt VARCHAR2(100);
PlSqlBlock VARCHAR2(200);
nDeptNo NUMBER(2) := 50;
strDname VARCHAR2(15) := 'MIGRATION';
strLoc VARCHAR2(15) := 'LUCERNE';
EmpRec emp%ROWTYPE;
BEGIN
SqlStmt := 'SELECT * FROM emp WHERE empno = :id';
EXECUTE IMMEDIATE SqlStmt INTO EmpRec USING 7788;
PlSqlBlock := 'BEGIN ShowSal(:TabName); END;';
EXECUTE IMMEDIATE PlSqlBlock USING 'emp';
EXECUTE IMMEDIATE 'DROP TABLE special_bonus';
EXECUTE IMMEDIATE 'CREATE TABLE special_bonus (id NUMBER, amt NUMBER)';
SqlStmt := 'INSERT INTO dept VALUES (:1, :2, :3)';
EXECUTE IMMEDIATE SqlStmt USING nDeptNo, strDname, strLoc;
EXECUTE IMMEDIATE 'DELETE FROM dept
WHERE deptno = :n' USING nDeptNo;
SqlStmt := 'ALTER SESSION SET SQL_TRACE TRUE';
EXECUTE IMMEDIATE SqlStmt;
END;
/
In the example below, a stand-alone procedure accepts the name of a
database table (such as 'emp') and an optional WHERE-clause condition (such as 'sal >
2000'). If you omit the condition, the procedure deletes all rows from the table.
Otherwise, the procedure deletes only those rows that meet the condition.
CREATE PROCEDURE delete_rows (
table_name IN VARCHAR2,
condition IN VARCHAR2 DEFAULT NULL) AS
where_clause VARCHAR2(100) := ' WHERE ' || condition;
BEGIN
IF condition IS NULL THEN where_clause := NULL; END IF;
EXECUTE IMMEDIATE 'DELETE FROM ' || table_name || where_clause;
END;
/
execute delete_rows('emp','sal > 2000');
We think, that EXECUTE IMMEDIATE is one of the most important new
features in Oracle 8i
Invoker- and Definer Rights
By default, stored procedures and SQL methods execute with the
privileges of their definer, not their invoker. Such definer-rights
routines are bound to the schema in which they reside. A user of a definer-rights procedure
requires only the privilege to execute the procedure and no privileges on the underlying
objects that the procedure accesses, because a definer-rights procedure operates under the
security domain of the user who owns the procedure, regardless of who is executing it. The
procedure's owner must have all the necessary object privileges for referenced objects.
Note, that the EXECUTE privilege cannot be granted to ROLES for definer rigths
procedures.
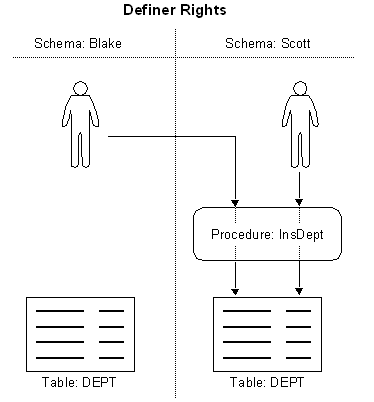
Advantage of Definer Rights
You can use definer-rights procedures to add a level of database
security. By writing a definer-rights procedure and granting only EXECUTE privilege to a
user, the user can be forced to access the referenced objects only through the procedure
(that is, the user cannot submit ad hoc SQL statements to the database).
An invoker-rights procedure executes with all of the invoker's
privileges, including enabled ROLES. A user of an invoker-rights procedure
needs privileges on the underlying objects that the procedure accesses for which names are
resolved in the invoker's schema.
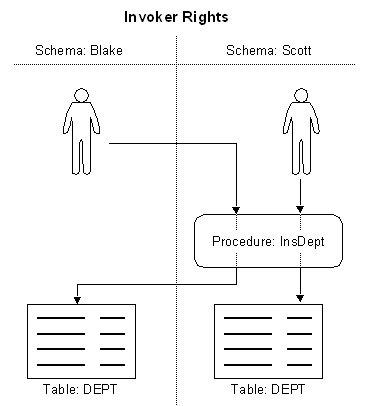
Advantage of Invoker Rights
Invoker-rights routines let you centralize data retrieval. They are
especially useful in applications that store data in different schemas. In such cases,
multiple users can manage their own data using a single code base.
Example on Invoker Rights
CONNECT sys/manager;
CREATE ROLE employees;
GRANT employees TO scott;
GRANT employees TO blake;
DISCONNECT;
CONNECT scott/tiger;
CREATE SEQUENCE deptno_seq;
GRANT SELECT ON deptno_seq TO employees;
CREATE PROCEDURE create_dept (pDept VARCHAR2, pLoc VARCHAR2)
AUTHID CURRENT_USER AS
BEGIN
INSERT INTO dept
VALUES (deptno_seq.NEXTVAL, pDept, pLoc);
END;
/
GRANT EXECUTE ON create_dept to EMPLOYEES;
DISCONNECT;
CONNECT sys/manager;
CREATE PUBLIC SYNONYM deptno_seq FOR scott.deptno_seq;
DISCONNECT;
CONNECT scott/tiger;
EXECUTE create_dept ('Free Climbing','Swiss Oberland');
SELECT * FROM dept;
DEPTNO DNAME LOC
--------- -------------- -------------
10 ACCOUNTING NEW YORK
20 RESEARCH
DALLAS
30 SALES
CHICAGO
40 OPERATIONS BOSTON
1 Free Climbing Swiss Oberland
DISCONNECT;
CONNECT blake/lion;
EXECUTE create_dept ('Alps Climbing','Everest');
DEPTNO DNAME LOC
--------- -------------- -------------
10 ACCOUNTING NEW YORK
20 RESEARCH
DALLAS
30 SALES
CHICAGO
40 OPERATIONS BOSTON
4 Alps Climbing Everest
DISCONNECT;
This example shows, each user can see only his/her own data ! This
behaviour is completly different from normal Definer Rights, where each user will see the
data in Scott's DEPT table. Use AUTHID CURRENT_USER AS to define Invoker Rights.
Please not, that Invoker Rights can be granted to ROLES, as this example shows.
Fine Grained Access Control
The functionality to support fine-grained access control is based on
dynamic predicates, where security rules are not embedded in
views, but are acquired at the statement parse time, when the base table or view
is referenced in a DML statement. A dynamic predicate for a table or view is generated by a
PL/SQL function, which is associated with a security policy through a
PL/SQL interface.
For example:
DBMS_RLS.ADD_POLICY
('scott','emp','emp_policy','secusr','emp_sec','select');
Whenever EMP table, under SCOTT schema, is referenced in a query or
subquery (SELECT), the server calls the EMP_SEC function (under SECUSR schema). This
returns a predicate specific to the current user for the EMP_POLICY policy. The policy
function may generate the predicates based on whatever session environment variables are
available during the function call. These variables usually appear in the form of
application contexts.
The server then produces a transient view with the text:
SELECT * FROM scott.emp WHERE P1
Here, P1 is the predicate returned from the EMP_SEC function. The
server treats the EMP table as a view and does the view expansion just like the ordinary
view, except that the view text is taken from the transient view instead of the data
dictionary. If the predicate contains subqueries, then the owner (definer) of the policy
function is used to resolve objects within the subqueries and checks security for those
objects. In other words, users who have access privilege to the policy protected objects do
not need to know anything about the policy. They do not need to be granted object
privileges for any underlying security policy. Furthermore, the users also do not require
EXECUTE privilege on the policy function, because the server makes the call with the
function definer's right.
Example
We need a policy on scott's EMP table, which shows only the rows
belonging to the caller of the query. Therefore we have to create the following predicate:
(e.g. ename='SCOTT')
connect scott/tiger
select 'ename='''|| sys_context('userenv','session_user') ||''''
from dual;
CONNECT system/manager
CREATE USER secusr IDENTIFIED by secusr
DEFAULT TABLESPACE users;
GRANT connect,resource,execute_catalog_role TO secusr;
CONNECT secusr/secusr;
CREATE OR REPLACE FUNCTION emp_sec (schema IN varchar2, tab IN varchar2)
RETURN VARCHAR2 AS
BEGIN
RETURN 'ename='''|| sys_context('userenv','session_user') ||'''';
END emp_sec;
/
EXECUTE dbms_rls.add_policy('scott',
'emp','emp_policy','secusr','emp_sec');
DISCONNECT;
CONNECT scott/tiger;
SELECT * FROM scott.emp;
EMPNO ENAME JOB
MGR HIREDATE
SAL
--------- ---------- --------- --------- --------- ---------
7788 SCOTT ANALYST
7521 09-DEC-82 3000
CONNECT sys/manager;
SELECT * FROM scott.emp;
EMPNO ENAME JOB
MGR HIREDATE
SAL
--------- ---------- --------- --------- --------- ---------
7369 SMITH CLERK
7369 17-DEC-80
800
7499 ALLEN SALESMAN
7369 20-FEB-81 1600
7521 WARD SALESMAN
7369 22-FEB-81 1250
7566 JONES MANAGER
7369 02-APR-81 2975
CONNECT system/manager;
SELECT * FROM scott.emp;
no rows selected
CONNECT secusr/secusr;
execute dbms_rls.drop_policy('scott','emp','emp_policy');
The User SCOTT can only see his own rows, the User SYSTEM can see NO
rows, but the User SYS can see ALL rows. Policies are not enabled for the SYS User
!
If you want to define your own predicate in the RETURN value, set it to (
' 1 = 2 ' ) for false
and ( ' 1 = 1 ' ) for true.
....
IF (....) THEN
RETURN ('1=2');
ELSE
RETURN ('1=1');
END;
DBMS_RLS.ADD_POLICY (
object_schema IN VARCHAR2 := NULL,
object_name IN VARCHAR2,
policy_name IN VARCHAR2,
function_schema IN VARCHAR2 := NULL,
policy_function IN VARCHAR2,
statement_types IN VARCHAR2 := NULL,
update_check IN BOOLEAN := FALSE,
enable IN BOOLEAN
:= TRUE);
|
object_schema
|
|
Schema containing the table or view (logon user, if NULL).
|
|
object_name
|
|
Name of table or view to which the policy is added.
|
|
policy_name
|
|
Name of policy to be added. It must be unique for the same table or
view.
|
|
function_schema
|
|
Schema of the policy function (logon user, if NULL).
|
|
policy_function
|
|
Name of a function which generates a predicate for the policy. If
the function is defined within a package, then the name of the package must be
present.
|
|
statement_types
|
|
Statement types that the policy will apply. It can be any
combination of SELECT, INSERT, UPDATE, and DELETE. The default is to apply to all of
these types.
|
|
update_check
|
|
Optional argument for INSERT or UPDATE statement types. The default
is FALSE. Setting update_check to TRUE causes the server to also check the policy
against the value after insert or update.
|
|
enable
|
|
Indicates if the policy is enabled when it is added. The default is
TRUE
|
Application Context
(Security Policy)
Application context facilitates the implementation of fine-grained access
control. It allows you to implement security policies with functions and then associate
those security policies with applications. Each application can have its own
application-specific context. Users are not allowed to arbitrarily change their context
(for example, through SQL*Plus).
-
Create a PL/SQL package with functions that validate and set the
context for your application. You may wish to use an event trigger on login to set the
initial context for logged-in users.
-
Use CREATE CONTEXT to specify a unique context name and associate it
with the PL/SQL package you created.
-
Reference the application context in a policy function implementing
fine-grained access control or create an event trigger on login to set the initial
context for a user. For example, you could query a user's employee number and set this
as an "employee number" context value.
-
Reference the application context.
Click here for an example, which shows the steps above.
Read Only Databases
The whole database can now be opened READ-ONLY (Before 8i, only
Tablespaces). Note that Disk-Sorts in the TEMP tablespaces are not possible, therefore you
must set SORT_AREA_SIZE and SORT_AREA_RETAINED_SIZE to values big enough to process the
sort operation in the memory.
sqlplus /nologin
SQL> connect sys as sysdba;
Enter password:
Connected to an idle instance.
SQL> startup mount;
ORACLE instance started.
Total System Global Area 96394640 bytes
Fixed Size
64912 bytes
Variable Size
13369344
bytes
Database Buffers 81920000
bytes
Redo Buffers
1040384 bytes
Database mounted.
SQL> alter database open read only;
Database altered.
SQL> connect scott/tiger
Connected.
SQL> select * from dept;
DEPTNO DNAME
LOC
---------- -------------- -------------
10 ACCOUNTING NEW
YORK
20 RESEARCH
DALLAS
30 SALES
CHICAGO
40 OPERATIONS BOSTON
SQL> insert into dept values (50,'DBTEAM','Seftigen');
insert into dept values (50,'DBTEAM','Seftigen')
ERROR at line 1:
ORA-01552: cannot use system rollback segment for non-system tablespace 'TAB'
Multiplexed Archiving up to 5
Destinations
In Oracle8 it was possible to define an alternate archive log destination
with LOG_ARCHIVE_DUPLEX_DEST. In Oracle 8i it's possible to have up to 5 alternate
destinations. You cannot use LOG_ARCHIVE_DEST_x with LOG_ARCHIVE_DEST or
LOG_ARCHIVE_DUPLEX_DEST.
Enter in INIT.ORA (Best if all alternate destinations are on different,
fast disks).
log_archive_dest_1 = "location=/u01/db/SOL3/arc1 mandatory
reopen=300"
log_archive_dest_2 = "location=/u01/db/SOL3/arc2 mandatory reopen=300"
log_archive_dest_3 = "location=/u01/db/SOL3/arc3 mandatory reopen=300"
log_archive_dest_4 = "location=/u01/db/SOL3/arc4 optional reopen=300"
log_archive_dest_5 = "location=/u01/db/SOL3/arc5 optional reopen=300"
log_archive_min_succeed_dest = 4
sqlplus /nologin
SQL> connect sys as sysdba;
SQL> startup mount;
SQL> archive log list;
SQL> alter database archivelog;
SQL> alter database open;
SQL> alter system switch logfile;
From now the archive logs will be saved to the specified
destinations;
Standby Database
Oracle8i contains an enhanced feature that automatically keeps a standby
database synchronized with your production database. This new feature, called the Automated
Standby Database (ASD), greatly reduces the amount of manual work database administrators
must perform.
The new featues in 8i are:
- Offline Redo-Logs are automatically transfered to the Stand-By database.
- The copied offline Redo-Logs are automatically applied to the Stand-By database.
- Stand-By database may be open "Read-Only".
- More than one Stand-By database supported.
- Stand-By database isn't 100% synchronized with Production database (Online Redolog is
missing).
Block Checking
DB_BLOCK_CHECKING is used to control whether block checking is done for
transaction managed blocks. As early detection of corruptions is ueful, and has
minimal, if any, performance impact. As the parameter is dynamic, it provides more
flexibility than events 10210 and 10211, which it will ultimately replace.
If DB_BLOCK_CHECKSUM is set to TRUE, a checksum is
calculated and stored in the cache header of every data block when writing it to disk.
Checksums will be verified when a block is read only if this parameter is TRUE and the last
write of the block stored a checksum. Every log block will also be given a
checksum before it is written to the current log. Warning:Setting
DB_BLOCK_CHECKSUM to TRUE can cause performance overhead.
We normaly use the following Settings in the INIT.ORA File:
db_block_checking = true
db_block_checksum = false
Other possibilities to check the integrity of the data can be done
with:
- ANALYZE TABLE ... VALIDATE STRUCTURE.
- Export to /dev/null.
There exists a Package so called DBMS_REPAIR ....
hopefully we never have to use this ....
Using LogMiner to Analyze Online
and Archived Redo Logs
LogMiner allows you to read information contained in online and archived
redo logs. LogMiner is especially useful for identifying and undoing logical corruption.
LogMiner processes redo log files, translating their contents into SQL statements that
represent the logical operations performed to the database. The V$LOGMNR_CONTENTS view then
lists the reconstructed SQL statements that represent the original operations (SQL_REDO
column) and the corresponding SQL statement to undo the operations (SQL_UNDO column). Apply
the SQL_UNDO statements to roll back the original changes to the database.
Steps to perform a LogMiner Analyze:
CONNECT sys/manager
execute dbms_logmnr_d.build(
'sol3_dict_file.ora','/u01/db/SOL3/adm/utl');
BEGIN
dbms_logmnr.add_logfile(
options => dbms_logmnr.NEW,
logfilename => '/u01/db/SOL3/arc/SOL3_86.arc');
dbms_logmnr.add_logfile(
options => dbms_logmnr.ADDFILE,
logfilename => '/u01/db/SOL3/arc/SOL3_87.arc');
dbms_logmnr.start_logmnr(
dictfilename => '/u01/db/SOL3/adm/utl/sol3_dict_file.ora');
END;
/
SELECT TO_CHAR(TIMESTAMP,'HH24:MI.SS') "Time",
USERNAME,
OPERATION,
SQL_REDO,
SQL_UNDO
FROM v$logmnr_contents
WHERE username = 'SCOTT';
EXECUTE dbms_logmnr.end_logmnr();
Event Handling and Event Attributes
System events, like LOGON and SHUTDOWN, provide a mechanism for tracking
system changes. With Oracle, this tracking can be combined with database event
notification. You can obtain certain event-specific attributes when a trigger is fired.
These attributes can be used as standalone functions.
The following Event Attributs are defined (from Oracle Manual).
|
|
|
|
|
|
sysevent
|
VARCHAR2(20)
|
System event firing
the trigger: Event name
is same as that in the
syntax.
|
INSERT INTO event_table
(sys.sysevent);
|
|
instance_num
|
NUMBER
|
Instance number.
|
IF (instance_num = 1)
THEN INSERT
INTO event_table ('1');
END IF;
|
|
database_name
|
VARCHAR2(50)
|
Database name.
|
DECLARE
db_name VARCHAR2(50);
BEGIN
db_name := database_name;
END;
|
|
server_error
|
NUMBER
|
Given a position
(1 for top of stack), it
returns the error number
at that position on error
stack
|
INSERT INTO
event_table
('top stack error ' ||
sys.server_error(1));
|
|
is_servererror
|
BOOLEAN
|
Returns TRUE if given
error is on error stack,
FALSE otherwise.
|
IF(is_servererror(error_number))
THEN INSERT INTO
event_table
('Server error!!');
END IF;
|
|
login_user
|
VARCHAR2(30)
|
Login user name.
|
SELECT sys.login_user
FROM dual;
|
|
dictionary
_obj_type
|
VARCHAR(20)
|
Type of the dictionary
object on which the DDL
operation occurred.
|
INSERT INTO
event_table
('This object is a ' ||
sys.dictionary_obj_type);
|
|
dictionary
_obj_name
|
VARCHAR(30)
|
Name of the dictionary
object on which the
DDL operation occurred.
|
INSERT INTO
event_table ('Changed
object is ' ||
sys.dictionary_obj_name');
|
|
dictionary
_obj_owner
|
VARCHAR(30)
|
Owner of the dictionary
object on which the DDL
operation occurred.
|
INSERT INTO event_table
('object owner is' ||
sys.dictionary_obj.owner');
|
|
des_encrypted
_password
|
VARCHAR(2)
|
The DES encrypted
password of the user
being created or altered.
|
IF(dictionary_obj_type = 'USER')
THEN
INSERT INTO event_table
(sys.des_encypted_password);
END IF;
|
System Events with Trigger Examples
|
|
|
|
| STARTUP |
This event is fired when the database is open |
sysevent, login_user, instance_num, database_name |
| SHUTDOWN |
This event is fired just before the server starts the shutdown of an
instance. For abnormal instance shutdown, this event may not be fired.
|
sysevent, login_user, instance_num, database_name |
| SERVERERROR |
This event is fired when the error eno
occurs. If no condition is given, then this event fires when any error occurs. |
sysevent, login_user, instance_num database_name,
server_error, is_servererror |
Example: Log when database is started
CREATE TABLE event_table (EVENT_TEXT VARCHAR2(255));
CREATE OR REPLACE TRIGGER event_startup
AFTER STARTUP ON DATABASE
BEGIN
INSERT INTO event_table VALUES
('USER: '||USER||' '||SYS.SYSEVENT||' AT '
||TO_CHAR(SYSDATE,'DD.MM.YYYY HH24:MI.SS'));
END;
/
SELECT * FROM event_table;
EVENT_TEXT
-----------------------------------------
User SYS STARTUP at 16.12.1999 15:37.04
USER: SYS STARTUP AT 17.12.1999 11:58.14
CREATE TRIGGER log_errors
AFTER SERVERERROR ON DATABASE
BEGIN
IF (IS_SERVERERROR (1017)) THEN
-- Do something for ORA-1017
ELSE
-- Do something for the OTHERS errors
END IF;
END;
Client Events with Trigger Examples
Client events are the events related to user logon/logoff, DML, and DDL
operations
|
|
|
|
|
LOGON
|
These events are fired after a successful logon of a user.
|
sysevent, login_user, instance_num, database_name
|
|
LOGOFF
|
These events are fired at the start of a user logoff .
|
sysevent, login_user, instance_num, database_name
|
|
BEFORE CREATE
|
These events are fired when a catalog object is created.
|
sysevent, login_user, instance_num database_name,
dictionary_obj_type, dictionary_obj_name, dictionary_obj_owner
|
|
AFTER CREATE
|
|
BEFORE ALTER
|
These events are fired when a catalog object is altered.
|
sysevent, login_user, instance_num database_name,
dictionary_obj_type dictionary_obj_name,dictionary_obj_owner
|
|
AFTER ALTER
|
|
DROP
|
These events are fired when a catalog object is dropped
|
sysevent, login_user, instance_num database_name,
dictionary_obj_type dictionary_obj_name, dictionary_obj_owner
|
|
BEFORE DROP
|
|
AFTER DROP
|
Example: On Logon and On Create Trigger
CREATE OR REPLACE TRIGGER Sys.On_Logon
AFTER LOGON ON DATABASE
BEGIN
INSERT INTO sys.event_table VALUES
('USER: '||USER||' '||SYS.SYSEVENT||' AT '
||TO_CHAR(SYSDATE,'DD.MM.YYYY HH24:MI.SS'));
END;
/
CREATE OR REPLACE TRIGGER Scott.On_Create
AFTER CREATE ON SCHEMA
BEGIN
INSERT INTO sys.event_table VALUES
(sys.dictionary_obj_type||': '||sys.dictionary_obj_name
||' created by: '||USER||' at: '
||TO_CHAR(SYSDATE,'DD.MM.YYYY HH24:MI.SS'));
END;
/
SELECT * FROM sys.event_table;
EVENT_TEXT
-------------------------------------------------------
TABLE: TEST created by: SCOTT at: 19.12.1999 16:29.37
USER: SCOTT LOGON AT 19.12.1999 16:28.58
Faster Startup after Instance Crash
DB_BLOCK_MAX_DIRTY_TARGET = n Blocks specifies the number of buffers that
can be dirty (modified and different from what is on disk) in the buffer cache. It
indirectly specifies a rough limit on the number of blocks that must be read during crash
and instance recovery.
Optimizer Statistics and Create Index
Create the Cost based optimizer statistics when you create the index
create index addr_indx on customer(ADDRESS) compute
statistics;
Manipulate Optimizer Statistics with
DBMS_STATS
DBMS_STATS provides a mechanism for you to view and modify optimizer
statistics gathered for database objects.The statistics can reside in the data dictionary
or in a table created in the user's schema. Only statistics stored in the dictionary itself
have an impact on the cost-based optimizer.
DBMS_STATS is divided into three main sections:
- Setting or Getting Statistics
- Transferring Statistics
- Gathering Optimizer Statistics
The following procedures enable the gathering of certain classes of
optimizer statistics, with possible performance improvements over the ANALYZE command:
GATHER_INDEX_STATS
GATHER_TABLE_STATS
GATHER_SCHEMA_STATS
GATHER_DATABASE_STATS
Gather Table Statistics:
EXEC DBMS_STATS.GATHER_TABLE_STATS
(ownname=>'SCOTT',tabname=>'EMP',estimate_percent=>60);
Gather Schema Statistics:
EXEC DBMS_STATS.GATHER_SCHEMA_STATS
(ownname=>'SCOTT',block_sample=>FALSE,estimate_percent=>60,
method_opt=>'FOR ALL COLUMNS',degree=>5);
You can transfer statistics from the dictionary to a user stat table and
from a user stat table to the dictionary. The statistics can be manipulated in the user
stat table.
Create the Export Table:
EXEC DBMS_STATS.CREATE_STAT_TABLE
(ownname=>'SCOTT',stattab=>'SCOTT_STAT');
Retrieve statistics for a particular table and stores them in the user
stat table:
EXEC DBMS_STATS.EXPORT_TABLE_STATS
(ownname=>'SCOTT',tabname=>'EMP',stattab=>'SCOTT_STAT');
Manipulate statistics in the user stat table:
EXEC DBMS_STATS.SET_TABLE_STATS
(ownname=>'SCOTT',tabname=>'EMP',stattab=>'SCOTT_STAT',
numrows=>'5000',statown=>'SCOTT');
Now transfer manipulated statistics from the user stat table to the
dictionary.
EXEC DBMS_STATS.IMPORT_TABLE_STATS
(ownname=>'SCOTT',tabname=>'EMP',stattab=>'SCOTT_STAT',statown=>'SCOTT');
Preserve Execution Plans (Outlines)
Plan Stability preserves execution plans in "Stored
Outlines".
- Plan Stability prevents from affecting the performance characteristics of your
applications. (Changes to the optimizer mode settings and changes to parameters affecting
the sizes of memory structures such as SORT_AREA_SIZE, and BITMAP_MERGE_AREA_SIZE)
- Plan Stability is most useful when you cannot risk any performance changes in your
applications.
- Stored outlines stabilizes the generated execution plan in subsequent Oracle
releases.
- Plan Stability also facilitates migration from the rule-based optimizer to the
cost-based optimizer when you upgrade to a new version of Oracle.
- You may use different Plans for the Day- and Night Processing.
Stored Outlines will be saved in the OUTLN schema.
The following statement creates a stored outline called SALARIES, stored in
the category SPECIAL.
CREATE OR REPLACE OUTLINE
salaries FOR CATEGORY special
ON SELECT ename, sal FROM emp;
When this same SELECT statement is subsequently compiled, if the
USE_STORED_OUTLINES parameter is set to SPECIAL, Oracle generates the same execution plan
as was generated when the outline SALARIES was created.
ALTER SESSION SET USE_STORED_OUTLINES = special;
ALTER SESSION SET USE_STORED_OUTLINES = false;
SELECT ol_name,creator FROM outln.ol$;
SELECT * FROM user_outlines;
ALTER OUTLINE salaries REBUILD;
The OUTLN_PKG package contains the functional interface for subprograms
associated with the management of stored outlines. A stored outline is the stored data that
pertains to an execution plan for a given SQL statement. It enables the optimizer to
repeatedly recreate execution plans that are equivalent to the plan originally generated
along with the outline.The data stored in an outline consists, in part, of a set of hints
that are used to achieve plan stability.
Drops all outlines that have not been used since they were created
execute OUTLN_PKG.DROP_UNUSED;
Enable Parallel Automatic Tuning
Parallel execution dramatically reduces response time for data-intensive
operations on large databases typically associated with Decision Support Systems (DSS). You
can also implement parallel execution on certain types of OLTP (Online Transaction
Processing) and hybrid systems. The optimal setting of the different parameters which are
involved for parallel execution are extremly complex. The new initSID.ora parameter
PARALLEL_AUTOMATIC_TUNING = TRUE helps to simlify this complex task.
When PARALLEL_AUTOMATIC_TUNING is TRUE, Oracle automatically sets other
parameters as shown below. For most systems, you do not need to make further adjustments to
have an adequately tuned, fully automated parallel execution environment.
Parameters calculated by PARALLEL_AUTOMATIC_TUNING:
- PARALLEL_ADAPTIVE_MULTI_USER
- PROCESSES
- SESSIONS
- PARALLEL_MAX_SERVERS
- LARGE_POOL_SIZE
- PARALLEL_EXECUTION_MESSAGE_SIZE
Locally managed Tablespaces
Typically, tablespaces are "dictionary mapped," which
means that such tablespaces rely on SQL dictionary tables to track space utilization.
Locally managed tablespaces, on the other hand, use bit maps (instead of
SQL dictionary tables) to track used and free space. Therefore there is a smaller overhead
for extent allocation and coalesce of free extents is no more necessary. Note that, SMON
coalesce adjacient extents in dictionary mapped tablespaces only if PCTINCREASE > 0.
Space Management with locally managed tablespaces
Extents can be allocated UNIFORM (Each extent has a fixed size, typically
1MByte) or AUTOALLOCATE ((Extents with minimal size of 64K). For the SYSTEM tablespace, you
can specify EXTENT MANGEMENT LOCAL in the CREATE DATABASE command. If the SYSTEM tablespace
is locally managed, other tablespaces in the database can be dictionary-managed but you
must create all rollback segments in locally-managed tablespaces.
Normal Tablespace (System Managed)
CREATE TABLESPACE users2
DATAFILE '/u01/db/SOL3/usr/SOL3_users2.dbf' SIZE 5M REUSE
AUTOEXTEND ON NEXT 1M MAXSIZE UNLIMITED
INITIAL 1M
EXTENT MANAGEMENT LOCAL AUTOALLOCATE
PERMANENT
ONLINE;
Temporary Tablespace (UNIFORM Managed)
CREATE TEMPORARY TABLESPACE temp2
TEMPFILE '/u01/db/SOL3/tmp/SOL3_temp2.dbf' SIZE 5M REUSE
AUTOEXTEND ON NEXT 1M MAXSIZE UNLIMITED
EXTENT MANAGEMENT LOCAL UNIFORM SIZE 2M;
Note:
- DEFAULT STORAGE is not supported
ORA-25143: default storage clause is not compatible with allocation policy.
- CREATE DATABASE doesn't support EXTENT MANGEMENT LOCAL yet.
ORA-00933: SQL command not properly ended.
Read Only Tablespaces
Read Only Tablespaces are not new in 8.1.5, but id you try to switch to
an Read-Only Tabelspace on a busy System you no longer get an error, Oracle waits until the
ressource becomes free.
alter tablespace users read only;
alter tablespace users read write;
Transportable Tablespaces
You can use transportable tablespaces to move a subset of an Oracle
database and "plug" it in to another Oracle database, essentially moving tablespaces
between the databases. Moving data via transportable tablespaces can be much faster than
performing either an import/export or unload/load of the same data, because transporting a
tablespace only requires the copying of datafiles and integrating the tablespace structural
information. You can also use transportable tablespaces to move index data, thereby
avoiding the index rebuilds you would have to perform when importing or loading table
data.
- The source and target DB must be on the same hardware platform. For example, you can
transport tablespaces between Sun Solaris Oracle DBs, or you can transport tablespaces
between NT Oracle DBs. However, you cannot transport a tablespace from a SUN Solaris DB
to an NT DB.
- The source and target DB must have the same DB block size.
- The source and target DB must use the same character set.
- You cannot transport a tablespace to a target DB in which a tablespace with
the same name already exists.
- Currently, transportable tablespaces do not support: snapshot/replication ,
function-based indexes, Scoped REFs, domain indexes (a new type of index provided by
extensible indexing), 8.0-compatible advanced queues with multiple recipients.
Step 1: Pick a Self-contained Set of
Tablespaces
You can only transport a set of tablespaces that is self-contained. In
this context "self-contained" means that there are no references from inside the set of
tablespaces pointing outside of the tablespaces.
execute dbms_tts.transport_set_check('USERS',TRUE);
Here, transport_set_check is a PL/SQL routine in the PL/SQL package
DBMS_TTS:
PROCEDURE transport_set_check(
ts_list IN varchar2, incl_constraints IN boolean)
ts_list: List of tablespace names separated by comma
incl_constraints: TRUE: If one would like to take constraints into consideration, FALSE:
otherwise.
After invoking this PL/SQL routine, you can see all violations by
selecting from the TRANSPORT_SET_VIOLATIONS view. If the set of tablespaces is
self-contained, this view will be empty. If the set of tablespaces is not self-contained,
this view lists all the violations
select * from transport_set_violations;
Step 2: Generate a Transportable Tablespace
Set on Source DB
After identifying the self-contained set of tablespaces you want to
transport, generate a transportable set by performing the following tasks:
alter tablespace users read only;
-
Invoke the Export utility and specify which tablespaces are in the
transportable set. Although the
Export utility is used, only data dictionary structural information is exported. Hence,
this operation is
even quicker for a large tablespace.
exp userid=sys/manager transport_tablespace=y
tablespaces=users triggers=n constraints=y
grants=y file=trans_users.dmp
cd /u01/db/SOL3/usr (On Source DB)
ftp rabbit
cd /disk2/db/RAB1/usr
put SOL3_users1.dbf
alter tablespace users read write; (On Source DB)
Step 3: Plug In the Tablespace
Set
To plug in a tablespace set, perform the following tasks:
mv SOL3_users1.dbf RAB1_users1.dbf
imp userid=sys/manager transport_tablespace=y
datafiles='/u01/db/SOL3/usr/RAB1_users1.dbf'
tablespaces=users file=trans_users.dmp
alter tablespace users read write; (On Target DB)
Notes
When you specify TABLESPACES, the supplied tablespace names are compared
to those in the export file. Import returns an error if there is any mismatch. Otherwise,
tablespace names are extracted from the export file.
If you do not specify FROMUSER and TOUSER, all database objects (such as
tables and indexes) will be created under the same user as in the source database. Those
users must already exist in the target database. If not, import will return an error
indicating that some required users do not exist in the target database.
You can use FROMUSER and TOUSER to change the owners of objects. For
example, if you specify FROMUSER=dcranney,jfee TOUSER=smith, williams, objects in the
tablespace set owned by dcranney in the source database will be owned by smith in the
target database after the tablespace set is plugged in. Similarly, objects owned by jfee in
the source database will be owned by williams in the target database. In this case, the
target database does not have to have users dcranney and jfee, but must have users smith
and williams.
Partitioning Enhancements
For an in depth discussion with examples on Oracle8 and 8i Partitioning
click here.
Online Index Creation and Rebuild
Previously, when creating an index on a table there has always been a DML
S-lock on that table during the index build operation, which meant you could not perform
DML operations on the base table during the build. Now, with the ever-increasing size of
tables and necessity for continuous operations, you can create and rebuild indexes
online--meaning you can update base tables at the same time you are building or
rebuilding indexes on that table. Note, though, that there are still DML SS-locks, which
means you cannot perform other DDL operations during an online index build.
Indexes can now be created and rebuild online, without to lock the
corresponding table.
CREATE UNIQUE INDEX pk_cdr ON cdr(bkg_id) ONLINE;
ALTER INDEX pk_cdr REBUILD
STORAGE (INITIAL 1M NEXT 1M) PCTFREE 0
TABLESPACE idx
ONLINE;
Creating a Key-Compressed Index
Creating an index using key compression enables you to eliminate repeated
occurrences of key column prefix values. Append COMPRESS = i, where i = Number of
attributes in the index for Non-Unique indexes and
i = Number of attributes - 1 for Unique indexes.
CREATE INDEX emp_ename ON emp (ename)
TABLESPACE users
COMPRESS 1;
Function Based Indexes (FBI)
You can create indexes on functions and expressions that
involve one or more columns in the table being indexed. A function-based index
precomputes the value of the function or expression and stores it in the
index. You can create a function-based index as either B*-tree or bitmap
index.
Using FBI with SQL-Function
query_rewrite_enabled = true
query_rewrite_integrity = trusted
connect system/....
grant query rewrite to scott;
CREATE INDEX upper_ename_idx ON emp (UPPER(ename)) COMPUTE
STATISTICS;
ANALYZE TABLE emp COMPUTE STATISTICS FOR ALL COLUMNS;
SQL> set autotrace on explain
SQL> SELECT * FROM emp WHERE UPPER(ename) = 'KING';
Execution Plan
---------------------------------------------------------
SELECT STATEMENT Optimizer=CHOOSE (Cost=10 Card=52874)
TABLE ACCESS (BY INDEX ROWID) OF 'EMP' (Cost=10 Card=52874)
INDEX (RANGE SCAN) OF 'UPPER_ENAME_IDX' (NON-UNIQUE) (Cost=1 Card=52874)
Note to use a function-based index:
-
The table must be analyzed after the index is
created.
-
The query must be guaranteed not to need any NULL
values from the indexed expression, since NULL values are not stored in
indexes.
Using FBI with SQL-Operation
CREATE INDEX sal_comm_idx ON emp (sal + comm);
SELECT * FROM emp WHERE sal + comm < 4000;
Using FBI with PL/SQL Function
CREATE OR REPLACE FUNCTION sal_com (numSal IN NUMBER,
numCom IN NUMBER)
RETURN NUMBER DETERMINISTIC IS
sal_com NUMBER;
BEGIN
sal_com := numSal + numCom;
RETURN sal_com;
END;
/
CREATE INDEX sal_com_idx ON emp (sal_com(sal,comm)) COMPUTE
STATISTICS;
SELECT sal_com(sal,comm) FROM emp WHERE sal_com(sal,comm) < 6000;
In some cases the optimizer can use a previously calculated value rather
than executing a user-written function. This is only safe for functions that behave in a
restricted manner. The function must always return the same output return value for
any given set of input argument values.
Index only Tables and Secondary Index
Support
You can move your existing data into an index-organized table and do all
the operations you would perform in an ordinary table. There exists no real "table" in an
IOT, all the data are packed in a B*Tree Index. IOT's have NO physical
rowid, therefore a secondary index on an index-organized table cannot be based on
a physical rowid which is inherently fixed. Instead, a secondary index for an
index-organized table is based on what is called the logical rowid
(UROWID). A logical rowid has no permanent physical address and can move across
data blocks when new rows are inserted. However, if the physical location of a row changes,
its logical rowid remains valid. Use IOT when all or nearly all attributes are in
the index (Intersection Tables).
Example
In the following example, an IOT table is created which is often used by
Web text-search engines.
CREATE TABLE DocIdx (
Token VARCHAR2(20),
DocId NUMBER,
Hits NUMBER,
CONSTRAINT Pk_DocIdx PRIMARY KEY (Token, DocId))
ORGANIZATION INDEX TABLESPACE idx;
Now create the secondary Index (new in 8.1.5)
CREATE INDEX DocHitsId ON DocIdx(Hits);
Now use the logical ROWID (UROWID)
DECLARE
rid UROWID;
BEGIN
INSERT INTO DocIdx VALUES ('Or80', 2, 30)
RETURNING Rowid INTO rid;
UPDATE DocIdx SET Token='Or81'
WHERE ROWID = rid;
END;
Drop Column Support
Dropping columns lets you free space in the database by dropping columns
you no longer need, or by marking them to be dropped at a future time when the demand on
system resources is less.
ALTER TABLE emp DROP COLUMN job;
ALTER TABLE emp DROP COLUMN empno CASCADE CONSTRAINT;
ALTER TABLE verybig DROP COLUMN col CHECKPOINT 10000;
ALTER TABLE emp SET UNUSED COLUMN mgr;
ALTER TABLE emp DROP UNUSED COLUMNS;
Moving Tables to
other Tablespaces
The move table clause lets you relocate data of a nonpartitioned table
into a new segment, optionally in a different tablespace, and optionally modify any of its
storage attributes.
ALTER TABLE emp
MOVE TABLESPACE users
STORAGE (INITIAL 64K NEXT 64K) PCTFREE 0;
For an index-organized table rebuilds the
index-organized table's primary key index B*-tree. Specify ONLINE that DML operations on
the index-organized table are allowed during rebuilding of the table's primary key index
B*-tree.
ALTER TABLE iot_tab
MOVE TABLESPACE tab
STORAGE (INITIAL 64K NEXT 64K) PCTFREE 0
ONLINE;
Skip locked rows with SKIP LOCKED
Usually Oracle locks the rows for other session in a SELECT ... FOR
UPDATE statement. This behaviour can be desireable or not. Another approach offers the SKIP
LOCKED clause. This means, that only unlocked rows will be displayed for all other
sessions.
|
|
|
|
|
T1
|
update emp set sal = sal + 1
where deptno = 20;
|
|
|
T2
|
|
SELECT * FROM emp
WHERE deptno = 20;
Rows from Rollback Segment are reconstructed.
|
|
T3
|
|
select * from emp
where deptno = 20 for update;
Process 2 is waiting ... Canceled with CTRL-C
|
|
T4
|
|
select * from emp
where deptno = 20
for update skip locked;
Now now rows are selected
|
|
T5
|
|
select * from emp
where deptno in (10,20,30)
for update skip locked;
Rows for deptno 10,30 are displayed but not for deptno 20 which are
locked.
|
Resource Management
The Database Resource Manager allows the database administrator to have
more control over resource management than would normally be possible through operating
system resource management alone. Using this facility, the database administrator can:
- Guarantee groups of users a minimum amount of processing resources, regardless of the
load or number of users in other groups on the system.
- Distribute available processing resources by allocating percentages of CPU time to
different users and applications. For example, in a data warehouse, a higher priority may
be given to ROLAP applications than to batch jobs.
- Limit the degree of parallelism that a set of users can use.
- Configure an instance to use a particular plan for allocating resources. A database
administrator can dynamically change the plan, for example, from a daytime setup to a
nighttime setup, without having to shutdown and restart the instance.
Please consult the Manual Oracle8i Concepts for more Information, this
topic is too specific to present here.
Automatic Instance Registration
Database instances register themselves with the listener when
started. Prior to this release, information about the instance had to be manually
configured in the LISTENER.ORA file. Database instance registration is comprised of two
elements:
- Service registration, which provides the listener with instance information, such as
database service names and instance names.
- MTS dispatcher registration, which provides dispatcher information to the
listener
When an instance is started, initialization parameters are read from the
INITSID.ORA. One of these initialization parameters is the service name.
By default, an instance background process registers instance information to a listener on
the local machine. If a listener is started after the instance, there may be a delay before
the instance and dispatchers are registered. The instance will attempt to connect to the
listener periodically. Similarly, if a listener gets an incoming request before an instance
is registered, the listener may reject the request.
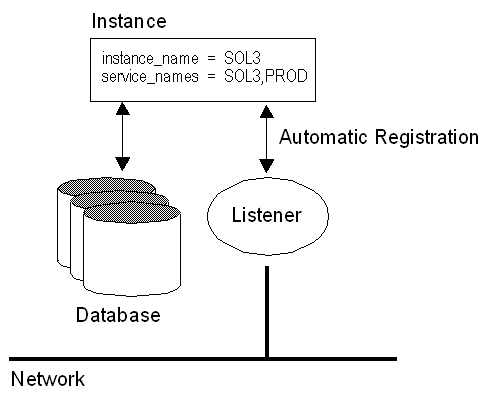
Setup initSID.ora
### Automatic Instance Registration
### -------------------------------
# Service registration, which provides the listener with instance information
# such as database service names and instance names.
instance_name = SOL3
service_names = SOL3,PROD
Setup TNSNAMES.ORA
### NetService Descriptor in TNSNAMES.ORA
### -------------------------------------
# NetService in TNSNAMES.ORA replaces SID Parameter used
# in Oracle7 and Oracle8 Releases. NetService is defined as follows:
# NetService = <service_names from initSID.ora>.<db_domain>
SOL3.WORLD =
(DESCRIPTION =
(ADDRESS = (PROTOCOL = TCP)(HOST = quorum)(PORT = 1523))
(CONNECT_DATA = (SERVICE_NAME =
SOL3.WORLD))
)
Load Balancing and Client Failover
Instance registration enables connection load balancing. Connection load
balancing balances the number of active connections among various instances and dispatchers
for the same service. This enables listeners to make their routing decisions based on how
many connections each dispatcher has and on how loaded the nodes that the instances
run.
Connection load balancing evenly distributes the number of active
connections among various instances and dispatchers for the same service.
The load of a instance and dispatcher is determined by the number of connections.
Connection load balancing is only enabled for an MTS environment.
Example: Connection Load Balancing with Failover for two Listeners in an Oracle 8i
Environment
SOL3.WORLD =
(DESCRIPTION =
(LOAD_BALANCE = ON)
(FAILOVER = ON)
(ADDRESS = (PROTOCOL = TCP)(HOST =
161.72.194.130)(PORT = 1521))
(ADDRESS = (PROTOCOL = TCP)(HOST =
161.72.194.131)(PORT = 1521))
(CONNECT_DATA =
(SERVICE_NAME = SOL3.WORLD)
)
)
New Service Name Concept
Up to Oracle 8, the client was configured with the
Oracle System Identifier (SID) of a database instance. This SID was then passed to the
listener. The listener would then verify this information and permit or deny a connection.
The SID was also used internally by the database as pointer to the System Global Area
(SGA). While a SID identified a database instance, it did not identify a database. This
limitation caused a database to have no more than one service associated with it.
In Oracle 8.1 multiple instances are supported, using
the following new parameters in connect descriptors: SERVICE_NAME is
typically the global database name, a name comprised of the database name and
domain name, entered during installation or database creation.
INSTANCE_NAME is typically the SID entered during installation or database
creation. INSTANCE_NAME is optional, representing the name of instance and is used to
uniquely identify a specific instance when multiple instances (Parallel Server) share
common services names. INSTANCE_NAME should not be confused with the SID,
which actually uniquely identifies the instances shared memory on a host.
SOL3.world =
(DESCRIPTION =
(ADDRESS =
(COMMUNITY = tcp.world) (PROTOCOL = tcp) (HOST =
badile) (PORT = 1523)
)
(CONNECT_DATA =
(SID = SOL3) (GLOBAL_NAME = SOL3.world)
)
)
SOL3.WORLD =
(DESCRIPTION =
(ADDRESS =
(PROTOCOL = tcp)(HOST = badile)(PORT = 1523)
)
(CONNECT_DATA =
(SERVICE_NAME = SOL3.WORLD)
(INSTANCE_NAME = SOL3) #
Optional
)
)
DB_DOMAIN
DB_DOMAIN in the initialization file (INITSID.ORA) no longer has a
default setting of .WORLD. The new setting is NULL. Therefore, service names do not need to
include the domain, if the default setting is used. In prior releases of Oracle, the
default setting was .WORLD.
- If DB_DOMAIN is set to NULL, the service name does not need to be
domain-qualified.
- If the DB_DOMAIN is not set to NULL, ensure the service name you enter
includes the domain. For example, if an Oracle8i database has a service
name of SOL3 and a domain of AKADIA.COM, you specify a service name of SOL3.AKADIA.COM to
identify the service.
Setup initSID.ora
db_domain = AKADIA.COM
service_names = SOL3
Setup TNSNAMES.ORA
SOL3.WORLD =
(DESCRIPTION =
(ADDRESS = (PROTOCOL = TCP)(HOST = quorum)(PORT = 1523))
(CONNECT_DATA = (SERVICE_NAME =
SOL3.AKADIA.COM))
)
Java Support
Prior to this release, Net8 only supported connections that used the
Two-Task Common (TTC) presentation layer and Transparent Network Substrate
(TNS) Network session (NS) layer to establish client
connections.
The Java option allows customers to program the database server using
traditional database stored procedures, Enterprise JavaBeans and CORBA Servers. To support
clients accessing Enterprise JavaBeans and CORBA Servers in the database, the presentation
layer and session layer support have been expanded.
Clients access EJBs and CORBA Servers in the database via the
Inter-Orb Protocol (IIOP) protocol. To support IIOP, the database must be
configured in MTS mode with the General Inter-Orb Protocol (GIOP)
presentation protocol. (IIOP is an implementation of GIOP over TCP/IP).
Oracle8i provides a GIOP service implementation. The Oracle8i Java VM is a session-oriented
Java VM. This means that each session in the database effectively gets its own VM as a
private server.
More Information can be found in the Original Oracle Documentation:
Oracle8i Enterprise JavaBeans and CORBA Developer's Guide,
Oracle8i Java Stored Procedures Developer's Guide and Net8
Documentation.
Net8 Configuration Assistant
The Net8 Configuration Assistant is post-installation tool that performs
basic configuration. After installation, it automatically configures default configuration
files. In addition, the Net8 Configuration Assistant may be run in stand-alone mode to
configure various elements of configuration, including the:
Start Net8 Configuration Assistant:
$ DISPLAY=<X-Window-Host:0.0>
$ export DISPLAY
$ netasst
SQL*Plus replaces SVRMGRL
Oracle has announced, that SVRMGRL (Server Manager) will be replaced with
SQL*PLus. In Oracle 8.1 you can now use all DBA commands as in SVRMGRL.
sqlplus /nologin
SQL> connect sys/manager as sysdba;
SQL> archive log list;
SQL> show sga;
SQL> show parameters;
SQL> recover database;
SQL> shutdown immediate;
SQL> startup;
....
Export / Import to / from several files
Export supports writing to multiple export files and Import can
read from multiple export file, you can specify multiple filenames to be used.
When Export reaches the value you have specified for the maximum FILESIZE, Export stops
writing to the current file, opens another export file with the next name specified by the
parameter FILE and continues until complete or the maximum value of FILESIZE is again
reached. If you do not specify sufficient export filenames to complete the export, Export
will prompt you to provide additional filenames. If you specify a value (byte limit) for
the FILESIZE parameter, Export will write only the number of bytes you specify to each dump
file. Specify the filesize in (B)ytes, (K)Bytes, (M)Bytes or (G)Bytes. Of course, IMP is
able to import these files again.
exp system/manager full=y file=full1.dmp,full2.dmp
filesize=500K
Export combined with a query
The new QUERY parameter allows you to select a subset of rows from a set
of tables when doing a table mode export. The value of the query parameter is a string that
contains a WHERE clause for a SQL select statement which will be applied to all tables (or
table partitions) listed in the TABLE parameter.
For example, if user SCOTT wants to export only those employees whose job
title is SALESMAN and whose salary is greater than 1600, he could do the following (note
that this example is Unix-based):
exp scott/tiger tables=emp query=\"where job=\'SALESMAN\' and
sal\<1600\"
Note
Since the value of the QUERY parameter contains blanks, most operating
systems require that the entire strings where job=\'SALESMAN\' and
sal\<1600 be placed in double quotes or marked as a literal by some method.
Also note that operating system reserved characters need to be escaped as are single
quotes, double quotes and '<' in the Unix example above.
Export / Import with Optimizer
Statistics
In some cases, Export will place the precomputed statistics in the export
file as well as the ANALYZE commands to regenerate the statistics.
However, the precomputed optimizer statistics will NOT BE
USED at export time if:
- A table has indexes with system generated names (including
LOB indexes)
- A table has columns with system generated names
- There were row errors while exporting
- The client character set or NCHARSET does not match server
character set or NCHARSET
- You have specified a QUERY clause
- Only certain partitions or subpartitions are to be
exported
- Tables have indexes based upon constraints that have been
analyzed
- Tables have indexes with system generated names that have
been analyzed
However, specifying ROWS=N does not
preclude saving the precomputed statistics in the Export file. This allows
you to tune plan generation for queries in a non-production database using
statistics from a production database.
exp scott/tiger file=emp.dmp tables=\(emp\)
statistics=compute
If statistics are requested at Export time and analyzer statistics are
available for a table, Export will place the ANALYZE command to recalculate the statistics
for the table into the dump file. In certain circumstances, Export will also write the
precalculated optimizer statistics for tables, indexes, and columns to the dump file.
Use precalculated optimizer statistics in dump file:
imp scott/tiger analyze=y recalculate_statistics=n
file=emp.dmp
Recalculate optimizer statistics with ANALYZE when importing:
imp scott/tiger analyze=y recalculate_statistics=y
file=emp.dmp
Do not use any optimizer statistics:
imp scott/tiger analyze=n file=emp.dmp
Materialized Views for Data Warehouses
Materialized views are used in warehouses to increase the speed of
queries on very large databases. Queries to large databases often involve
joins between tables or aggregations such as SUM, or
both. These operations are very expensive in terms of time and processing power.
The following queries make use of MVIEWS:
- Aggregation on a single table
- Joins between tables
- Aggregations and Joins
The following query don't use MVIEWS:
Materialized view can be used to replicate data, which
was formerly achieved by using the CREATE SNAPSHOT command. Now CREATE MATERIALIZED
VIEW is a synonym for CREATE SNAPSHOT.
Materialized views improve query performance by precalculating expensive
join and aggregation operations on the database prior to execution time
and storing these results in the database. The query optimizer can make
use of materialized views by automatically recognizing when an existing
materialized view can and should be used to satisfy a request. It then
transparently rewrites the request to use the materialized view (Query
Rewrite). Queries are then directed to the materialized view and not to the underlying
detail tables or views. Rewriting queries to use materialized views rather than detail
relations results in a significant performance gain.
Privileges:
SQL> grant query rewrite to scott;
SQL> grant create materialized view to scott;
SQL> alter session set query_rewrite_enabled = true;
Set in initSID.ora:
optimizer_mode = choose
job_queue_interval = 3600
job_queue_processes = 1
query_rewrite_enabled = true
query_rewrite_integrity = enforced
Create the Materialized View:
CREATE MATERIALIZED VIEW emp_sum
ENABLE QUERY REWRITE
AS SELECT deptno,job,SUM(sal)
FROM emp
GROUP BY deptno,job;
Create Optimizer Statistics and Refresh Materialized
View:
execute dbms_utility.analyze_schema('SCOTT','ESTIMATE');
execute dbms_mview.refresh('emp_sum');
Test the Materialized View:
set autotrace on explain
SELECT deptno,SUM(sal)
FROM emp
GROUP BY deptno,job;
Execution Plan
-----------------------------------
0 SELECT STATEMENT Optimizer=CHOOSE
1 0 TABLE ACCESS (FULL) OF 'EMP_SUM'
Create the Materialized View:
CREATE MATERIALIZED VIEW emp_dept_sum
ENABLE QUERY REWRITE
AS SELECT dname,job,SUM(sal)
FROM emp e, dept d
WHERE e.deptno = e.deptno
GROUP BY dname,job;
Create Optimizer Statistics and
Refresh Materialized View:
execute dbms_utility.analyze_schema('SCOTT','ESTIMATE');
execute dbms_mview.refresh('emp_dept_sum');
Test the Materialized View:
set autotrace on explain
SELECT dname,job,SUM(sal)
FROM emp e, dept d
WHERE e.deptno = e.deptno
GROUP BY dname,job;
Execution Plan
----------------------------------------
0 SELECT STATEMENT Optimizer=CHOOSE
1 0 TABLE ACCESS (FULL) OF 'EMP_DEPT_SUM'
Refreshing Materialized Views (MVIEWS)
When creating a materialized view, you have the option of specifying
whether the refresh occurs manually (ON DEMAND) or
automatically (ON COMMIT, DBMS_JOB).
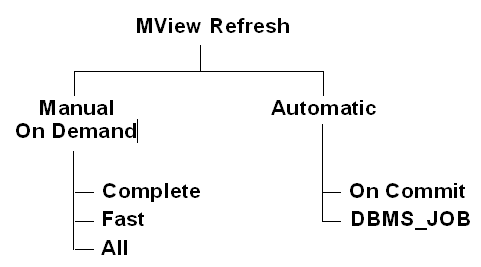
To use the fast warehouse refresh facility, the ON DEMAND mode must be
specified, then the materialized view can be refreshed by calling one of the procedures in
DBMS_MVIEW.
MVIEW manual Refresh with DBMS_MVIEW
The DBMS_MVIEW package provides three different types of refresh
operations.
-
DBMS_MVIEW.REFRESH
Refresh one or more materialized views
-
DBMS_MVIEW.REFRESH_ALL_MVIEWS
Refresh all materialized views
-
DBMS_MVIEW.REFRESH_DEPENDENT
Refresh all table-based materialized views that depend on a specified detail table or
list of detail tables
A complete refresh occurs when the materialized view is initially
defined, unless it references a prebuilt table and complete refresh may be requested at any
time during the life of the materialized view. Since the refresh involves reading the
detail table to compute the results for the materialized view, this can be a very
time-consuming process, especially if there are huge amounts of data to be read
and processed.
CREATE MATERIALIZED VIEW emp_dept_sum
ENABLE QUERY REWRITE
AS SELECT dname,job,SUM(sal)
FROM emp e, dept d
WHERE e.deptno = e.deptno
GROUP BY dname,job;
EXECUTE DBMS_MVIEW.REFRESH('emp_dept_sum');
If you specify REFRESH FAST (only deltas performed by UPDATE, INSERT,
DELETE on the base tables will be refreshed), Oracle performs further verification of the
query definition to ensure that fast refresh can always be performed if any of the detail
tables change. These additional checks include:
- A materialized view log must be present for each detail table.
- The rowids of all the detail tables must appear in the SELECT list of the MVIEW query
definition.
- If there are outer joins, unique constraints must be on the join columns of the inner
table.
Create the MVIEW Log(s)
CREATE MATERIALIZED VIEW LOG ON emp
WITH ROWID;
CREATE MATERIALIZED VIEW LOG ON dept
WITH ROWID;
- Create the Refresh Fast MVIEW
CREATE MATERIALIZED VIEW emp_dept_sum
REFRESH FAST
ENABLE QUERY REWRITE
AS SELECT dname,job,SUM(sal)
FROM emp e, dept d
WHERE e.deptno = e.deptno
GROUP BY dname,job;
- Execute the manual fast Refresh
EXECUTE DBMS_MVIEW.REFRESH('emp_dept_sum','F');
F = Fast Refresh
C = Complete Refresh
MVIEW automatic Refresh with
DBMS_JOB
Instead of using DBMS_MVIEW you can automtically refresh the MVIEW
(Snapshot) using Oracle DBMS_JOB Management. Note, that the CREATE SNAPSHOT is now a
synonym for CREATE MATERIALIZED VIEW.
CREATE MATERIALIZED VIEW emp_dept_sum
PCTFREE 5
PCTUSED 60
NOLOGGING PARALLEL 5
TABLESPACE users
STORAGE (INITIAL 50K NEXT 50K)
USING INDEX STORAGE (INITIAL 25K NEXT 25K)
REFRESH FAST
START WITH SYSDATE
NEXT SYSDATE + 1/12
ENABLE QUERY REWRITE AS
SELECT dname,job,SUM(sal)
FROM emp e, dept d
WHERE e.deptno = e.deptno
GROUP BY dname,job;
Check the generated Job
SELECT SUBSTR(job,1,4) "Job", SUBSTR(log_user,1,5) "User",
SUBSTR(schema_user,1,5) "Schema",
SUBSTR(TO_CHAR(last_date,'DD.MM.YYYY HH24:MI'),1,16) "Last Date",
SUBSTR(TO_CHAR(next_date,'DD.MM.YYYY HH24:MI'),1,16) "Next Date",
SUBSTR(broken,1,2) "B", SUBSTR(failures,1,6) "Failed",
SUBSTR(what,1,20) "Command"
FROM dba_jobs;
Job User Schem Last Date
Next Date B
Fail Command
---- ----- ----- ---------------- ---------------- - ---- --------------------
90 SCOTT SCOTT 28.01.2000 11:33 28.01.2000 13:33 N 0
dbms_refresh.refresh
Automatic Fast Refresh of Materialized
Views
This is completly new in Oracle8i, so far it was possible to refresh a
snapshot with DBMS_JOB in a short interval according the snaphot log. With Oracle 8i, it's
possible to refresh automatically on the next COMMIT performed at the
master table. This ON COMMIT refreshing can be used with
materialized views on single table aggregates and materialized views containing joins only.
ON COMMIT mview logs must be build as ROWID logs, not as primary key logs. For performance
reasons, it's best to create indexes on the ROWID's of the MVIEW. The underlaying table for
the MVIEW can be prebuilt.
Example
1. Create ROWID Materialized View Log's.
DROP MATERIALIZED VIEW LOG on emp;
CREATE MATERIALIZED VIEW LOG ON emp
WITH ROWID;
DROP MATERIALIZED VIEW LOG on dept;
CREATE MATERIALIZED VIEW LOG ON dept
WITH ROWID;
2. Prebuild the table for the Materialized View
CREATE TABLE empdep AS
SELECT empno, ename, dname, loc,
e.rowid emp_rowid,
d.rowid dep_rowid
FROM emp e, dept d
WHERE e.deptno = d.deptno;
3. Create Indexes on prebuilt table for performance reasons
CREATE UNIQUE INDEX emprowid
ON empdep (emp_rowid);
CREATE INDEX deprowid
ON empdep (dep_rowid);
CREATE UNIQUE INDEX empdep
ON empdep (empno);
4. Create the REFRESH FAST ON COMMIT Materialized View
CREATE MATERIALIZED VIEW empdep
ON PREBUILT TABLE
REFRESH FAST ON COMMIT
ENABLE QUERY REWRITE
AS SELECT empno, ename, dname, loc,
e.rowid emp_rowid,
d.rowid dep_rowid
FROM emp e, dept d
WHERE e.deptno = d.deptno;
Calculate multiple levels of subtotals
with ROLLUP
ROLLUP enables a SELECT statement to calculate multiple levels of
subtotals across a specified group of dimensions. It also calculates a grand total. ROLLUP
is a simple extension to the GROUP BY clause, so its syntax is extremely easy to use.
Example
SELECT deptno,job,count(*),sum(sal)
FROM emp
GROUP BY ROLLUP(deptno,job);
DEPTNO JOB
COUNT(*) SUM(SAL)
--------- --------- --------- ---------
10 CLERK
1
1300
10 MANAGER
1
2450
10 PRESIDENT
1 5000
10
3 8750
20 ANALYST
2
6000
20 CLERK
2
1900
20 MANAGER
1
2975
20
5 10875
30 CLERK
1
950
30 MANAGER
1
2850
30 SALESMAN
4
5600
30
6 9400
14 29025
Create cross-tabular reports with CUBE
CUBE enables a SELECT statement to calculate subtotals for all possible
combinations of a group of dimensions. It also calculates a grand total. This is the set of
information typically needed for all cross-tabular reports, so CUBE can calculate a
cross-tabular report with a single SELECT statement.
SELECT deptno,job,count(*),sum(sal)
FROM emp
GROUP BY CUBE(deptno,job);
DEPTNO JOB
COUNT(*) SUM(SAL)
--------- --------- --------- ---------
10 CLERK
1
1300
10 MANAGER
1
2450
10 PRESIDENT
1
5000
10
3 8750
20 ANALYST
2
6000
20 CLERK
2
1900
20 MANAGER
1
2975
20
5 10875
30 CLERK
1
950
30 MANAGER
1
2850
30 SALESMAN
4
5600
30
6 9400
ANALYST
2
6000
CLERK
4
4150
MANAGER
3
8275
PRESIDENT
1
5000
SALESMAN
4
5600
14 29025
GROUPING Function with ROLLUP and CUBE
Two challenges arise with the use of ROLLUP and CUBE. First, how can we
programmatically determine which result set rows are subtotals, and how do
we find the exact level of aggregation of a given subtotal? We will often need to use
subtotals in calculations such as percent-of-totals, so we need an easy way to determine
which rows are the subtotals we seek. Second, what happens if query results contain
both stored NULL values and "NULL" values created by a ROLLUP or CUBE? How does an
application or developer differentiate between the two?
To handle these issues, Oracle 8i introduces a new function called
GROUPING. Using a single column as its argument, Grouping returns 1 when
it encounters a NULL value created by a ROLLUP or CUBE operation. That is, if the NULL
indicates the row is a subtotal, GROUPING returns a 1. Any other type of value, including a
stored NULL, will return a 0.
- GROUPING = 0 is a stored NULL not created by ROLLUP or CUBE
- GROUPING = 1 is a NULL value created by ROLLUP or CUBE
SELECT deptno,job,count(*),sum(sal),
GROUPING(Job)
FROM emp
GROUP BY ROLLUP(deptno,job);
DEPTNO JOB
COUNT(*) SUM(SAL) GROUPING(JOB)
--------- --------- --------- --------- -------------
10 CLERK
1
1300
0
10 MANAGER
1
2450
0
10 PRESIDENT
1 5000
0
10
1 1000
0
10
4 9750
1 <==
Aggregat
20 ANALYST
2
6000
0
20 CLERK
2
1900
0
20 MANAGER
1
2975
0
20
5 10875
1
30 CLERK
1
950
0
30 MANAGER
1
2850
0
30 SALESMAN
4
5600 0
30
6 9400
1 <==
Aggregat
15 30025
1 <==
Aggregat
SELECT deptno,count(*),sum(sal)
FROM emp
GROUP BY ROLLUP(deptno,job)
HAVING GROUPING(job) = 1;
DEPTNO COUNT(*) SUM(SAL)
--------- --------- ---------
10 4
9750
20 5
10875
30 6
9400
15 30025
SELECT DECODE (GROUPING(dname),1,'All
Departements',dname) AS Departement,
DECODE (GROUPING(job),1,'All
Jobs',job) AS Job,
COUNT(*), SUM(sal)
FROM emp e, dept d
WHERE e.deptno = d.deptno
GROUP BY ROLLUP(dname,job);
DEPARTEMENT JOB
COUNT(*) SUM(SAL)
---------------- --------- --------- ---------
ACCOUNTING CLERK
1
1300
ACCOUNTING MANAGER
1 2450
ACCOUNTING PRESIDENT
1 5000
ACCOUNTING
1 1000
ACCOUNTING All Jobs
4 9750
RESEARCH ANALYST
2 6000
RESEARCH CLERK
2
1900
RESEARCH MANAGER
1 2975
RESEARCH All Jobs
5 10875
SALES CLERK
1
950
SALES MANAGER
1 2850
SALES SALESMAN
4 5600
SALES All Jobs
6 9400
All Departements All Jobs 15
30025
Top-n / Bottom-n Queries
Top-N queries ask for the n largest or smallest values of a column.
Never use ROWNUM and ORDER BY together, because Oracle first fetch the
rows according ROWNUM and then sort these found rows, this is of course not what we really
want !
Oracle8i now offers ORDER BY in Views and Inline Views, due to this, it's
easy to implement a Top-n query.
SELECT * FROM emp
WHERE ROWNUM < 6
ORDER BY sal DESC;
EMPNO ENAME JOB
MGR HIREDATE
SAL COMM
DEPTNO
--------- ---------- --------- ------ --------- --------- --------- ---------
7566 JONES MANAGER
7369 02-APR-81 2975
20
7499 ALLEN SALESMAN
7369 20-FEB-81 1600
300 30
7521 WARD SALESMAN
7369 22-FEB-81 1250
500 30
7654 MARTIN SALESMAN 7521
28-SEP-81 1250
1400 30
7369 SMITH CLERK
7369 17-DEC-80 800
20
CREATE OR REPLACE VIEW emporder
AS SELECT * FROM emp
ORDER BY sal DESC;
SELECT * FROM emporder
WHERE ROWNUM < 6;
EMPNO ENAME JOB
MGR HIREDATE
SAL COMM
DEPTNO
--------- ---------- --------- ------ --------- --------- --------- ---------
7839 KING PRESIDENT
17-NOV-81 5000
10
7788 SCOTT ANALYST
7521 09-DEC-82 3000
20
7902 FORD ANALYST
7521 03-DEC-81 3000
20
7566 JONES MANAGER
7369 02-APR-81 2975
20
7698 BLAKE MANAGER
7521 01-MAY-81 2850
30
SELECT * FROM (SELECT * FROM emp ORDER BY sal DESC)
WHERE ROWNUM < 6;
EMPNO ENAME JOB
MGR HIREDATE
SAL COMM
DEPTNO
--------- ---------- --------- ------ --------- --------- --------- ---------
7839 KING PRESIDENT
17-NOV-81 5000
10
7788 SCOTT ANALYST
7521 09-DEC-82 3000
20
7902 FORD ANALYST
7521 03-DEC-81 3000
20
7566 JONES MANAGER
7369 02-APR-81 2975
20
7698 BLAKE MANAGER
7521 01-MAY-81 2850
30
|