|
 Sizing of Locally Managed
Tablespaces Sizing of Locally Managed
Tablespaces
More and more we are using locally managed tablespaces. They offer
a large amount of benefits, so why should we not use this new feature?
Some thoughts are needed when you decided to use Uniform Extent
Allocation. With the uniform method, you specify an extent size when you create the
tablespace, and all extents for all objects created within that tablespace will be that
size.
The uniform method also provides an enforcement mechanism, because you
can’t override the uniform extent size of locally managed tablespaces when you create
a schema object such as a table or an index.
The goal is to allocate as much disk space as really needed and as really
used. With the uniform extent allocation you can calculate or even estimate the number of
extents you want to allocate. Gaps or unused disk space within the tablespace should be
avoided.
Lets assume that we create a tablespace with the uniform extent size of 1
MByte and 10 extents. Remember that locally managed tablespaces will use another 64 KBytes
or the Header Bitmap:
10 * 1 * 1024K + 64K = 10304K
Note that all calculations are made in KBytes and that your chosen extent
size is the multiple of your defined block size. The following statement creates this
locally managed tablespace with a uniform extent size of 1 MByte:
CREATE TABLESPACE uni_test
DATAFILE ‘C:\Oradata\ASU1\tab\uni_test.dbf’
SIZE 10304K
EXTENT MANAGEMENT LOCAL UNIFORM SIZE 1024K;
Now every object created within the newly created tablespace gets its
uniform extent size of 1 MByte:
CREATE TABLE tab_1 (
num NUMBER
) TABLESPACE uni_test;
CREATE TABLE tab_2 (
num NUMBER,
text VARCHAR2(255)
) TABLESPACE uni_test
STORAGE
(INITIAL 100K
NEXT
100K
MINEXTENTS 1
MAXEXTENTS UNLIMITED
PCTINCREASE 0);
CREATE TABLE tab_3 (
num NUMBER,
text VARCHAR2(255),
create_date DATE
) TABLESPACE uni_test
STORAGE
(MINEXTENTS 2
MAXEXTENTS UNLIMITED
PCTINCREASE 0);
If you are including a STORAGE clause when you create tables or indexes,
Oracle will allocate as much extents as you indicate to use. Table TAB_1 will be allocated
with one extent, table TAB_2 too because you need at least 100 KBytes. Table TAB_3 will be
created with two extents. This could also be done by defining an INITIAL value of 2
MBytes.
The allocated blocks and extents can be verified using the view
DBA_SEGMENTS:
SELECT segment_name, segment_type, blocks, extents
FROM dba_segments
WHERE owner = 'TEST'
ORDER BY EXTENTS
/
SEGMENT_NAME
SEGMENT_TYPE
BLOCKS EXTENTS
-------------------- ------------------ ---------- ----------
TAB_1
TABLE
256 1
TAB_2
TABLE
256 1
TAB_3
TABLE
512 2
The free space in the tablespace UNI_TEST can be verified using the view
DBA_FREE_SPACE:
SELECT tablespace_name, bytes, blocks
FROM dba_free_space
WHERE tablespace_name = 'UNI_TEST'
/
TABLESPACE_NAME
BYTES BLOCKS
------------------------------ ---------- ----------
UNI_TEST
6291456 1536
That means in the tablespace UNI_TEST are still 1536 blocks available.
How many extents are these blocks? This can be calculated by multiplying the number of
available blocks by the block size and divided by the extent size:
1536 * 4K / 1024K = 6 extents
That fits with our calculations and verifications: 4 extents are already
used and another 6
extents could be used to fill up the whole tablespace.
If you check the physical file size used for the tablespace UNI_TEST you
will be surprised: Instead of the calculated 10304 KBytes (10'551'296 Bytes) you will find
the disk file’s size of 10'555'392 Bytes. Oracle allocates another block which can
not be used for object allocation. Some of the Oracle tools such as the Tablespace Manger
shows the total number of blocks according to the disk file size. In our example this are
2577 blocks, but usable are only 2576 blocks minus 64 KBytes (for header bitmap).
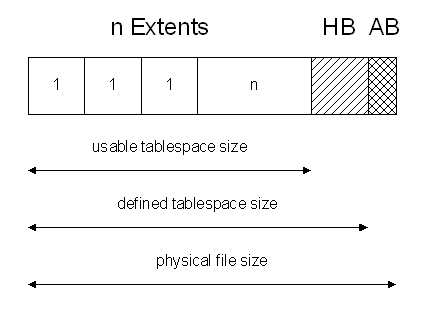
Keep the following rules in mind during the sizing of tablespaces:
-
Each extent size is the multiple of your defined block size.
-
The usable tablespace size is the multiple of your estimated number
of extents.
-
The defined tablespace size used during CREATE TABLESPACE statement
adds 64
KBytes for the header bitmap (HB) to the usable tablespace size.
-
The physical file size adds one block (AB) to the defined tablespace
size.
Oracle8i: How to migrate LONG RAW to
BLOB
In Oracle8i BLOB's (Binary Large Objects) can be used instead of
LONG RAW's to store binary unformatted data, like documents, images, audio and video. On
the new BLOB data type many of the former LONG RAW restrictions are not valid anymore and
up to 4GB can be stored. This tip shows how to migrate LONG RAW columns to BLOB's.
It is worth to create a separate tablespace for the LOB's bigger contents
to gain performance. The tables containing LOB columns can be stored together with other
tables in a tablespace (called tab in this sample). However
the LOB columns referencing their data in a separate tablespace (called btab here).
CREATE TABLESPACE btab
DATAFILE '.../lob/POR1_lob1.dbf' SIZE 512064K REUSE
AUTOEXTEND ON NEXT 10M MAXSIZE UNLIMITED
EXTENT MANAGEMENT LOCAL UNIFORM SIZE 256K
PERMANENT
ONLINE;
A new table must be created that contains the new BLOB column. Even if it
is possible to add a BLOB column to an existing table we cannot migrate old LONG RAW data
in it. The required SQL function TO_LOB can be used
in SELECT subqueries of INSERT statements only.
Lets assume the old table docs looks like this...
id NUMBER(10) NOT
NULL
bdata LONG RAW NULL
... we create the new one:
CREATE TABLE newdocs (
id NUMBER(10) CONSTRAINT
nn_newdocs_id NOT NULL,
bdata
BLOB DEFAULT
empty_blob() NULL
)
PCTFREE 5
PCTUSED 40
INITRANS 1
MAXTRANS 255
TABLESPACE tab STORAGE (
INITIAL
500K
NEXT 500K
MINEXTENTS 1
MAXEXTENTS UNLIMITED
PCTINCREASE 0
FREELISTS 1
)
LOB (bdata) STORE AS (
TABLESPACE btab
STORAGE (INITIAL 100M NEXT 100M PCTINCREASE
0)
CHUNK 50
PCTVERSION 10
NOCACHE LOGGING
);
LOB's in general do not use rollback segments. To maintain read
consistency Oracle creates new LOB page versions every time a lob changes.
PCTVERSION is the percentage of all used LOB data space that can be occupied by old
versions of LOB data pages. As soon as old versions of LOB data pages start to occupy more
than the PCTVERSION amount of used LOB space, Oracle tries to reclaim the old versions and
reuse them. In other words, PCTVERSION is the percent of used LOB data blocks that is
available for versioning old LOB data. The PCTVERSION can be set to the percentage of LOB's
that are occasionally updated. If LOB's are inserted once and afterwards usually read only,
0% can be used.
If CACHE is specified Oracle places LOB pages in the buffer cache
for faster access. NOCACHE can be used if there are occasionally no writes to stored LOB's
and infrequently reads only. CACHE READ is good for busy read operations and infrequent
writes.
Set CHUNK to the number of blocks of LOB data that will be
accessed at one time. This reduces network roundtrip overheads. The INITIAL and NEXT
storage parameters must be greater than CHUNK * DB_BLOCK_SIZE size. Use bigger CHUNK's if
possible.
The default setting ENABLE STORAGE IN ROW stores LOB's less than
4KB within the table and greater LOB's are automatically moved out of the row. This is the
recommended setting. DISABLE STORAGE IN ROW can be used to store all data outside the rows.
A lot of small LOB's within a table can decrease performance of table operations like full
table scans or multi-row accesses.
Consider that CHUNK and ENABLE/DISABLE STORAGE IN ROW cannot be altered
after table creation.
Finally we can use the following SQL statement to migrate the data from
the old to the new table:
INSERT INTO newdocs (id, bdata)
SELECT id, TO_LOB(bdata)
FROM docs;
To copy the data is easy. The SQL function TO_LOB( ) can be used
to convert LONG RAW to BLOB. It's also possible to convert LONG to CLOB if required. The
main thing of the whole data migration is to choose good storage parameter settings
especially if a large number and large LOB's in size need to be stored.
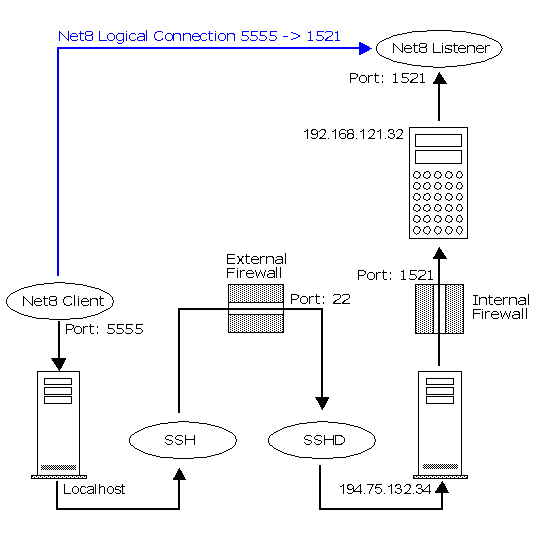
Net8 access trough a
firewall with port forwarding using SSH
One option for secure communication between the Net8 client
and server is to tunnel the communication inside the Secure Shell
protocol.
Conceptually, it works like this. First, you install an SSH
client on the local machine where you run your Net8 client. You use the SSH client to
establish an SSH connection to the remote host where the Net8 server is running. You also
use the SSH client to establish a "listen" on a local port for Net8 requests.
Here's the cool part: when you fire up your Net8 client, it
connects to the Net8 port on localhost - your machine - instead of connecting to port 143
on a remote server machine.
The SSH client then forwards everything it receives on the
local Net8 port through the SSH session, or tunnel, to the remote SSH daemon, which then
forwards the data to the Net8 port on the remote host.
How does the SSH daemon on the receiving end know what to do
with all this Net8 information coming at it? Well, the information is part of the
port-forwarding arrangement you gave the daemon when you first fired up the SSH
session. For example, you'd invoke SSH from your unix client machine like this
$ ssh -f -L localport:remotehost:remoteport tail -f
/dev/null
Tfhe command must be invoked as root because root privilege
is required to set up port forwarding. The -f option tells SSH to run in the
background after port forwarding has been established. -L
localport:remotehost:remoteport specifies that the given port on the local (client)
host is to be forwarded to the given host and port on the remote side. In our example, we
use port 5555 on the client and port 1521 on the database server 192.168.121.32
The server port must be whichever port listens for Net8
requests (1521 on most systems). Depending on the SSH client, you'll either be prompted for
your password to log in to the SSHD 194.75.132.34 server when issuing the tunneling
command, or you'll have to initiate a login manually to establish the session, In all
cases, you'll have to use SSH to log in to the remote host before you can use it to
"launder" your connection. The entire Net8 port-forwarding scenario is shown in the next
figure.
Example
We start by using lsof (list open files), a program that tells you which open
files and network connections belong to which processes. to check for software listening at
local TCP port 5555. There is none. We confirm this by trying to telnet to localhost
at port 555 without success.
$ lsof -i tcp:5555
$ telnet localhost
5555
At this point, we're certain that there's no activity, such
as a listen or an open connection, on port 555 on our local machine. That port is okay to
use. Next, we set up the port forwarding by issuing an SSH command. Remember that you have
to be root to set up port forwarding:
$ su -
$ ssh -f -L 5555:192.168.121.32:1521
194.75.132.34 tail -f /dev/null
$ ps -ef
The tail -f /dev/null that we tacked on the end of
the SSH command is just a low-overhead command to keep the session open. We didn't want to
keep an actual shell session open and running in the background when we didn't need it, so
we used the tail command instead. You can verify with ps -ef, that the
command is now running in the background and you now have a permanent Net8 connection
through two firewalls -- cool isn't it?
Next you have to setup your TNSNAMES.ORA configuration file,
then check the connection with tnsping and finally connect with sqlplus.
ORA1.WORLD =
(DESCRIPTION =
(ADDRESS_LIST =
(ADDRESS = (PROTOCOL = TCP)(HOST = localhost)(PORT
= 5555))
)
(CONNECT_DATA =
(SERVICE_NAME = ORA1.WORLD)
(SRVR = DEDICATED)
)
)
$ tnsping ORA1
$ sqlplus scott/tiger@ORA1
Automatically Calculating
Percentages in Queries
Starting with Release 7.1 of Oracle, users have had access to a feature
called an inline view. An inline view is a view within a query. Using this feature, you can
easily accomplish your task.
Example: Show percentage of salaries for each department
Every row in the report must have access to the total sum of sal. You can
simply divide sum (sal) by that total, and you'll have a number that represents the
percentage of the total.
column percentage format 99.9
select deptno, sum(sal),sum(sal)/tot_sal*100 "PERCENTAGE"
from emp, (select sum(sal) tot_sal from emp)
group by deptno, tot_sal;
DEPTNO SUM(SAL) PERCENTAGE
---------- ---------- ----------
10
8750 30.1
20
10875 37.5
30
9400 32.4
With Oracle8i Release 2 (8.1.6 and higher), you can calculate percentages
by using the new analytic functions as well. The query using an analytic function might
look like this:
column percentage format 99.9
select deptno, sum(sal), (ratio_to_report(sum(sal)) over())*100 "PERCENTAGE"
from emp
group by deptno;
DEPTNO SUM(SAL) PERCENTAGE
---------- ---------- ----------
10
8750 30.1
20
10875 37.5
30
9400 32.4
The query produces the same answer—but it does so more efficiently,
because it does not have to make two passes over the data to arrive at the answer. Because
the analytic functions are built-in, queries that use them will find the answer more
rapidly than the "pure" SQL-based approach.
Show Table and System Privileges
It is normally difficult to list all privileges and roles assigned to a
specific user in one select, since a privilege can be assigned to a role, which can be
assigned to another role, which in turn can be assigned to another role, which can be
granted a user. The following view lists all of your roles, all of the roles granted to
those roles, and so on:
CREATE VIEW user_role_hierarchy
AS
SELECT u2.name granted_role
FROM (SELECT * FROM sys.sysauth$
CONNECT BY PRIOR privilege# = grantee#
START WITH grantee# = uid OR grantee# = 1) sa,
sys.user$ u2
WHERE u2.user#=sa.privilege#
UNION ALL SELECT user FROM DUAL
UNION ALL SELECT 'PUBLIC' FROM DUAL
/
GRANT SELECT ON user_role_hierarchy TO PUBLIC;
That view is based on the existing data dictionary view, and if you
create the new view as SYS, it will show the currently logged-in users their roles (and all
of the roles granted to those roles, and so on). You'll find this view to be very fast.
To get all of your table privileges, you should do this:
SELECT DISTINCT privilege, owner, table_name
FROM dba_tab_privs
WHERE grantee IN (SELECT * FROM user_role_hierarchy);
And to get all of your system privileges, you should do this:
select distinct privilege
from dba_sys_privs
where grantee in (select * from user_role_hierarchy);
How to switch Oracle in Single User
Mode ?
During a migration it may be important, that nobody can
connect to the database. You may have two possibilities to achieve this
An exclusive table lock is the most restrictive mode of table lock,
allowing the transaction that holds the lock exclusive write access to the table. An
exclusive table lock is acquired for a table as follows:
$ sqlplus scott/tiger
SQL> GRANT ALL ON emp TO PUBLIC;
SQL> LOCK TABLE emo
IN EXCLUSIVE MODE;
$ sqlplus test/test
SQL> SELECT * FROM
scott.emp;
(This works)
SQL> DELETE FROM scott.emp WHERE empno = 7369; (Waiting ...)
Permitted Operations
Only one transaction can obtain an exclusive table lock for a table. An
exclusive table lock permits other transactions only to query the table.
Prohibited Operations
An exclusive table lock held by a transaction prohibits other
transactions from performing any type of DML statement or placing any type of lock on the
table.
Lock Duration
Oracle releases all locks acquired by the statements within a
transaction when you either commit or roll back the transaction. Oracle also releases
locks acquired after a savepoint when rolling back to the savepoint. However, only
transactions not waiting for the previously locked resources can acquire locks on the now
available resources. Waiting transactions will continue to wait until after the original
transaction commits or rolls back completely.
You may use the RESTRICTED SESSION system privilege to switch the
database in single user mode for migrations.
|
RESTRICTED SESSION
|
Specifies whether logon to Oracle is restricted
|
|
|
ENABLE
|
Qllows only users with RESTRICTED SESSION system privilege to log
on to Oracle. Existing sessions are not terminated.
|
|
|
DISABLE
|
reverses the effect of the ENABLE RESTRICTED SESSION clause,
allowing all users with CREATE SESSION system privilege to log on to Oracle. This is
the default.
|
|
|
You can use this clause regardless of whether your instance has the
database dismounted or mounted, open or closed.
|
In a first step (before the migration), you shutdown the
database an start it again to be sure that all users are disconnected. Now revoke the
RESTRICTED SESSION system privilege from most users, this system privilege is normally not
used.
$ svrmgrl
svrmgr> CONNECT SYS AS sysdba;
svrmgr> SHUTDOWN IMMEDIATE;
svrmgr> STARTUP;
svrmgr> SPOOL revoke_restricted_session;
svrmgr> SELECT 'REVOKE restricted session FROM '
|| username || ';' FROM dba_users
WHERE username NOT IN
('SYS','SYSTEM');
svrmgr> SPOOL OFF;
svrmgr> @revoke_restricted_session.log;
svrmgr> ALTER SYSTEM ENABLE
RESTRICTED SESSION;
As user SYS you can now perform the migration. If an
ordinary user tries to connect, he will get the following error messge:
sqlplus scott/tiger
ERROR: ORA-01035: ORACLE only available to users
with RESTRICTED SESSION privilege
After the migration to not to forget, to disable the
RESTRICTED SESSION system privilege
svrmgr> ALTER SYSTEM DISABLE RESTRICTED
SESSION;
How to store data DES encrypted in
Oracle ? This tip is from
the Oracle Magazine, it shows the usage of the DBMS_OBFUSCATION_TOOLKIT.
The DBMS_OBFUSCATION_TOOLKIT is the DES encryption package. This package shipped with
Oracle8i Release 2 and later. It provides first-time field-level encryption in the
database. The trick to using this package is to make sure everything is a multiple of
eight. Both the key and the input data must have a length divisible by eight (the key must
be exactly 8 bytes long).
Example
CREATE OR REPLACE PROCEDURE obfuscation_demo AS
l_data varchar2(255);
l_string VARCHAR2(25) := 'hello world';
BEGIN
--
-- Both the key and the input data must have a length
-- divisible by eight (the key must be exactly 8 bytes long).
--
l_data := RPAD(l_string,(TRUNC(LENGTH(l_string)/8)+1)*8,CHR(0));
--
DBMS_OUTPUT.PUT_LINE('l_string before encrypt: ' || l_string);
--
-- Encrypt the input string
--
DBMS_OBFUSCATION_TOOLKIT.DESENCRYPT
(input_string => l_data,
key_string => 'magickey',
encrypted_string => l_string);
--
DBMS_OUTPUT.PUT_LINE('l_string ENCRYPTED: ' || l_string);
--
--
-- Decrypt the input string
--
DBMS_OBFUSCATION_TOOLKIT.DESDECRYPT
(input_string => l_string,
key_string => 'magickey',
decrypted_string => l_data);
--
DBMS_OUTPUT.PUT_LINE('l_string DECRYPT: ' || L_DATA);
--
END;
/
SQL> exec obfuscation_demo
l_string before encrypt: hello world
l_string ENCRYPTED: ¿¿¿H?¿¿¿
l_string DECRYPT: hello world
PL/SQL procedure successfully completed.
You must protect and preserve your "magickey"—8 bytes
of data that is used to encrypt/decrypt the data. If it becomes compromised, your data is
vulnerable.
Dynamic SQL queries that
return multirow result sets The OPEN FOR clause allows to build dynamic SQL with variable table-, or
column names that return multirow result sets. Let's take a closer look at OPEN FOR and
multirow queries with a concrete example. Create the following tables:
SQL> create table emp_10 as select * from emp where
deptno = 10;
SQL> create table emp_20 as select * from emp where deptno = 20;
SQL> create table emp_30 as select * from emp where deptno = 30;
Now look at the following code
CREATE OR REPLACE PROCEDURE show_emp_any (
postfix IN VARCHAR2)
IS
TYPE refCur IS REF CURSOR;
emp_cv refCur;
emp_rec emp%ROWTYPE;
BEGIN
OPEN emp_cv FOR
'SELECT * ' ||
'FROM emp_' || postfix ||
' ORDER BY sal DESC';
LOOP
FETCH emp_cv INTO emp_rec;
EXIT WHEN emp_cv%NOTFOUND;
DBMS_OUTPUT.put_line (
emp_rec.empno || ': $' ||
TO_CHAR (emp_rec.sal)
);
END LOOP;
CLOSE emp_cv;
END;
/
The first step in a dynamic multirow query is to define the cursor
variable that will point to the result set in the System Global Area. We declare the cursor
variable as an instance of a REF CURSOR type, so we must consider the question of whether
to make it strong or weak. A REF CURSOR is strong if it is strongly typed, which means the
TYPE statement includes a RETURN clause defining what structure is allowable (number of
items and datatypes) for data fetched through a cursor variable based on this TYPE.
With dynamic SQL, however, you are not allowed to use strong REF CURSORs.
At compile time, the query associated with the REF CURSOR is just a string, so the PL/SQL
engine cannot validate that the query's SELECT list is consistent with the record structure
in the REF CURSOR's RETURN clause.
Once that is done, we declare a record that we can use to retrieve
individual rows from any of the three tables (all three tables have the same structure, so
we can %ROWTYPE the record against any of the tables.
We must use dynamic SQL, since we are constructing the name of the
table each time we run the program. But dynamic SQL doesn't require any more in the way
of special code than what we have just described. We can use the familiar explicit-cursor
syntax unchanged for my cursor-variable-based code, as the following lines demonstrate:
SQL> exec show_emp_any('10');
7839: $5000
7782: $2450
7934: $1300
SQL> exec show_emp_any('20');
7788: $3000
7902: $3000
7566: $2975
7876: $1100
7369: $800
SQL> exec show_emp_any('30');
7698: $2850
7499: $1600
7844: $1500
7521: $1250
7654: $1250
7900: $950
Formatted SELECT * FROM 'table'
Statement Results
This tip comes from Anirban
Das, a Senior IA from Vernon Hills, IL. We have improved the SQL statement in some
points, so WHERE clauses will be correctly executed.
In SQL*Plus, it is often difficult to read the results of a SELECT *FROM
'table' statement since the output could wrap across multiple lines. For example, the
normal output of SELECT * FROM 'dba_users' would be :
USERNAME
USER_ID PASSWORD
------------------------------ ---------- ---------
ACCOUNT_STATUS
LOCK_DATE EXPIRY_DAT
-------------------------------- ---------- ----------
DEFAULT_TABLESPACE
TEMPORARY_TABLESPACE CREATED
------------------------------ --------------------------- -------
PROFILE
------------------------------
EXTERNAL_NAME
------------------------------------------------------------------
SYS
0 5638228DAF52805F
OPEN
SYSTEM
TEMP
28-AUG-00
The results are not clearly readable.
Implementing this SQL script, the output would be :
ACCOUNT_STATUS = ----------------OPEN [4]
CREATED = -----------------------08/28/2000 14:56:08 [9]
DEFAULT_TABLESPACE = ------------SYSTEM [6]
EXPIRY_DATE = -------------------[0]
EXTERNAL_NAME = -----------------[0]
LOCK_DATE = ---------------------[0]
PASSWORD = ----------------------5638228DAF52805F [16]
PROFILE = -----------------------DEFAULT [7]
TEMPORARY_TABLESPACE = ----------TEMP [4]
USERNAME = ----------------------SYS [3]
USER_ID = -----------------------0 [1]
This formats the results to 1 row per screen with the length of data in
square braces [ ]. It also allows optional WHERE clause and ORDER BY .
Click here for the improved
script.
Switch to another Oracle User and
back
Sometimes, the DBA needs to log into a user's account to make a change,
such as to grant a privilege on a user's table to another user, but, may not know what
the user's password is, or, may need to make changes to a set of users from a script,
but, doesn't want to include their passwords in the script itself. Oracle provides an
undocumented "identified by values" clause in the "alter user" command that can be
used for this purpose. Since the dba_users table contains the encoded password for
each user, this value can be used to generate an "alter user" command to reset the user's
password back to its original value. Then, from user system or another DBA user, you
can alter the user's password to a known value (such as "whatever"), log into the user's
account using "connect userid/whatever", make the changes that are needed, connect back to
the system account, and run the generated "alter user" command to put the original password
back.
The following SQL generates a password change script (setpw.sql) to set
all users to a known password ("whatever"), and, another script (resetpw.sql) to set all
users back to their original passwords. This would be used as part of another script
to generate the password change scripts, run setpw.sql, log in and make the changes that
are needed, and immediately run resetpw.sql to put the passwords back. Note that the
users won't be able to log in during that time, since their passwords are not valid while
you are running the script.
spool setpw.sql
select 'alter user ' || username || ' identified by whatever;'
from dba_users;
spool off
spool resetpw.sql
select 'alter user ' || username || ' identified by values ''' ||
password || ''';' from dba_users;
spool off
Generated Script setpw.sql
alter user SYS identified by whatever;
alter user SYSTEM identified by whatever;
alter user DES identified by whatever;
alter user ELAN identified by whatever;
Generated Script resetpw.sql
alter user SYS identified by values '5638228DAF52805F';
alter user SYSTEM identified by values 'D4DF7931AB130E37';
alter user DES identified by values 'ABFEC5AC2274E54D';
alter user ELAN identified by values 'B53CE8493EC6FB92';
Access Internet Web pages from SQL
or PL/SQL
Using the package UTL_HTTP, you can access any HTML page
from SQL
set pages 50000
select utl_http.request('https://www.akadia.com/')
from dual;
What is a JDBC KPRB driver and
what is it used for ?
JDBC is a set of classes and interfaces written in Java to allow other
Java programs to send SQL statements to a relational database management system.
Oracle provides three categories of JDBC drivers:
-
JDBC Thin Driver (No local Net8 installation required/ handy for
applets)
-
JDBC OCI for writing stand-alone Java applications
-
JDBC KPRB driver (default connection) for Java Stored Procedures and
Database JSP's.
Oracle's JDBC Thin driver uses Java sockets to connect directly to
Oracle. It provides its own TCP/IP version of Oracle's Net8 (SQL*Net) protocol. Because it
is 100% Java, this driver is platform independent and can also run from a Web Browser
(applets).
Oracle's JDBC OCI drivers uses Oracle OCI (Oracle Call Interface)
to interact with an Oracle database. You must use a JDBC OCI driver appropriate to your
Oracle client installation. The OCI driver works through either SQL*Net or Net8.
Either of these client versions can access Oracle7 or Oracle8
servers.
The JDBC OCI drivers allow you to call the OCI directly from Java,
thereby providing a high degree of compatibility with a specific Version of Oracle. Because
they use native methods, they are platform specific.
Oracle's JDBC KBPR driver is mainly used for writing Java stored
procedures, triggers and database JSPs. It uses the default/ current database session and
thus requires no additional database username, password or URL.
All three drivers support the same syntax and API's. Oracle needs three
drivers to support different deployment options. Looking at source code, they will only
differ in the way you connect to the database. Remember, you must use a JDBC version that
matches the version of your Java Development Kit.
The the JDBC thin driver provides the only way to access Oracle from the
Web (applets). It is smaller and faster than the OCI drivers, and doesn't require a
pre-installed version of the JDBC drivers.
import java.sql.*;
class dbAccess {
public static void main (String args []) throws SQLException
{
DriverManager.registerDriver (
new oracle.jdbc.driver.OracleDriver()
);
Connection conn = DriverManager.getConnection
("jdbc:oracle:thin:@dbhost:1521:ORA1", "scott", "tiger");
// @machine:port:SID, userid,
password
Statement stmt = conn.createStatement();
ResultSet rset = stmt.executeQuery (
"select BANNER from SYS.V_$VERSION"
);
while (rset.next())
System.out.println (rset.getString(1));
// Print col 1
stmt.close();
}
}
One must have Net8
(SQL*Net) installed and working before attempting to use one of the OCI drivers.
import java.sql.*;
class dbAccess {
public static void main (String args []) throws SQLException
{
try {
Class.forName ("oracle.jdbc.driver.OracleDriver");
} catch (ClassNotFoundException e) {
e.printStackTrace();
}
Connection conn = DriverManager.getConnection
("jdbc:oracle:oci8:@ORA1", "scott", "tiger");
// or oci7 @Service, userid, password
Statement stmt = conn.createStatement();
ResultSet rset = stmt.executeQuery (
"select BANNER from SYS.V_$VERSION"
);
while (rset.next())
System.out.println (rset.getString(1)); //
Print col 1
stmt.close();
}
}
One can obtain a handle to the default or current connection (KPRB
driver) by calling the OracleDriver.defaultConenction() method. Please note that
you do not need to specify a database URL, username or password as you are already
connected to a database session. Remember not to close the default connection. Closing the
default connection might throw an exception in future releases of Oracle.
import java.sql.*;
class dbAccess {
public static void main (String args []) throws SQLException
{
Connection conn = (new
oracle.jdbc.driver.OracleDriver()).defaultConnection();
Statement stmt = conn.createStatement();
ResultSet rset = stmt.executeQuery (
"select BANNER from SYS.V_$VERSION"
);
while (rset.next())
System.out.println (rset.getString(1)); // Print col 1
stmt.close();
}
}
How does one enable dead connection
detection ?
Dead database connections can be detected and killed by SQL*Net if you
specify the SQLNET.EXPIRE_TIME=n parameter in your SQLNET.ORA file (usually in
$TNS_ADMIN). This parameter will instruct SQL*Net to send a probe through the network to
the client every n minutes, if the client doesn't respond, it will be killed.
NOTE: This parameter is only useful on the database server side,
specifying it on a client workstation will have no effect.
How to connect to a
system regardless of machine failure ?
You can place multiple address entries for a single connection alias in
the TNSNAMES.ORA file. This means that you can connect to a database, even if some kind of
physical failover occurred. Look at the following example:
ORA1 = (DESCRIPTION =

                     (ADDRESS_LIST
        =


        (ADDRESS =


        (PROTOCOL = TCP)


        (HOST = Host1))


        (ADDRESS =


        (PROTOCOL = TCP)


        (HOST = Host2)))


        (CONNECT_DATA=((SID=ORA1))))
Suppose Host1 is down, then every new NET8
connection using service ORA1 will automatically login to Host2. However, there is one
restriction, the SID must be the same on both machines. This feature can provide
guaranteed login for application servers and for the Oracle Parallel Server.
The mystery of Stored Outlines
The SQL statements in a hybrid system need to have an
execution plan that is appropriately tailored for the type of system configuration you are
using. When running the statements during the day in the OLTP configuration they
need to use a different execution plan than they would use when running at night in the
DSS configuration. This can be achieved by creating two different stored outlines
for each SQL statement. The outlines are grouped by categories. You can name one category
OLTP and the other DSS. Each category contains the different execution paths.
To ensure that the same tuning execution plan is used every
time a particular query is recompiled, you must create a stored outline for it. The stored
outline is created with the CREATE OUTLINE command. When creating an individual stored
outline for your SQL statement using the CREATE OUTLINE command you give the outline a name
which is later used to identify which outline to use during the statements execution.
CREATE OR REPLACE OUTLINE emp_hiredate
FOR CATEGORY dss ON
SELECT empno,ename,TO_CHAR(hiredate,'DD.MM.YYYY') hiredate
FROM (SELECT empno,ename,hiredate
FROM emp
ORDER BY hiredate DESC)
WHERE ROWNUM < 5
/
Outline created.
The statement in the stored outline must match the text of
the SQL statement being executed. This is done by using the method for comparing cursors in
the shared pool.
Stored outlines rely on hints used by the optimizer for its
execution plans. Stored outlines use the cost-based optimizer. Their query text must match
exactly the text of the stored outline SQL statement. The USE_STORED_OUTLINES parameter may
be set at the instance or session levels, but will be of no use if the stored outline has
not yet been created. The parameter identifies a stored outline to be used when executing a
SQL statement. If the parameter is set to TRUE, DEFAULT category outlines are used. If the
parameter is set to a category name, that categories outlines are used. This parameter is
set using the ALTER SESSION or ALTER SYSTEM command. The ALTER OUTLINE SQL command can be
used to change the category of an outline, rename an outline, or rebuild an outline.
ALTER SESSION SET USE_STORED_OUTLINES = TRUE;
All stored outlines are stored in the OUTLN schema and may
be transferred easily using the Export/Import utility. The OUTLN schema is automatically
created with the database.
The OL$ OUTLN schema table contains the outline name,
statement text, category, and the creation date. The OL$HINTS OUTLN schema table contains
the hints for the outlines in the OL$ table. This information can also be viewed in the
DBA_OUTLINES and DBA_OUTLINE_HINTS data dictionary views.
SELECT name,used FROM USER_OUTLINES;
Top-N SQL queries with Inline
Views
Suppose you want to retrieve and sort information on the
4 most recently hired employees in a very efficient way. This can be achieved using an
inline view combined with ORDER BY and ROWNUM.
An in-line view, which is a feature of a Top-N SQL query, is
a subquery. This type of subquery differs from a regular subquery by containing an ORDER BY
clause which is not allowed in a regular subquery. The ROWNUM condition, which is an
enhanced sorting mechanism, would be used in the outer query to complete the Top-N SQL
query.
Example
We need to retrieve and sort information on the 4 most
recently hired employees from the following list (marked in blue color).
SELECT empno,ename,TO_CHAR(hiredate,'DD.MM.YYYY') "hiredate"
FROM emp
ORDER BY hiredate DESC;
EMPNO ENAME
hiredate
---------- ---------- ----------
7876
ADAMS 12.01.1983
7788 SCOTT 09.12.1982
7934 MILLER 23.01.1982
7900 JAMES 03.12.1981
7902 FORD
03.12.1981
7839 KING 17.11.1981
7654 MARTIN 28.09.1981
7844 TURNER 08.09.1981
7782 CLARK 09.06.1981
7698 BLAKE 01.05.1981
7566 JONES 02.04.1981
7521 WARD 22.02.1981
7499 ALLEN 20.02.1981
7369 SMITH 17.12.1980
The first approach is to used the following query, which does not
select the Top-4 rows !
SELECT empno,ename,hiredate
FROM emp
WHERE ROWNUM < 5
ORDER BY hiredate DESC;
EMPNO ENAME
HIREDATE
---------- ---------- ----------
7566 JONES 02.04.1981
7521 WARD 22.02.1981
7499 ALLEN 20.02.1981
7369 SMITH 17.12.1980
The solution is to use an inline view with an
ORDER BY and a ROWNUM condition, in the outer
query to complete the Top-N SQL query.
SELECT *
FROM (SELECT empno,ename,hiredate
FROM emp
ORDER BY hiredate DESC)
WHERE ROWNUM < 5;
EMPNO ENAME
HIREDATE
---------- ---------- ----------
7876 ADAMS 12.01.1983
7788 SCOTT 09.12.1982
7934 MILLER 23.01.1982
7900 JAMES 03.12.1981
The purpose of this query is to retrieve and sort
information on the 4 most recently hired employees. This is a Top-N SQL query which is more
efficient than a regular query because Oracle stores a maximum of only 5 rows as the data
is retrieved from the table avoiding sorting all of the rows in the table at once. The
WHERE clause contains 'ROWNUM < 5' which prevents sorting on more than 5 rows at one
time -- cool isn't it ?
iFS (Internet Filesystem) Test
Installation
Internet portals are currently implementing document
management systems as part of the offered services on their portal. We have been asked to
review Oracle Internet File System (iFS) in order to enable iFS for the portal. This
article is based on iFS version 1.0.8.3.
iFS is, as its name suggests, a file system for the
internet. It allows users to store content at a central location, through different
interfaces like a web browser, the Microsoft Windows Explorer or an ftp client. All content
is stored in an Oracle 8i Release 2 or 3 database, completely transparent for the end
user.
The objects stored into iFS can get organised within a
virtual folder structure and protected by access control lists (ACL) that allow fine
grained access control. Versioning of the content is also supported.
Using Oracle interMedia (optional) it is possible to do
full text searches through the content stored in iFS. For example, one search would
allow to find all email messages, Microsoft Word documents and Microsoft Excel Spreadsheets
that contain the keyword "Akadia".
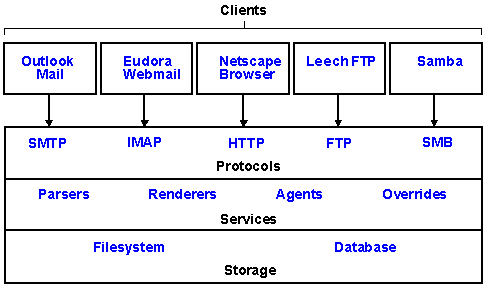
Protocol servers are used to interact with iFS. You can
connect to them using standard clients, such as Eudora (email) or the Microsoft Windows
Explorer; iFS clients that get shipped with the product, such as the web interface; or a
custom written client.
The following main protocol servers are shipped with the
product:
The SMTP protocol server allows to use iFS to deliver
emails.
They will get stored in iFS.
Through the IMAP protocol server, it is possible to
connect any email client (that understands IMAP) to iFS. The emails are stored centrally
within the database.
Using the HTTP protocol server, you can access iFS using
your web browser. The standard web server that gets shipped with iFS is Sun's Java Web
Server. iFS is certified with JRun from Allaire, this allows to run it with many other
web servers like Apache or Netscape.
The FTP protocol server is another way to store or
retrieve files from iFS.
Using SMB, an iFS mount point can get mapped as a network
drive in Microsoft Windows Explorer, just like any other network share. This allows to
use iFS like a normal disk drive in Microsoft Windows, programs can get run directly off
iFS.
iFS can get customised in many different ways. The following
describe the "points of access".
Whenever content is stored into iFS, the existence of an
appropriate parser is checked. If there is one, the content is not just stored in its
binary format, but the parser is invoked. A parser could, for example, extract some
metadata out of the content and store it separately. An XML parser gets shipped with the
product. Using it, objects (like users or groups) can get created automatically when
uploading a file that contains its description.
A renderer formats the output. Using a renderer, one can
reconstruct a file in its original format that was parsed when stored into iFS or make it
look completely different. Renderers can be seen as the opposite of a parser.
Agents are server side Java programs used to automate a
task. They can react on any event within iFS. For example, a project manager could get
emailed whenever one of his team members updates the timesheet. Agents can be triggered
time-based, event-based or both.
With Overrides, it is possible to re-define the
functionality of iFS. This is quite complex and dangerous.
The iFS document hierarchy will not fit all application
needs. Using custom classes, the hierarchy can get extended. Custom attributes can get
added to existing document classes using XML.
Custom Java Server Pages (JSP) can get written and
registered to serve a specific document type (display its contents), or you can write a
custom application using JSPs.
The iFS Java API can get used to write custom applications
or to enhance, change or customise the behaviour of the components described above. A
custom application is the mix of several or all techniques to customise iFS as described
above.
iFS is quite resource intensive. The requirements for
both software and hardware are described below. Oracle recommends to set up a two-tier
configuration with a database server and an application server. iFS is available on Sun
Solaris (Version 2.6 with patch 107733 or newer) and Microsoft Windows NT 4.0 by the time
of the writing of this article. The required database release is Oracle8i, Release 2
(8.1.6), it needs the JDBC:OCI Driver for Java 1.1 to connect to it. For a two-tier
configuration, Oracle Administrator Client is required, too.
For the evaluation, the complete software has been installed
and configured at the offices of Akadia AG. The version used is 1.0.8.3 on Sun Solaris. Due
to limited system availability, the evaluation was carried out in a single tier
environment. Both the database and the application server was installed on the same
machine. Both the CPU and memory minimum requirements were not met.
First of all, a new database using the NLS character set
US7ACII of version 8.1.6 had to get created. The installation of JServer (required for
interMedia) was very tedious, as the memory requirements are extremely high. After
installing interMedia, iFS 1.0.8.0 and the patchset 1.0.8.3 was installed. This is a very
easy and straightforward task.
Shared Pool and Java Pool in INIT.ORA
parallel_automatic_tuning = false
shared_pool_size = 200000000
java_pool_size = 100000000
Installation Script
#!/bin/ksh
####################################################################
#
# Install JServer and Intermedia for iFS
#
# Must be run as a UNIX user belongig to the dba group
#
###################################################################
sqlplus << EOF
internal
spool JServer.log
### Setup a database for running Java and the
ORB
### ---------------------------------------------
@$ORACLE_HOME/javavm/install/initjvm.sql
### Initializes Java library needed by PL/SQL
### -----------------------------------------
@$ORACLE_HOME/rdbms/admin/initplsj.sql
### Script used to load AQ/JMS jar files into the
database
### ------------------------------------------------------
@$ORACLE_HOME/rdbms/admin/initaqjms.sql
### Load Java RepAPI server classes and publish
'repapi' obj
### --------------------------------------------------------
@$ORACLE_HOME/rdbms/admin/initrepapi.sql
disconnect
spool off
exit
EOF
### Oracle81x interMedia Installation of
ORDSYS
### and ORDPLUGINS objects
### -------------------------------------------------------------
sqlplus << EOF
internal
spool ordinst.log
@$ORACLE_HOME/ord/admin/ordinst.sql
spool off
exit
EOF
sqlplus << EOF
internal
SPOOL iminst.log
@$ORACLE_HOME/ord/im/admin/iminst.sql
spool off
exit
EOF
sqlplus << EOF
internal
spool spoolctx.log;
@$ORACLE_HOME/ctx/admin/dr0csys ctxsys DRSYS DRSYS
connect ctxsys/ctxsys
@$ORACLE_HOME/ctx/admin/dr0inst \
/opt/oracle/product/8.1.6/ctx/lib/libctxx8.so
@$ORACLE_HOME/ctx/admin/defaults/drdefus.sql
spool off
exit
EOF
iFS is configured using a graphical configuration assistant
or by editing the text configuration files. Only minimal configuration is required to get
iFS running.
The HTTP protocol server and the shipped web client have
been tested extensively. The application is very robust and works well even with large
files (note that only the Sun Java Web Server was tested - it does not allow for
scalability). A 20MB upload lasted approximately 2 minutes (via LAN, database not tuned).
The FTP protocol server also worked without problems, but was not tested extensively. Other
interfaces were out of the scope of these tests.
The Power of CASE Expressions
in SQL Queries
One of the most powerful SQL features is often unknown -
CASE Expressions in SQL Queries. An expression is a combination of one or more
values, operators, and SQL functions that evaluate to a value. An expression generally
assumes the datatype of its components.
CASE expressions let you use IF ... THEN ... ELSE logic in SQL statements
without having to invoke procedures. The syntax is:
CASE_expression ::=

Oracle searches for the first WHEN ... THEN pair for which condition is
true.
-
If Oracle finds such a pair, then the result of the CASE expression
is expr1.
-
If Oracle does not find such a pair,
At least one occurrence of expr1 or expr2 must be non-null.
Note:
The maximum number of arguments in a CASE expression is 255, and each
WHEN ... THEN pair counts as two arguments. To avoid exceeding the limit of 128 choices,
you can nest CASE expressions. That is expr1 can itself be a CASE expression.
The following statement finds the average salary of all employees in the
EMP table. If an employee's salary is less than $2000, the CASE expression uses $2000
instead.
SELECT AVG(CASE WHEN e.sal > 2000 THEN e.sal ELSE 2000
END)
from emp e;
CREATE OR REPLACE VIEW v_user AS
SELECT u.id_item,
u.id_type,
u.createdate,
u.llogdate,
u.clogdate,
u.account,
u.fname,
u.lname,
c.lockstate,
i.id_item rootid, (
CASE WHEN EXISTS (
SELECT
id_user
FROM
participant
WHERE
accesstype = 2
AND id_user = u.id_item
)
THEN 1 ELSE 0 END
) AS userstate
FROM user u, cug c, item i
WHERE c.id_item = u.id_item
AND i.id_cug (+) = c.id_item
AND i.id_parent (+) = 0
AND u.id_item > 0
ORDER BY u.id_item;
In this example, we use a subquery in the CASE expression
block. If the subquery finds an entry the CASE expression evaluates to 1, else to 0 which
is stored in userstate.
We think, that such constructs can be very powerful -
without to programming PL/SQL.
Online Rebuild of Indexes
If you must create an index on a large and busy table which
cannot suffer any downtime, then you can build this index without interrupting the
availability of this table.
The command ...
CREATE INDEX index-name ON
table-name (column-name) ONLINE;
... will create the index without interrupting the
availability of the table.
Note, that NO downtime is experienced when rebuilding
an index online. All DML operations may continue without interruption. This operation works
on partitioned, nonpartitioned, and index-organized tables with B*-tree indexes.
Locks are briefly placed on the table during the prepare
phase to place entries in the data dictionary and to create the index structure.
Rebuilding an index online requires double the space of the current index.The table
is offline briefly during the prepare and merge phases. Bitmap, cluster, and secondary
indexes that are on index-organized tables may not be rebuilt.
Speed up Queries using Function
based Indexes
When you use an application that often select rows based on
an expression, then a function based index (an index on a function) can help to avoid full
table scans. A function-based index is based on expressions. Expressions may be arithmetic
expressions, built-ins, or other user-defined expressions.
 Lets look at an example Lets look at an example
SQL> SELECT sal FROM emp
WHERE sal + comm * (sal - 100) < 1500;
Without a function based index, you will notice, that oracle
performs a full table scan.
Create the function based index
SQL> CREATE INDEX calc_on_emp ON emp (sal + comm * (sal - 100));
Enable the function based index
SQL> ALTER SESSION SET QUERY_REWRITE_ENABLED = TRUE;
SQL> ALTER SESSION SET QUERY_REWRITE_INTEGRITY = TRUSTED;
Check, that the function based index is used
SQL> ANALYZE INDEX calc_on_emp COMPUTE STATISTICS;
SQL> set autotrace on explain;
SQL> SELECT sal FROM emp
WHERE sal + comm * (sal - 100) < 1500;
Execution Plan
-------------------------------------------------
0 SELECT STATEMENT Optimizer=CHOOSE
(Cost=10 Card=21690
Bytes=108450)
1 0 TABLE ACCESS (BY INDEX ROWID) OF
'EMP'
(Cost=10 Card=21690
Bytes=108450)
2 1 INDEX (RANGE SCAN) OF 'CALC_ON_EMP'
(NON-UNIQUE) (Cost=2 Card=21690)
We use an application that deletes data with records in excess of 20MB
from the fact table.
It takes the following form:
DELETE measurements
WHERE last_modified_by
LIKE '%'||'&1'||'#'||'&2'||'#%''
This process currently takes nearly two to three hours each time it runs.
Is there a way we can speed this up? Note that &1&1 is of fixed length and
&2&2 is of varying length and mixed case. The character in front of &1&1 is
#.
Let's say the &1 is after the first # and the &2 is after the second, up to the
third. Then I would recommend a function-based index (an index on a function—a
capability added in Oracle8i). You can make an index on some function of the
last_modified_by column that will allow you to find all of the rows you want to delete via
the index—as opposed to the full scan that is occurring now. The index you want to
create would take the form:
create index t_idx on
t(substr(last_modified_by,
instr(last_modified_by,'#',1,1)+1,
instr(last_modified_by,'#',1,3)
instr(last_modified_by,'#',1,1)-1 ))
/
Index created.
If I'm off on the placement of the #'s, you just need to adjust the
fourth parameter to instr in the above—I'm looking for the first and third ones. The
index you create will pick off just the fields you are interested in—in effect, it
will index &1#&2 for you. You would then create a view to delete from, so that you
can avoid typos in the function.
create or replace view t_view
as
select t.*,
substr(last_modified_by,
instr(last_modified_by,'#',1,1)+1,
instr(last_modified_by,'#',1,3)
instr(last_modified_by,'#',1,1)-1 ) idx_col
from t
/
View Created.
This new view will use an index after having the necessary session or system parameters
set (the following may be set in your init.ora to make them the default).
alter session set QUERY_REWRITE_ENABLED=TRUE;
Session altered.
alter session set QUERY_REWRITE_INTEGRITY=TRUSTED;
Session altered.
set autotrace on explain
delete /*+ index( t_view t_idx ) */
from t_view
where idx_col = 'amper1_data#amper2_data';
1 row deleted.
Execution Plan
--------------------------------------------
0 DELETE STATEMENT Optimizer=CHOOSE (Cost=1 Card=1
1 0 DELETE OF 'T'
2 1 TABLE ACCESS (BY INDEX ROWID) OF 'T' (Cost=1
3 2 INDEX (RANGE SCAN) OF 'T_IDX' (NON-
UNIQUE)
SQL> set autotrace off
This process can make use of an index, and, if the number of rows to be
deleted is a small fraction of the 20 million rows present, will definitely speed up the
operation.
File I/O with Oracle PL/SQL
The UTL_FILE package lets your PL/SQL programs read and write operating
system (OS) text files. It provides a restricted version of standard OS stream file
input/output (I/O).
Server security for PL/SQL file I/O consists of a restriction on the
directories that can be accessed. Accessible directories must be specified in the instance
parameter initialization file (INIT.ORA).
Specify the accessible directories for the UTL_FILE functions in the
initialization file using the UTL_FILE_DIR parameter. For example:
UTL_FILE_DIR = <directory name>
If the initialization file for the instance contains the line
UTL_FILE_DIR = /u01/oracle/db, then the directory /u01/oracle/db is accessible to the FOPEN
function. Note that a directory named /u01/oracle/DB would not be accessible on
case-sensitive operating systems.
The parameter specification UTL_FILE_DIR = * has a special meaning.
This entry turns off directory access checking, and it makes any directory accessible to
the UTL_FILE functions.
The ' * ' option should be used with great caution. Oracle does not
recommend that you use this option in production systems. Also, do not include ' . '
(the current directory for UNIX) in the accessible directories list. To ensure security on
file systems that enable symbolic links, users must not be allowed WRITE permission to
directories accessible by PL/SQL file I/O functions. The symbolic links and PL/SQL file I/O
could be used to circumvent normal operating system permission checking and allow users
read/write access to directories to which they would not otherwise have access.
CREATE OR REPLACE
PROCEDURE file_io_with_plsql IS
l_fhd
utl_File.File_Type;
l_fdir
v$parameter.value%Type;
l_fname VARCHAR2(30) :=
'myfile.log';
l_fmode VARCHAR2(1) :=
'W';
l_buf VARCHAR2(100);
BEGIN
--
-- Open file for write to location 'utl_file_dir'
-- specified in v$parameter
--
BEGIN
SELECT value
INTO l_fdir
FROM v$parameter
WHERE name = 'utl_file_dir';
IF (l_fdir IS NULL) THEN
RAISE NO_DATA_FOUND;
END IF;
l_fhd := utl_File.FOpen(l_fdir,l_fname,l_fmode);
EXCEPTION
WHEN NO_DATA_FOUND THEN
RAISE_APPLICATION_ERROR(
-20101,'ERROR: file_io_with_plsql():
utl_File.FOpen()'
);
END;
--
-- Write some text to the file
--
utl_file.Putf(l_fhd,'Hello World ...');
utl_file.FFlush(l_fhd);
utl_file.FClose(l_fhd);
--
-- Read the text back from file
--
l_fmode := 'R';
l_fhd := utl_File.FOpen(l_fdir,l_fname,l_fmode);
utl_file.Get_Line(l_fhd,l_buf);
dbms_output.put_line('Readed from OS-file: ' || l_buf);
utl_file.FClose(l_fhd);
END file_io_with_plsql;
/
SQL> set serveroutput on;
SQL> exec file_io_with_plsql;
Readed from OS-file: Hello World ...
PL/SQL procedure successfully completed.
Using Index Only Tables (IOTs)
Index-organized tables are tables with data rows grouped according to the
primary key. The attributes of index-organized tables are stored entirely within the
physical data structures for the index. Index-organized tables provide fast key-based
access to table data for queries involving exact match and range searches. Changes to the
table data (such as adding new rows, updating rows, or deleting rows) result only in
updating the index structure (because there is no separate table storage area). Also,
storage requirements are reduced because key columns are not duplicated in the table and
index. The remaining non-key columns are stored in the index structure.
Index-organized tables are particularly useful when you are using
applications that must retrieve data based on a primary key such as intersection
tables.
Note the following important constraints
-
The data in an index-organized table is not duplicated.
-
Index-organized tables can be reorganized with the ALTER
TABLE
statement MOVE clause
-
Index-organized table must have a Primary Key
-
Index-organized tables may not have unique constraints.
-
Cannot contain LONGs or LOBs.
-
The DBA_TABLES data dictionary view contains two new columns,
IOT_NAME and IOT_TYPE, to provide information on index-organized tables.
Here is an example
CREATE TABLE my_intersection (
id1 NUMBER(15) NOT NULL,
id2 NUMBER(15) NOT NULL,
job VARCHAR2(500) NULL,
CONSTRAINT pk_my_intersection
PRIMARY KEY (id1,id2))
ORGANIZATION INDEX
STORAGE (INITIAL 256K NEXT 256K PCTINCREASE 0)
TABLESPACE idx
INCLUDING job
OVERFLOW TABLESPACE tab;
How to query a "n X m"
relation ?
Consider the following situation: We have employees and projects. An
employee can be registered (work for) in 0, 1or more projects. For a certain project, o one
or more employees are allocated. We have a typical many-to-many relationship which is
normalized with the intersection entity PROJALLOC.
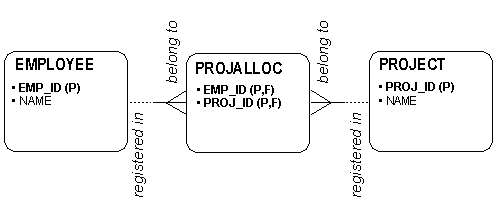
CREATE TABLE employee (
emp_id NUMBER NOT NULL,
name VARCHAR2(30),
CONSTRAINT emp_pk PRIMARY KEY (emp_id)
);
CREATE TABLE project (
proj_id NUMBER NOT NULL,
name VARCHAR2(30),
CONSTRAINT proj_pk PRIMARY KEY (proj_id)
);
CREATE TABLE projalloc (
emp_id NUMBER NOT NULL,
proj_id NUMBER NOT NULL,
CONSTRAINT pa_pk PRIMARY KEY (proj_id, emp_id),
CONSTRAINT pa_fk1 FOREIGN KEY (proj_id) REFERENCES PROJECT (proj_id),
CONSTRAINT pa_fk2 FOREIGN KEY (emp_id)
REFERENCES EMPLOYEE (emp_id)
);
INSERT INTO employee (emp_id,name) VALUES (1,'ALLEN');
INSERT INTO employee (emp_id,name) VALUES (2,'BAKER');
INSERT INTO employee (emp_id,name) VALUES (3,'FORD');
INSERT INTO employee (emp_id,name) VALUES (4,'MILLER');
INSERT INTO employee (emp_id,name) VALUES (5,'SCOTT');
INSERT INTO project (proj_id,name) VALUES (1,'PROJECT 01');
INSERT INTO project (proj_id,name) VALUES (2,'PROJECT 02');
INSERT INTO project (proj_id,name) VALUES (3,'PROJECT 03');
INSERT INTO project (proj_id,name) VALUES (4,'PROJECT 04');
INSERT INTO project (proj_id,name) VALUES (5,'PROJECT 05');
INSERT INTO projalloc (proj_id,emp_id) VALUES (1,1);
INSERT INTO projalloc (proj_id,emp_id) VALUES (1,2);
INSERT INTO projalloc (proj_id,emp_id) VALUES (1,3);
INSERT INTO projalloc (proj_id,emp_id) VALUES (2,2);
INSERT INTO projalloc (proj_id,emp_id) VALUES (2,5);
INSERT INTO projalloc (proj_id,emp_id) VALUES (3,3);
INSERT INTO projalloc (proj_id,emp_id) VALUES (4,3);
COMMIT;
EMP_ID NAME EMP_ID
PROJ_ID PROJ_ID NAME
------------------------------------------------------------
1
Allen
1 1
1 Project 01
2
Baker
2 1
2 Project 02
3
Ford
2 2
3 Project 03
4
Miller
3 1
4 Project 04
5
Scott
3 4
5 Project 05
3 3
5 2
-
Show all employees with all assigned projects.
-
Sow all employees with no project assigned.
-
Show all projects with no employees assigned.
|
EMPLOYEE
|
PROJECT
|
|
Allen
|
Project 01
|
|
Baker
|
Project 01
|
|
Baker
|
Project 02
|
|
Ford
|
Project 01
|
|
Ford
|
Project 03
|
|
Ford
|
Project 04
|
|
Miller
|
|
|
Scott
|
Project 02
|
|
|
Project 05
|
The obvious approach with outer joins leads to the error message
below:
select e.name employee,p.name name
from employee e, projalloc pa, project p
where e.emp_id = pa.emp_id(+)
and p.proj_id = pa.proj_id(+)
order by 1
ORA-01417: a table may be outer joined to at most one other table
$ oerr ora 1417
"a table may be outer joined to at most one other table"
Cause: a.b (+) = b.b and a.c (+) = c.c is not allowed
Action: Check that this is really what you want, then join b and c first in a view.
Use the UNION construct to query the two special cases ( all employees
with no project assigned and all projects with no employees assigned).
select e.name employee,p.name project
from employee e, projalloc pa, project p
where e.emp_id = pa.emp_id
and p.proj_id = pa.proj_id
union
select e.name, null
from employee e, projalloc pa
where e.emp_id = pa.emp_id(+)
and pa.emp_id is null
union
select null, p.name project
from project p, projalloc pa
where p.proj_id = pa.proj_id(+)
and pa.proj_id is null
order by 1;
EMPLOYEE
PROJECT
------------------------------ -----------
ALLEN
PROJECT 01
BAKER
PROJECT 01
BAKER
PROJECT 02
FORD
PROJECT 01
FORD
PROJECT 03
FORD
PROJECT 04
MILLER
SCOTT
PROJECT 02
PROJECT 05
Logging using autonomous transactions
At times, you may want to commit or roll back some changes
to a table independently of a primary transaction's final outcome. For example, while
running a transaction, you may want to log error messages to a debug table even if the
overall transaction rolls back. Autonomous transactions allow you to do such tasks.
An autonomous transaction executes within an autonomous
scope. An autonomous scope is a routine you mark with the pragma (compiler directive)
AUTONOMOUS_TRANSACTION. The pragma instructs the PL/SQL compiler to mark a routine
as autonomous (independent).
You need to log an error to your database log table. On the
other hand, you need to roll back your core transaction because of the error. And you don't
want to roll back over other log entries
Create the Log Table: log
CREATE TABLE log (
log_code INTEGER,
log_mesg VARCHAR2(2000),
log_date DATE,
log_user VARCHAR2(50),
log_mach VARCHAR2(100),
log_prog VARCHAR2(100)
);
Now create the Logging Procedure write_log, which inserts a row in
the log table when an error occurs. You can use the procedure write_log an an
error handler in the EXCEPTION part.
CREATE OR REPLACE PROCEDURE write_log (
log_code IN INTEGER,
log_mesg IN VARCHAR2) IS
--
PRAGMA AUTONOMOUS_TRANSACTION;
--
CURSOR sess IS
SELECT machine, program
FROM v$session
WHERE audsid = USERENV('SESSIONID');
--
-- MT = Main Transaction, AT = Autonomous Transaction
--
rec sess%ROWTYPE;
--
BEGIN
-- MT suspends
--
OPEN sess;
FETCH sess INTO rec;
CLOSE sess;
--
INSERT INTO log VALUES ( -- AT begins
log_code,
log_mesg,
SYSDATE,
USER,
rec.machine,
rec.program
);
COMMIT;
-- AT ends
EXCEPTION
WHEN OTHERS THEN
ROLLBACK;
END;
-- MT resumes
/
Now create a test procedure with the EXCEPTION handler
write_log
CREATE OR REPLACE PROCEDURE add_emp IS
BEGIN
INSERT INTO emp (ename)
VALUES ('miller'); -- MT begins
COMMIT;
EXCEPTION
WHEN OTHERS THEN
write_log (SQLCODE,SQLERRM);
ROLLBACK;
RAISE;
END;
-- MT ends
/
Test the execption handler
SQL> exec add_emp;
SQL> SELECT * FROM log;
LOG_CODE LOG_MESG
-------- --------------------------------------------------------
-1400 ORA-01400: cannot insert NULL into ("SCOTT"."EMP"."EMPNO")
The error is logged in the autonomous transaction, but the main
transaction is rolled back.
Creating updatable views using
INSTEAD OF triggers
INSTEAD OF triggers provide a transparent way of modifying
views that cannot be modified directly through UPDATE, INSERT, and DELETE statements. These
triggers are called INSTEAD OF triggers because, unlike other types of triggers, Oracle
fires the trigger instead of executing the triggering statement. The trigger performs
UPDATE, INSERT, or DELETE operations directly on the underlying tables.
We create the VIEW emp_dept, which joins the table
emp and dept. An INSERT is only possible with an INSTEAD OF trigger.
Create the view based on emp and dept
CREATE VIEW emp_dept AS
SELECT e.empno,
e.ename,
e.job,
d.deptno,
d.dname
FROM emp e, dept d
WHERE e.deptno = d.deptno;
Try to insert a row
INSERT INTO emp_dept (empno,ename,job,deptno,dname)
VALUES (9999,'Mayor','Engineer',20,'Agriculture');
ORA-01779: cannot modify a column which maps to a non
key-preserved table
Check if view is updatable -- it is not.
SELECT column_name,
updatable ,
insertable,
deletable
FROM user_updatable_columns
WHERE table_name = 'EMP_DEPT';
COLUMN_NAME
UPD INS DEL
------------------------------ --- --- ---
EMPNO
NO NO NO
ENAME
NO NO NO
JOB
NO NO NO
DEPTNO
NO NO NO
DNAME
NO NO NO
Create the INSTEAD OF trigger
CREATE OR REPLACE TRIGGER trg_emp_dept
INSTEAD OF INSERT ON emp_dept
DECLARE
duplicate_record EXCEPTION;
PRAGMA EXCEPTION_INIT (duplicate_record, -00001);
BEGIN
INSERT INTO emp (empno,ename,job)
VALUES (:NEW.empno,:NEW.ename,:NEW.job);
INSERT INTO dept (deptno,dname)
VALUES (:NEW.deptno,:NEW.dname);
EXCEPTION
WHEN duplicate_record THEN
RAISE_APPLICATION_ERROR (-20001,'Duplicate employee
or departement');
END trg_emp_dept;
/
Try to insert a row
INSERT INTO emp_dept (empno,ename,job,deptno,dname)
VALUES (9999,'Mayor','Engineer',20,'Agriculture');
1 row created.
The Power of Inline Views
A subquery in the FROM clause of a SELECT statement is also called an
inline view. When a query contains an inline view, the inline is merged into the query.
Powerful constructs can be built using inline views as the next example shows: check the
tablespace available, free and used space.
set linesize 100
column file_name format a40 heading "File"
column tablespace_name format a10 heading "Tablespace"
column allocated format 999,999,999 heading "Allocated"
column free format 999,999,999 heading "Free"
column used format 999,999,999 heading "Used"
select a.file_name file_name,
a.tablespace_name tablespace_name,
a.bytes allocated,
nvl(b.free,0) free,
a.bytes-nvl(b.free,0) used
from dba_data_files a, (select file_id, sum(bytes) free
from dba_free_space
group by file_id) b
where a.file_id = b.file_id (+);
File
Tablespace Allocated
Free Used
---------------- ---------- ------------ ------------ ------------
ARK1_SYS1.DBF SYSTEM 209,715,200
126,484,480 83,230,720
ARK1_RBS1.DBF RBS
524,353,536 398,458,880 125,894,656
ARK1_USERS1.DBF USERS
94,437,376 58,195,968 36,241,408
ARK1_TAB1.DBF TAB
209,780,736 98,566,144 111,214,592
ARK1_IDX1.DBF IDX
209,780,736 169,345,024 40,435,712
ARK1_OEM1.DBF OEM
524,353,536 356,515,840 167,837,696
Counting Backwards to Reset a
Sequence Value
Consider a sequence
named "MY_SEQ" which has been created to generate automatic numbers. Somebody, by mistake,
has tried to access the sequence from SQL*Plus and consequently the value has been
increased to e.g. 32. Our objective is now to reset the value to 10 so that next created
number will have a value of 11.
SELECT increment_by
FROM user_sequences
WHERE sequence_name = 'MY_SEQ' ;
This will return 1. It is not always necessary to run the above query to
find out the INCREMENT BY value. You can find it out by looking at the column data for
which the sequence is used.
ALTER SEQUENCE my_seq INCREMENT BY -1;
DECLARE
temp NUMBER(10);
BEGIN
WHILE(TRUE)
LOOP
SELECT MY_SEQ.NEXTVAL
INTO temp
FROM DUAL;
IF (temp = 10) THEN
EXIT;
END IF;
END LOOP;
EXCEPTION
WHEN OTHERS THEN
DBMS_OUTPUT.PUT_LINE(SQLERRM);
END;
ALTER SEQUENCE my_seq INCREMENT BY 1;
Logon DB Trigger to Setup the User
Environment
Date and time format settings are based on the user's locale and native
language. For example, SCOTT needs default NLS_DATE_FORMAT "MM/DD/YYYY", and ZAHN needs
default "DD-MON-YYYY".,etc. The idea is to create an AFTER LOGON trigger at database level,
which reads LOGON session UserName and sets up NLS_DATE_FORMAT by executing ALTER SESSION
dynamically.
CREATE OR REPLACE TRIGGER setup_env
AFTER LOGON
ON DATABASE
declare
c integer;
r integer;
BEGIN
IF SYS_CONTEXT('userenv','session_user') = 'SCOTT' THEN
c := dbms_sql.open_cursor();
dbms_sql.parse(c,'alter session set nls_date_format='||
chr(39)||'MM/DD/YYYY'||chr(39), dbms_sql.NATIVE);
r:=dbms_sql.execute(c);
dbms_sql.close_cursor(c);
ELSIF SYS_CONTEXT('userenv','session_user') = 'ZAHN' THEN
c := dbms_sql.open_cursor();
dbms_sql.parse(c,'alter session set nls_date_format='||
chr(39)||'DD-MON-YYYY'||chr(39), dbms_sql.NATIVE);
r:=dbms_sql.execute(c);
dbms_sql.close_cursor(c);
END IF;
END;
/
Identify the Datafile Size Limit
There is always some ambiguity regarding the datafile size limit on a
given platform and version of the database. Here is a simple way of identifying the maximum
size to which a datafile can grow before switching to the next datafile.
Suppose you have a locally managed tablespace 'NOL' with AUTOEXTEND on
without the MAXEXTEND value specified (Note: Don't do this ... the reason to read this
tip).
sqlplus sys/....
CREATE TABLESPACE nol
DATAFILE 'E:\Oradata\ARK1\Nol\ARK1_nol1.dbf' SIZE 5M
REUSE
AUTOEXTEND ON
EXTENT MANAGEMENT LOCAL UNIFORM SIZE 512K
NOLOGGING
PERMANENT
ONLINE;
Now let's get the file id of the datafile created for the NOL
tablespace
select file_id,file_name,autoextensible
from dba_data_files
where tablespace_name like 'NOL';
FILE_ID
FILE_NAME
AUT
---------- ----------------------------------- ---
9
E:\ORADATA\ARK1\NOL\ARK1_NOL1.DBF YES
Querying the filext$ table, we can get the value of the maximum size in
database blocks to which the datafile can grow before switching to the next file.
Technically this must be the maximum filesize that Oracle can understand for a database
datafile.
select * from filext$ where file# = 9;
FILE#
MAXEXTEND INC
---------- ---------- ----------
9
4194302 1
Getting the Blocksize of the Database:
select value from v$parameter where name = 'db_block_size';
VALUE
-----
4096
Setting the default would give you a maximum value of 4194302 blocks with
increments of 1 block when the datafile extends. On a database of 4K block size this would
work out to be:
select (4194302*4096)/1024 from dual;
(4194302*4096)/1024
-------------------
16'777'208
So, the database datafile can have a maximum size of 16.7 GByte on a 4k
database block size and Windows 2000 platform. The above shows that the dependency is on
the database block size for a given platform. Also if we do not set the MAXEXTEND for the
datafile, then the first datafile would grow to the MAXEXTEND value and only then would
shift to the next datafile for
a given tablespace with multiple datafiles. So it is imperative to set the MAXEXTEND
value when turning on the AUTOEXTEND option.
Oracle8i Profiler for PL/SQL
Profilers are helpful tools to investigate programs and identify slow
program parts and bottle necks. Furthermore you can determine which procedure, function or
any other code part is executed how many times. To be able to use the DBMS_PROFILER package
you have to install once for your database the following packages. Do this as user SYS:
Suppose Oracle is installed in ORACLE_HOME = D:\Oracle\Product\8.1.7
sqlplus sys/<passwd>
@D:\Oracle\Product\8.1.7\Rdbms\admin\profload.sql
@D:\Oracle\Product\8.1.7\Rdbms\admin\proftab.sql
@D:\Oracle\Product\8.1.7\Rdbms\admin\dbmspbp.sql
@D:\Oracle\Product\8.1.7\Rdbms\admin\prvtpbp.plb
Additionally install again the proftab file as the owner your
packages belong to:
sqlplus scott/tiger
@D:\Oracle\Product\8.1.7\Rdbms\admin\proftab.sql
A typical profile cycle looks like this:
Start your profiler before every profile cycle:
sqlplus scott/tiger
exec DBMS_PROFILER.START_PROFILER;
For example, create and start the following procedure, to create a random
number using the DBMS Package DBMS_RANDOM
CREATE OR REPLACE FUNCTION myrand (n IN NUMBER) RETURN NUMBER IS
my_random_number NUMBER;
BEGIN
DBMS_RANDOM.INITIALIZE (n);
my_random_number := DBMS_RANDOM.RANDOM;
DBMS_RANDOM.TERMINATE;
RETURN (my_random_number);
END;
/
SELECT myrand (5000) FROM dual;
exec DBMS_PROFILER.STOP_PROFILER;
SELECT plsql_profiler_runnumber.currval FROM dual;
CURRVAL
----------
1
The run id (in our example = 1) is used to identify the profile cycle.
All results for all cycles remain stored. You can use the run ids to compare different
cycles with different program codes against each other.
Here is a code sample how to select profiler information:
col line format 9999 heading "Line"
col total_occur format 999,999 heading "Tot Occur"
col total_time format 999,990.999 heading "Tot Time[ms]"
col text format a50 heading "Code"
SELECT s.line,
p.total_occur,
p.total_time,
s.text
FROM all_source s, (
SELECT u.unit_owner,
u.unit_name,
u.unit_type,
d.line#,
d.total_occur,
d.total_time/1000000 total_time
FROM plsql_profiler_data d,
plsql_profiler_units u
WHERE u.unit_number = d.unit_number
AND
u.runid = d.runid
AND
u.runid = 1 -- Set
run id here
) p
WHERE s.name = 'MYRAND' -- Set
Procedure Name here
AND s.owner = 'SCOTT' --
Set Procedure Owner here
AND s.owner = p.unit_owner (+)
AND s.name = p.unit_name (+)
AND s.type = p.unit_type (+)
AND s.line = p.line# (+)
ORDER BY s.line;
You have to set your run id, a package name and the package owner. To
specify the source lines is not mandatory (not set in the example) but very convenient.
Some development tools support the evaluation of these two profiler tables. However if you
select them in SQL*Plus you will get a lot of lines. In a first step you can display all
the lines and later on, if you focus down to certain code parts, you may like to restrict
your selection by line numbers.
A typical output looks like this.
Tot Tot
Line Occur Time[ms] Code
----- ----- -------- ----------------------------------------------
1
FUNCTION myrand (n IN NUMBER) RETURN NUMBER IS
2
my_random_number NUMBER;
3
BEGIN
4 1 0.035
DBMS_RANDOM.INITIALIZE (n);
5 2 0.009
my_random_number := DBMS_RANDOM.RANDOM;
6 1 0.005
DBMS_RANDOM.TERMINATE;
7 1 0.002 RETURN
(my_random_number);
8 0 0.000 END;
The file number is followed by the number of executions and the total
time in milliseconds.
Enabling and Disabling
Automatic Extension for a Datafile
You can create datafiles or alter existing datafiles so that they automatically increase
in size when more space is needed in the database. The files increase in specified
increments up to a specified maximum.
If you have no automatic mechanism to check the growth of your Oracle Datafile,
ATOEXTEND ON will fillup the filesystem until 100%, then it is not easily to reclaim space.
We think, that the disadvantage is greater than the advantage, due to this, check your
Oracle Datafiles and reset AUTOEXTEND to OFF.
To find out if a datafile is auto-extensible, query the DBA_DATA_FILES
view and examine the AUTOEXTENSIBLE column.
SELECT file_name,autoextensible FROM dba_data_files;
FILE_NAME
AUT
----------------------------------- ---
/u01/db/DIA3/sys/DIA3_sys1.dbf NO
/u01/db/DIA3/cdr/DIA3_cdr1.dbf NO
/u01/db/DIA3/cre/DIA3_cre1.dbf NO
/u01/db/DIA3/rbs/DIA3_rbs1.dbf NO
/u01/db/DIA3/usr/DIA3_users1.dbf NO
/u01/db/DIA3/tab/DIA3_tab1.dbf YES
You can specify automatic file extension by specifying an AUTOEXTEND ON clause when you
create datafiles using the following SQL statements:
- CREATE DATABASE
- CREATE TABLESPACE
- ALTER TABLESPACE
CREATE TABLESPACE rbs
DATAFILE '/u01/db/DIA3/rbs/DIA3_rbs1.dbf' SIZE 512064K REUSE
AUTOEXTEND ON NEXT 10M MAXSIZE UNLIMITED
EXTENT MANAGEMENT LOCAL UNIFORM SIZE 1M
PERMANENT
ONLINE;
You can enable or disable automatic file extension for existing datafiles, or manually
resize a datafile using the SQL statement ALTER DATABASE. The following example enables
automatic extension for a datafile added to the USERS tablespace:
ALTER TABLESPACE users
ADD DATAFILE '/u02/oracle/rbdb1/users03.dbf' SIZE 10M
AUTOEXTEND ON
NEXT 512K
MAXSIZE 250M;
The value of NEXT is the minimum size of the increments added to the file when it
extends. The value of MAXSIZE is the maximum size to which the file can automatically
extend.
The next example disables the automatic extension for the datafile.
ALTER DATABASE DATAFILE '/u02/oracle/rbdb1/users03.dbf'
AUTOEXTEND OFF;
The Power of EXECUTE IMMEDIATE and
CASE WHEN
Never do procedurally what you can do in a single SQL
statement. If you have a typical CASE construct you can use EXECUTE IMMEDIATE with a CASE
statement.
Suppose you have the following UPDATE:
DECLARE CURSOR empcur IS
SELECT empno, job FROM emp
WHERE (empno IN ('7566','7369','7654'))
AND (job IN ('MANAGER','CLERK','SALESMAN'))
FOR UPDATE;
BEGIN
FOR rec IN empcur LOOP
IF rec.job = 'MANAGER' AND
rec.EMPNO = '7566' THEN
UPDATE emp
SET code = 'D01'
WHERE CURRENT OF empcur;
ELSIF
rec.job = 'CLERK' AND
rec.EMPNO = '7369' THEN
UPDATE emp
SET code = 'D02'
WHERE CURRENT OF empcur;
ELSIF
rec.job = 'SALESMAN' AND
rec.EMPNO = '7654' THEN
UPDATE emp
SET code = 'D03'
WHERE CURRENT OF empcur;
END IF;
END LOOP;
END;
/
Use dynamic SQL on the update since PLSQL doesn't understand
CASE until 9i but that's not really relevant. Unlearn "procedural" coding. Try to do it in
SQL, resorting to procedural logic only when truly necessary.
DECLARE
BEGIN
EXECUTE IMMEDIATE
'update emp
set code =
case when (job = ''MANAGER'' and empno = 7566)
then ''D01''
when (job = ''CLERK''
and empno = 7369) then ''D02''
when (job = ''SALESMAN''
and empno = 7654)then ''D03''
else NULL
end
where empno in (''7566'',''7369'',''7654'')
and job IN (''MANAGER'',''CLERK'',''SALESMAN'')';
END;
/
Tracking the progress of a long
running statement
Sometimes you run an INSERT or DELETE statement that takes a
long time to complete. You have wondered how many rows have already been inserted or
deleted so that you can decide whether or not to abort the statement. Is there a way to
display how many rows have been deleted while the statement is occurring ?
You can query the V$SESSION_LONGOPS table to track the
progress of the statement.
Example: Starting the following long running
INSERT
INSERT INTO bigemp SELECT * FROM bigemp;
Check the progress:
SELECT sid,sofar,totalwork,time_remaining
FROM v$session_longops
WHERE sid = 10 and time_remaining > 0;
SID
SOFAR TOTALWORK TIME_REMAINING
---------- ---------- ---------- --------------
10
8448
11057 20
10
8832
11057 17
10
9024
11057 16
10
9184
11057 14
10
9536
11057 12
10
9646
11057 11
10
9920
11057 9
10
10421
11057 5
10
10529
11057 4
10
10814
11057 2
Slow count(*) and the Highwater Mark
For each object, Oracle also maintains a record of the
highest relative block of the table used to hold data. This highwater mark is
maintained in multiples of five blocks and is not reset unless the TRUNCATE command is
executed.
When Oracle performs operations requiring a full table scan,
such as SELECT count(*), all blocks up to and including the highwater mark are read. If a
table is created with 50,000 rows occupying 10,000 blocks, and those rows are subsequently
deleted, the highwater mark will remain at 10,000, and a SELECT count(*) command will read
all 10,000 blocks even though they are all empty.
An even worse scenario is possible. Suppose that a table
contains 50,000 rows, and the first 49,000 rows are then deleted. The blocks corresponding
to the deleted data are placed at the end of the free block list. When the next INSERT
statement is executed, Oracle finds the first block on the free block list, which is beyond
the highwater mark. The effect is that all the free space (49,000 rows worth) is ignored,
and the physical table becomes bigger.
Full table scans and other similar operations still have to
read all the empty blocks, and performance is significantly impacted. If you use
SQL*Loader with the direct path option, these loads always begin at the highwater mark, so
the table size may grow while leaving significant amounts of free space unused.
To easily determine the current value of the highwater mark,
use the following formula after analyzing the table:
highwater mark = total blocks - empty blocks - 1
Total blocks for a table can be obtained by using the
following query.
SELECT blocks
FROM dba_segments
WHERE owner = '&Owner'
AND segment_name = 'Tablename';
Likewise, the number of empty blocks (blocks above the
highwater mark) can be obtained with this query:
SELECT empty_blocks
FROM dba_tables
WHERE owner = '&Owner'
AND table_name = 'Tablename';
John Dixon, published on http://www.revealnet.com a script which can be used to list all of the
tables specified by owner, where the High Water Mark is say 20% larger than the actual data
in the tables. This will indicate which tables require a rebuild.
Download Script: Oracle 7 Version / Oracle 8 Version
SQLNET Trace Route from Client to
Server
The Trace Route Utility (TRCROUTE) enables administrators to
discover what path or route a connection is taking from a client to a server. If TRCROUTE
encounters a problem, it returns an error stack to the client instead of a single error.
These additional error messages make troubleshooting easier.
TRCROUTE is different from TNSPING in that it travels as a
special type of connect packet, and is routed as such. As it travels toward its
destination, the TRCROUTE connect packet collects the TNS addresses of every node it
travels through. If an error occurs, TRCROUTE collects error information that shows where
the error occurred. The Trace Route Utility displays the information collected on the
client screen. You can redirect the TRCROUTE output to a file, and print it if you
wish.
Trace Route works only over Net8 and SQL*Net version 2.3 and
later. Every node along the route from client to server must use SQL*Net version 2.3 or
later. If a pre-2.3 node is on the path, the following error is displayed:
TNS-03603: Encountered a node with pre-2.3 version of
SQL*Net
TRCROUTE shows what node along the path is responsible for
any errors.
The Trace Route Utility uses minimal resources. It gathers
information in the connect data of a special connect packet; standard connect packets are
not affected.
The server is not affected by TRCROUTE. The listener
receives and processes the TRCROUTE connect packet. It returns the information to the
client by putting it into a refuse packet. The server does not need to start up any new
processes or deal with dummy connections.
To invoke TRCROUTE, enter the following from the command
line:
$ trcroute net_service_name
$ trcroute DIA3.WORLD
Copyright (c) 1999 Oracle Corporation. All rights reserved.
Route of TrcRoute:
------------------
Node:
Client Time and
address of entry into node:
-------------------------------------------------------------
15-JUL-2001 ADDRESS= PROTOCOL=TCP HOST=192.168.138.21 PORT=1523
Node:
Server Time and
address of entry into node:
-------------------------------------------------------------
15-JUL-2001 ADDRESS= PROTOCOL=TCP HOST=192.168.138.21 PORT=1523
Identifying Databases ( SERVICE_NAMES = DB_NAME +
DB_DOMAIN )
The Oracle9i software identifies a database by its global database
name. A global database name consists of the database name and network
domain. The global database name uniquely distinguishes a database from any other
database in the same network domain.
Example of a Global Database Name: DIA3.AKADIA.COM
In the preceding example, DIA3 is the name of the database. The
database name portion is a string of no more than 8 characters that can contain alpha,
numeric, and additional characters. The database name is also assigned to the DB_NAME
parameter in the init.ora file.
AKADIA.COM is the network domain in which the database is located.
Together, the database name and the network domain make the global database name unique.
The domain portion is a string of no more than 128 characters that can contain alpha,
numeric, period (.), and additional characters. The domain name is also assigned to the
DB_DOMAIN parameter in the init.ora file.
The DB_NAME parameter and the DB_DOMAIN name parameter combine to create
the global database name value assigned to the SERVICE_NAMES parameter in the init.ora
file.
Global Database Name = SERVICE_NAMES = DB_NAME + DB_DOMAIN
The System Identifier (SID) identifies a specific Oracle9i
instance reference to the database. The SID uniquely distinguishes a database from any
other database on the same computer. Multiple Oracle home directories enable you to have
multiple, active Oracle databases on a single computer. Each database requires a unique SID
and database name.
Managing Files from PL/SQL
with DBMS_BACKUP_RESTORE
Oracle 8i now offers many File I/O utilities which can be used to manage
files in the operating system filesystem. One of this File I/O package is
DBMS_BACKUP_RESTORE. It includes many procedures and functions to normalize filenames for
Windows NT environments. One of this function is DELETEFILE, which can be used to remove a
file from the filesystem.
In the next example we show a way to delete old archive log files
automatically, it works on Windows and Unix. Of course, make sure that you have valid
backups or you risk deleting archives that you may need. First, the script gives a grant to
objects owned by the user sys. Then, it creates a directory to use the BFILENAME
function. Finally, it creates two procedures: One that extracts the name of the archive and
another that finds old archive logs and deletes them.
CONNECT sys/your_sys_password
GRANT SELECT ON v_$archived_log TO SYSTEM;
GRANT EXECUTE ON dbms_backup_restore TO SYSTEM;
Use the CREATE DIRECTORY statement to create a directory object. A
directory object specifies an alias for a directory on the server's file system where
external binary file LOBs (BFILEs) are located. You can use directory names when referring
to BFILEs in your PL/SQL code and OCI calls, rather than hard-coding the operating system
pathname, thereby allowing greater file management flexibility
CONNECT SYSTEM/user_system_password;
CREATE OR REPLACE DIRECTORY ARCHIVEDIR AS 'D:\Oradata\ARK1\arc';
The PATH given in the above statement can also be read from the data
dictionary in the variable LOG_ARCHIVE_DEST
select value from v$parameter
where upper(name) = 'LOG_ARCHIVE_DEST';
CREATE OR REPLACE FUNCTION get_fname(p_path IN VARCHAR2)
RETURN VARCHAR2 IS
l_posi NUMBER;
l_fname VARCHAR2(100);
BEGIN
l_posi := length(p_path);
LOOP
--
-- NT or Unix
--
IF SUBSTR(p_path,l_posi,1) IN ('/','\') THEN
l_fname := SUBSTR(p_path,l_posi + 1);
EXIT;
ELSE
l_posi := l_posi - 1;
IF (l_posi < 0) THEN
EXIT;
END IF;
END IF;
END LOOP;
RETURN(l_fname);
END;
/
CREATE OR REPLACE PROCEDURE delete_archive_logs IS
arc_file BFILE;
arc_exist BOOLEAN;
arc_name VARCHAR2(100);
CURSOR get_archive IS
SELECT name
FROM v$archived_log;
WHERE completion_time < SYSDATE - 30;
BEGIN
FOR entry IN get_archive LOOP
arc_exist := FALSE;
arc_name := get_fname(entry.name);
arc_file := BFILENAME('ARCHIVEDIR',arc_name);
arc_exist := DBMS_LOB.FILEEXISTS(arc_file) = 1;
IF arc_exist THEN
dbms_output.put_line('Deleting: ' || entry.name);
SYS.DBMS_BACKUP_RESTORE.DELETEFILE(entry.name);
END IF;
END loop;
END;
/
SQL> SET SERVEROUTPUT ON;
SQL> EXEC delete_archive_logs
Deleting: D:\ORADATA\ARK1\ARC\ARK1_83.ARC
Deleting: D:\ORADATA\ARK1\ARC\ARK1_84.ARC
Deleting: D:\ORADATA\ARK1\ARC\ARK1_85.ARC
PL/SQL procedure successfully completed.
The procedure can easily enhanced to read the ARCHIVEDIR from the data
dictionary and to enter the days back to delete (instead of the fixed 30 days) as an
argument for the procedure DELETE_ARCHIVE_LOGS.
Migration to 8i / 9i: Set "_SYSTEM_TRIG_ENABLED"
to FALSE
This important Tip was published on Oracle Metalink.
This parameter was introduced in Oracle
8.1. It is a HIDDEN parameter (It begins with an UNDERSCORE). This parameter can only be
set in the init.ora file in Oracle8i. It can be changed dynamically using ALTER SYSTEM in
Oracle9i.
System triggers are a new feature in Oracle 8.1. When
_SYSTEM_TRIG_ENABLED is set to TRUE (the default) then system triggers are enabled. In some
cases it may be necessary to disable system triggers from firing by setting this parameter
to FALSE. This should only be done for short periods for specific operations. It is
not advisable to allow normal users onto the database whilst such triggers are disabled as
system triggers may be used for audit or security checking by certain
applications.
Description
When performing any of the following actions on an Oracle8i (or 9i)
database:
-
Installing a patch set
-
Upgrading
-
Downgrading
-
Performing any other operation which requires catalog or
catproc to be run
-
Installing Java (initjvm)
-
Any other action which runs scripts which modify objects owned by
SYS
then you should set the hidden init.ora parameter _SYSTEM_TRIG_ENABLED
to FALSE before starting the instance under Oracle8i (or 9i) to perform the respective
maintenance operation unless the steps you are following advise otherwise.
In Oracle8i add the lines below to the init.ora file used to start the
instance then stop and restart the instance before performing the maintenance
actions.
# Disable system triggers for the duration of the
# maintenance operation.
_SYSTEM_TRIG_ENABLED=FALSE
IMPORTANT: This parameter must be commented out and the instance
re-started once the required maintenance operations have been performed.
Most Oracle9i scripts include statements to dynamically set
_SYSTEM_TRIG_ENABLED to FALSE when required. However it is possible that some scripts
have omitted this step so it is still advisable to set this to FALSE.
You can do this in Oracle9i using the command:
ALTER SYSTEM SET "_system_trig_enabled"=FALSE;
Once the required steps are complete you can reenable triggers
thus:
ALTER SYSTEM SET "_system_trig_enabled"=TRUE;
The parameter _SYSTEM_TRIG_ENABLED does not exist in Oracle 8.0 or
earlier so should not be present when starting an instance under 8.0 or Oracle7. However,
if the operation being performed involves some steps under Oracle 8i / 9i and some under
8.0 / 7.X then set the parameter for the 8i / 9i steps.
Explanation
What does _SYSTEM_TRIG_ENABLED do ?
This hidden parameter stops system triggers from firing (eg: triggers
on various DDL or database events are disabled).
Why should it be set to false ?
The parameter should be set to FALSE for scripts which perform
dictionary operations as the objects on which the triggers depend may become invalid or
be dropped, causing the triggers to fail and thus preventing the scripts from running
successfully. Some examples are given below.
Example Problem Scenarios
There are many potential problem scenarios if you have system triggers
in place when performing dictionary maintenance operations. Some of the more common
symptoms are described below. In most cases setting _SYSTEM_TRIG_ENABLED=FALSE and
re-performing the operation will allow you to proceed.
If you have JIS installed and then deinstall Java using the "rmjvm"
script then any subsequent attempt to DROP a ROLE will error,
"rmjvm" does not drop all Java related objects. It leaves a database trigger behind which
then cannot execute
If you have JIS installed and re-run CATALOG and CATPROC then the same
trigger can become INVALID. This causes errors on many DROP SYNONYM commands.
If _SYSTEM_TRIG_ENABLED is not set to FALSE then you may encounter
an ORA-604 , ORA-6553 , PLS-213 in package STANDARD errors when
opening the database under Oracle8i/9i.
Can give ORA-600 [16201] errors opening a
database under Oracle9i for the first time when _SYSTEM_TRIG_ENABLED is not set to
FALSE.
Manually Removing all Oracle
Components from NT / 2000
This important Tip was published on Oracle Metalink.
If you have many Oracle Releases and Tools on your NT or
W2000 Workstation, you may encounter
problems to deinstall all of them with the Oracle Installer. It may be necessary to do a
manually Deinstallation.
This article describes the procedure how to manually perform the
actions to create a "clean machine" on Microsoft Windows NT/2000 and how to manually
remove all Oracle components (e.g.: oracle RDBMS database server, IAS, OEM, client
installations, etc) and services from your computer.
To remove all Oracle components from a computer on Windows NT/Windows 2000:
Ensure you are logged in as a user with Administrator privileges.
- Stop all Oracle services (if any are running)
NT: Choose Start > Settings > Control Panel > Services.
2000: Right click My Computer > Manage > Services and Applications >
Services
If any Oracle services (their names begin with Oracle) exist and have the status
Started, select the service and click Stop.
Click Close to exit the Services window.
Close the Control Panel/Computer Management window.
- Remove the following entries in the Windows
registry
Start the registry editor:
Choose Start > Run > regedt32
HKEY_LOCAL_MACHINE\SOFTWARE\ORACLE
Note the value of the key INST_LOC, this is the location of the Oracle Universal
Installer. The default location is C:\Program Files\Oracle\Inventory. If this value is
different, make note of it, so we can delete these files later. Delete this ORACLE
key.
HKEY_LOCAL_MACHINE\SOFTWARE\ODBC
Expand all subkeys and remove all keys under here which are
related with the
"Oracle ODBC Driver"
HKEY_LOCAL_MACHINE\SYSTEM\CurrentControlSet\Services
Remove all keys under here that begin with ORACLE or
ORAWEB.
HKEY_LOCAL_MACHINE\SYSTEM\CurrentControlSet\Services\EventLog\...
\Application
Remove all keys under here that begin with ORACLE.
HKEY_LOCAL_MACHINE\Software\Microsoft\Windows\CurrentVersion\Uninstall
Remove any entries related to Oracle.
HKEY_CLASSES_ROOT
Remove all keys that begin with Oracle, OraPerf or OraOLEDB
Close the registry.
- Clean up the environment settings
NT: Choose Start > Settings > Control Panel > System > Environment
tab
2000: Choose Start > Settings > Control Panel > System > Advanced tab
> Environment variables.
At "System Variables" click on the variable PATH in order to modify
the value. For example, you may see a path similar to this one:
C:\ORACLE\ORA81\BIN;C:\PROGRAM FILES\ORACLE\JRE\1.1.7\BIN
If an %ORACLE_HOME% was installed, remove this %ORACLE_HOME%\BIN
If JRE was installed by Oracle, remove the JRE path.
If there is a CLASSPATH variable under "System Variables", first make note of the path
defined, then delete it. This variable can be added back at a later date if needed.
Check if there are any other Oracle variables set in "System Variables", ORACLE_HOME,
ORACLE_SID or TNS_ADMIN. If these exist, delete them also.
Click on APPLY and OK.
Close the Control Panel window.
- Delete the software and icons
NT: Choose Start > Programs > Windows NT Explorer.
2000: Choose Start > Programs > Accessories > Windows NT Explorer.
NT: Go to SYSTEM_DRIVE:\WINNT\PROFILES\ALL USERS\START MENU\PROGRAMS
2000: Go to SYSTEM_DRIVE:\DOCUMENTS AND SETTINGS\ALL USERS\START MENU\PROGRAMS
(Note: These locations depend on whether OS was upgraded from NT,
or this was a fresh install of 2000)
and delete the following icons:
- Oracle - HOME_NAME
where HOME_NAME is the previous Oracle home name.
- Oracle Installation Products
Go to SYSTEM_DRIVE:\Program Files\Oracle or the location of INST_LOC as
noted earlier and delete this directory.
Go to SYSTEM_DRIVE:\Temp and delete all files and directories in here.
Go to the drive where the Oracle software is installed on your machine and delete all
ORACLE_BASE directories on your hard drive.
Close the Windows NT Explorer.
Empty the recycle bin
Right click on recycle bin > Empty Recycle Bin.
Reboot your computer
Restrict the Number of Records
While developping database application we often have to restrict the
number of records an end user can insert into a table. A simple solution is the following
code fragment in the BEFORE-INSERT-FOR-EACH-ROW Trigger:
select count(*) into l_cnt from detail;
if l_cnt >= 5 then
raise_application_error(-20101,
'Maximum number of records exceeded');
end if;
To reconstruct or understand the following descriptions please
download the example code
ex_restr_nbrof_records.sql or consult the source code, we assume, that the maximum number of detailrecords must be limited to
five.
We try to insert a 6Th record:
insert into detail values (6,'M1');
*
ERROR at line 1:
ORA-20101: Maximum number of recors reached
ORA-06512: at "SCOTT.BI_DETAIL", line 6
ORA-04088: error during execution of trigger
'SCOTT.BI_DETAIL'
So far so good. We’ll now demonstrate what happens, when we insert
records from two concurrent transactions. Delete one record in order to be able to insert
one record hereafter:
delete from detail where id=5;
1 row deleted.
commit;
Invoke the SQL-Plus tool and insert one record
insert into detail values (5,'M1');
1 row
created.
DO NOT COMMIT !
Invoke a second session by starting a SQL-Plus again and run the
statement
insert into detail values (6,'M1');
1 row created.
commit;
Commit complete.
Change to the other session and issue a commit
commit;
Commit complete.
select count(*) from detail;
COUNT(*)
----------
6
We now have 6 records. The maximum number allowed was 5 !
How to avoid this situation ?
Oracle does not support the "dirty read“
isolation level which is defined with:
"A transaction reads data written by concurrent uncommitted transaction“
A solution to solve this problem is to lock the corresponding master
record:
Change the ON INSERT Trigger:
create or replace trigger bi_detail
before insert
on detail
for each row
declare
l_cnt number;
l_dummy master.id%type;
begin
-- lock the master record to avoit too many
record
-- by using concurrent sessions.
select id into l_dummy from master
where id = :new.m_id for update nowait;
select count(*) into l_cnt from detail;
if l_cnt >= 5 then
raise_application_error(
-20101,'Maximum number of recors
reached');
end if;
end;
Delete the 2 records to test the solution:
delete from detail where id=5;
delete from detail where id=6;
commit;
There should be 4 records now:
select count(*) from detail;
COUNT(*)
----------
4
Now we try again with the two concurrent sessions:
insert into detail values (5,'M1');
1 row created.
Change to the second session and issue:
insert into detail values (6,'M1');
ERROR at line 1:
ORA-00054: resource busy and acquire with NOWAIT specified
ORA-06512: at "SCOTT.BI_DETAIL", line 6
ORA-04088: error during execution of trigger
'SCOTT.BI_DETAIL'
Go back to the first session and run:
commit;
Commit complete.
Remarks
If an exact maximum number of records is specified for a table, using a
lock is the only solution to avoid the above situation demonstrated. Often we want to limit
the number of deteilrecords in a way, that an end user can’t claim a huge amount of
disk space by inserting unbound number of records. In this case, the simple solution shown
at the begin will do it.
If the table doesn’t use a foreign key constraint, you can
implement an auxilliary table, insert one row and lock this row instead of the
masterrecord.
Interacting with Oracle via the
UNIX Korn shell
UNIX remains a fabulous choice for hosting Oracle
databases. Both technologies have proven to be more flexible and more stable for more time
than most of us care to remember.
The remarkable 'Korn' shell, when coupled
with the strength of the standard UNIX tool set, seems to be able to extract the best from
any programmer. While many Oracle customers shy away from actively adopting and supporting
UNIX development, most are perfectly happy to accept 'shell script', and 'shell script' is
all we need for many back-end applications. This article demonstrates how SQL*Plus
can be used in the same manner as any UNIX tool. And you will find that interacting with an
Oracle database via a 'shell script' program is simple, flexible and dynamic--the
UNIX way.
Background / Overview
SQL*Plus will happily integrate into the standard UNIX IO streams. The simplest way to
demonstrate this point is that the following UNIX command.
Note, that you first must start the Korn Shell (usually /bin/ksh), '$' is the Shell
Prompt.
/bin/ksh
$ print "select * from dual;" | sqlplus -s scott/tiger
Produces the following output:
D
-
X
[ Note: the '-s' flag suppresses the standard Oracle banner. ]
Once you grasp this, the possibilities for using SQL*Plus from UNIX can become quite
exciting. You can construct and run Dynamic SQL or PL/SQL statements without difficulty.
There is also a mechanism available to a shell script programmer that avoids commit or
rollback processing between SQL*Plus transactions.
By using pipes to deliver SQL or PL/SQL statements to SQL*Plus, you can avoid the use of
temporary files and construct SQL or PL/SQL statements 'on-the-fly'. You can also
use pipes to collect the output generated from SQL*Plus (thereby avoiding temporary files,
once again), and interpret the output of pipes using the UNIX tool set.
This article uses a simple UNIX file to Oracle table interface to demonstrate
UNIX/Oracle communications techniques.
Is Oracle working properly?
One of the first tasks required of an interface is to check that the target Oracle
database is actually ready for business. I've seen and used many methods to do this, but my
current favorite is to run a small predictable query and check the result. If the query
performs as expected, then it is likely that Oracle is OK. The following function
Is_Oracle_OK does the job
For SUN Solaris, grep in /usr/xpg4/bin
must be used, therefore the PATH variable is setup.
#!/bin/ksh
OLDPATH=$PATH
PATH=/usr/xpg4/bin:$OLDPATH
# For SUN Solaris 8
typeset -irx TRUE=0
typeset -irx FALSE=1
function Is_Oracle_OK
{
if print "
select dummy||'OK' from dual;
" | sqlplus -s scott/tiger | grep -q
XOK
then return ${TRUE}
fi
return ${FALSE}
}
if Is_Oracle_OK
then print "Oracle is up"
else print "Oracle is down"
fi
This script queries the "dual" table and then scans the output for the string that is
expected if everything is working well ("XOK"). Note that care has been taken to ensure
that if Oracle were to reject the submitted SQL, any fragment of an Oracle-generated error
report will not meet the acceptance criteria set within the grep command.
Dynamically Generated SQL
Now that we have established that the database is operational using the
Is_Oracle_OK function, we want to insert some of the contents of the
/etc/passwd file into a table. In this example, we want to load the first and fifth
fields (delimited by '|') of each line that begins with the character 'r'. To add a little
extra spice, the following example code creates, populates, queries and drops the example
table. We issue a commit every time 10 records are inserted and after the last insert. Note
the use of UNIX environment variables within the SQL statements.
#!/bin/ksh
OLDPATH=$PATH
PATH=/usr/xpg4/bin:$OLDPATH # For SUN Solaris 8
{
typeset TABLE='example' # Name the table to load
print "WHENEVER
SQLERROR EXIT"
print "WHENEVER OSERROR EXIT"
print "set autocommit off"
print "create table ${TABLE}
(
user_name varchar2(100),
user_description varchar2(100)
);"
typeset -i
COUNT=0 # Count records inserted
typeset FILE=/etc/passwd #
The file to load
typeset
Item1
# Holds user name from passwd file
typeset
Item5
# Holds user description
grep -E '^r' ${FILE} | while read LINE
do
let COUNT=COUNT+1
Item1=$(print ${LINE} | cut -d'|' -f1)
Item5=$(print ${LINE} | cut -d'|' -f5)
print "
insert into ${TABLE}
(
user_name,
user_description
)
values
(
'${Item1}',
'${Item5}'
);"
# Commit
every 10 records - COUNT ends with a '0'
[[ ${COUNT} == +([0-9])0 ]] && print "commit;"
done
print "commit;" # Issue a commit after the last
insert
print "select * from ${TABLE};"
print "drop table ${TABLE};"
} | sqlplus -s scott/tiger
In shell scripts, usually turn autocommit off and take charge of issuing the
commits self. Note that the shell variables Item1 and
Item5 are single-quoted within the insert SQL because they are strings. Don't quote
numbers !
Watch out for single-quote characters contained within the data source, they'll cause
the SQL statements to fail unless you escape them or remove them.
Keeping Track of Progress
A neat trick to use in some situations (like debugging) is to save all the SQL*Plus
input and output to a file. Try replacing the ...
"} | sqlplus -s scott/tiger"
.... command (on the last line of the previous example code),
with (all on a single line)
"} 2>&1 | tee -a /tmp/ora.txt |
sqlplus -s scott/tiger 2>&1 |
tee -a /tmp/ora.txt".
While this should work nicely, it's preferable to replace all
the 'sqlplus -s scott/tiger' strings within the body of the code with an alias, because this allows to offer a 'debug oracle'
facility, which can activate to record the Oracle IO. To do this, the beginning of
the Oracle Shell-script code includes
the following (again all on a single line)
alias To_Oracle="tee -a /tmp/ora.txt |
sqlplus -s scott/tiger 2>&1 |
tee -a /tmp/ora.txt"
Once the alias has been defined, use the alias To_Oracle instead of the string
'sqlplus -s scott/tiger' within the body of the code; for
example:
$ print "select * from dual;" |
To_Oracle
Quick Error Check
If SQL*Plus encounters an error, it generally reports the problem with an error code
prefixed with either ORA, ERROR. Armed with this knowledge, test that some Oracle
interactions have worked correctly by simply scanning the output for an occurrence of an
error prefix, for example in the following code snippet the name of
{TABLE} is missining to produce an error:
#!/bin/ksh
OLDPATH=$PATH
PATH=/usr/xpg4/bin:$OLDPATH
# For SUN Solaris
if print "
create table ${TABLE} # <--
Name of TABLE is missing !
(
user_name varchar2(16),
user_description
varchar2(64)
);"
|
sqlplus -s scott/tiger |
! grep -qiE 'ora|error'
then print "Table ${TABLE} created"
else print "An error was detected when creating table ${TABLE}"
fi
Once again, we like to define an alias for this call through
SQL*Plus, but a function that takes the SQL as an argument could also be used to make
things even prettier:
alias To_Oracle_OK="sqlplus -s scott/tiger 2>&1 |
! grep -qiE 'ora|error'"
The code now looks like this:
#!/bin/ksh
if print "
create table ${TABLE}
(
user_name varchar2(16),
user_description
varchar2(64)
);" | To_Oracle_OK
then print "Table ${TABLE} created"
else print "An error was detected when creating table ${TABLE}"
fi
The BIG 'commit' problem
When a SQL*Plus session terminates, all uncommitted transactions are either lost or
committed (depending on your setup). Using the method just outlined, this makes things a
bit difficult if you want to check how things are going without ending the current SQL*Plus
session. To counter this problem, set a SQL*Plus session as a co-process and communicate
with it using the print -p and read -p shell commands. For example, initiate
a SQL*Plus session as a co-process with the following command:
sqlplus -s scott/tiger |& # Co-process
print -p "select * from dual;" # Command to co-process
print -p "exit"
while read -p LINE
# Read from co-process
do
print - ${LINE}
done
You retrieve the SQL*Plus output:
D
-
X
Note: UNIX also reports that the co-process has completed.
Unfortunately, the read -p command will hang if there is no output to collect or
the output stream has not been terminated. This can even happen if you're just too quick in
trying to grab the output while Oracle is still cogitating. This method, however, does
offer the programming prize of being able to fully communicate with Oracle via a single,
unbroken SQL*Plus session.
To prevent the read command from hanging programs, place a marker in the output
stream (for example, using the SQL*Plus 'prompt' command) after requesting some work.
Then ensure that the code does not read beyond that marker.
Placing the marker also gives the system the moment required to prevent the 'too quick'
hang mentioned earlier.
sqlplus -s scott/tiger |&
# Start the sqlplus co-process
print -p "select * from dual;" # Issue SQL to co-process
(sqlplus)
print -p "prompt marker1" # Place
marker on output
while read -p
LINE
# Read all lines from co-process
do
[[ "${LINE}" == "marker1" ]] && break
print -
${LINE}
# Collect the output generated by SQL
done
Newer versions of the Korn shell offer a time-out argument for the read
command.
PL/SQL
When using the methods outlined in this article, PL/SQL can be used in just the same way
as SQL. For example:
sqlplus -s scott/tiger |& # Start
sqlplus as co-process
print -p "begin
null;
end;" # Define an anonymous PL/SQL block
print -p
'/'
# Execute the PL/SQL
print -p "exit"
# Terminate the co-process
while read -p
LINE # Get the
co-process output
do
print - ${LINE}
done
Produces the output:
PL/SQL procedure successfully completed.
Conclusion
The advantage of Oracle shell scripts is that you can apply the full range of UNIX tools
to the Oracle data. Given that the Oracle interface is reasonably simple, the productivity
boost gained by a shell scripter using UNIX to manipulate the data can be significant.
Have Fun with Unix and Oracle ...
How to escape
special characters in Oracle ?
If you want to retrieve TABLE_NAMES
from ALL_TABLES where the table name is like 'ADD_' using the following query, you may notice that the query is returning
ADDRESS and ADD_CODES:
create table address (p1 number);
create table add_codes (p1 number);
select distinct table_name
from all_tables
where table_name like 'ADD_%';
TABLE_NAME
----------
ADDRESS
ADD_CODES
If you try to escape the '_' character with the following query, you
will still get the same result.
select distinct table_name from all_tables
where table_name like 'ADD\_%'
Therefore the question is: How do you use LIKE to find data
that contains an underscore or percent sign ? The answer is to escape the underscore and/or
percent sign in the LIKE template. You have to designate what character you would like to
use via the ESCAPE keyword. A slash is commonly used, but any character would
actually work:
select distinct table_name
from all_tables
where table_name like 'ADD\_%' ESCAPE '\';
How
to return an exit code from SQL*Plus to the Unix Shell ?
If you want to return a code from SQL*Plus to the UNIX shell script, then
the WHENEVER SQLERROR directive can help. We can return a status from 0...255 to the
UNIX shell. This is usually in the $? environment variable ( for the Korn or Bash Shell )
immediately after execution of a command. Here is a KSH script that shows how this might
work:
#!/bin/ksh
sqlplus -s scott/tiger <<-EOF 1>/dev/null 2>&1
variable rc number
whenever sqlerror exit sql.sqlcode
begin
-- The Variable rc is the return code (from your programm logic)
-- which you want to send from SQL*Plus to the
shell, when
-- the scripts aborts due the WHENEVER SQLERROR
:rc := 1;
if (:rc <> 0)
then
raise_application_error((-20000-224) - :rc,
'Error!');
end if;
end;
/
EOF
Run this code as follows and you will see:
$ ./test.ksh
$ echo $?
1
The 1 is what you are looking for. The key is to use ...
raise_application_error( (-20000-224) - :rc, 'Error!' );
... to raise the error. We can raise errors in a given range, but the
shell will only keep an unsigned byte in the status return value (values 0...255). It takes
our exit file and just looks at that last byte. By using -20000-224 and subtracting from
your return code, we end up exiting with the value of your return code ( given that :rc
is in the range...255 ! ).
Help ! SQL*Plus hangs after
installing 'login.sql'
When SQL*Plus starts up, it looks for two files - glogin.sql and
login.sql. The glogin.sql must be in the directory $ORACLE_HOME/sqlplus/admin and
will be run as soon as the connection to the database is
complete. Once the glogin.sql file has been executed, the login.sql file will be
executed, but the location of the login.sql file is rather more flexible. It depends on
the current working directory (where you started SQL*Plus) and the operating system
environment variable SQLPATH.
If there is a login.sql in the local directory, it will be executed. If
there is no local file, then Oracle will examine the environment variable SQLPATH and
walk the path until it finds the first directory containing a file called login.sql and
will execute that script (and then stop walking the path).
Remember that the login.sql can overwrite the actions of glogin.sql.
If you want to copy this login.sql, make sure
that every user has the privilege to select from the v$instance dynamic
performance view (from the SYS schema). You may find on some
versions and platforms that you get an otherwise inexplicable hang as you connect from
SQL*Plus.
One major deficiency in this approach is that
if a user does a connect user/password then the glogin.sql script is not re-executed.
Depending what you have put into the prompt this could leave the user with a completely
misleading prompt.
As user SYS execute the following
GRANT SELECT ON V_$INSTANCE TO PUBLIC;
The following example for a login.sql sets the SQL
prompt to machine:SID>
set serveroutput on size 1000000 format
wrapped
set pagesize 24
set linesize 120
set trimspool on
column segment_name format a20
column column_name format a20
column plan_plus_exp format a90
set long 20000
define _editor=vi
set termout off
column prompter new_value m_prompt
select
host_name || ':' || instance_name || '>' prompter
from v$instance;
set sqlprompt '&m_prompt'
undefine m_prompt
commit;
set termout on
Test the script with scott/tiger:
diamond:zahn> sqlplus scott/tiger
SQL*Plus: Release 8.1.7.0.0 - Production
(c) Copyright 2000 Oracle Corporation.
Connected to:
Oracle8i Enterprise Edition Release 8.1.7.1.0 - Production
With the Partitioning option
JServer Release 8.1.7.1.0 - Production
diamond:DIA3>
How to
restrict your users to only one Oracle session ?
This can be a requirement of an application, well, we
have not found a good reason for limiting people in this way. However, people want
to do it and when they do, they usually do it the hard way. For example, they will
have a batch job run by the operating system that will look at the V$SESSION table and
arbitrarily kill sessions of users who have more then 1 session. Alternatively, they will
create their own tables and have the application insert a row when a user logs in, and
remove the row when they log out. This implementation invariably leads to lots of calls
to the help desk because when the application 'crashes', the row never gets removed.
There are lots of other 'creative' ways to do this, but none is
as easy as:
SQL> create profile one_session limit
sessions_per_user 1;
Profile created.
SQL> alter user scott profile one_session;
User altered.
SQL> alter system set resource_limit=true;
System altered.
That's it now any user with the ONE_SESSION profile can log on only
once.
Use of the NVL2 Function
Most of us are familiar with the NVL function which checks for the
existence of NULL values. Oracle provides a new function called NVL2 which checks for the
existence of NOT NULL. The syntax for this function is as follows.
NVL2(expr1,expr2,expr3);
If expr1 is not null then the function will return expr2. Otherwise, the function will
return expr3. The expr1 can have any datatype and arguments expr2 and expr3 can be of any
datatype other than LONG. The datatype of the return value is that of expr2.
- Example:
SQL> select
empno,ename,sal,comm,nvl2(comm,1,0) commpre
from emp order by empno;
EMPNO
ENAME
SAL COMM COMMPRE
---------- ---------- ---------- ---------- ----------
7369
SMITH
800
0
7499
ALLEN
1600
300 1
7521
WARD
1250
500 1
7566
JONES
2975
0
7654
MARTIN
1250
1400 1
7698
BLAKE
2850
0
7782
CLARK
2450
0
7788
SCOTT
3000
0
7839
KING
5000
0
7844
TURNER
1500
0 1
7876
ADAMS
1100
0
7900
JAMES
950
0
7902
FORD
3000
0
7934
MILLER
1300
0
- The above query checks for the presence of NOT NULL in the COMM field,
and returns 1 where COMM is NOT NULL and 0 where it is NULL.
- NVL takes 2 arguments while NVL2 takes 3.
- NVL returns the first argument if the first argument is not null, whereas NVL2
returns the second argument if the first argument is not null and returns the third
argument if the first argument is null.
- In NVL, the datatype of the return is that of the first argument, in NVL2 the
datatype of the return is that of the second argument.
Oracle 8i and 9i Online
Documentation
You find the Oracle 8i and 9i Online Documentation
under: http://tahiti.oracle.com/
Logging of DML commands
Suppose you are asked about certain activities on your database, in this example on a
certain table. You need to keep track who has inserted, updated, or even deleted which
record in this table.
For inserting and updating records you may include additional columns such as "last
inserted/updated by" and "last inserted/updated timestamp", but what's about the deleted
records?
Using an action log table offers you the possibility to keep track for
all DML statements if needed. Follow the straight forward example below and you will
participate in the benefits of action logging:
-- Create action log table
CREATE TABLE ACTION_LOG (
USER_ID
INTEGER,
USER_NAME VARCHAR2(30),
ACTION
VARCHAR2(30),
ACTION_DATE DATE,
SES_USERNAME VARCHAR2(30),
SES_OSUSER VARCHAR2(30),
SES_MACHINE VARCHAR2(64),
SES_TERMINAL VARCHAR2(30),
SES_PROGRAM VARCHAR2(48),
SES_CLIENT_INFO VARCHAR2(64)
);
-- Create trigger to log inserting,
updating,
-- deletion of ABC_USER
CREATE OR REPLACE TRIGGER TRG_ABC_USER_ACTION
BEFORE INSERT OR UPDATE OR DELETE
ON ABC_USER FOR EACH ROW
DECLARE
L_ACTION ACTION_LOG.ACTION%TYPE;
BEGIN
IF ( INSERTING ) THEN L_ACTION := 'INSERT'; END IF;
IF ( UPDATING ) THEN L_ACTION := 'UPDATE'; END IF;
IF ( DELETING ) THEN L_ACTION := 'DELETE'; END IF;
INSERT INTO ACTION_LOG
SELECT :OLD.USER_ID, :OLD.USER_NAME, L_ACTION,
SYSDATE, S.USERNAME, S.OSUSER, S.MACHINE,
S.TERMINAL, S.PROGRAM, S.CLIENT_INFO
FROM V$SESSION S
WHERE S.AUDSID = USERENV('SESSIONID');
END;
/
SHOW ERROR;
In the first step the action log table is created. You may enlarge this
example by your own needs, e.g. by table name to log different tables within the same
action table.
In the second step the trigger is created in the table which you wish
to get the logging information. In this case it's the ABC_USER table. According to the
current DML statement the local action variable is set to either 'INSERT', 'UPDATE', or
'DELETE'. The insert statement to the logging table gathers the current information about
the manipulated user data (USER_ID, USER_NAME) and the current session settings. The
current session settings are selected from V$SESSION using the general purpose function
USERENV() to match the current session identifier.
Truncating a Table from a Remote
Database
If you try to truncate a table on a remote database,
you will get the following error:
ORA-02021: DDL operations are not allowed on a
remote database.
You have a database link to the remote database so you can see objects there and execute them (e.g. procedures, functions,
packages, triggers, etc). The solution is to create the following procedure on the remote database, then execute
it from the local one.
CREATE OR REPLACE PROCEDURE
Truncate_Remote_Table(p_table_name VARCHAR2) AS
/*
Procedure Name: Truncate_Remote_Table
Purpose: To truncate a table on a local database
from a remote database.This procedure is
executed remotely via a dblink and passed
in the table name that exists on the local
database.
Thanks to: Giovanni Jaramillo
*/
v_sql_error_code PLS_INTEGER;
v_sql_error_message VARCHAR2(512);
BEGIN
EXECUTE IMMEDIATE 'TRUNCATE TABLE ' || p_table_name;
EXCEPTION
WHEN OTHERS THEN
v_sql_error_code := SQLCODE;
v_sql_error_message := SQLERRM(v_sql_error_code);
DBMS_OUTPUT.ENABLE(5000);
DBMS_OUTPUT.PUT_LINE('OTHER ERROR');
DBMS_OUTPUT.PUT_LINE(v_sql_error_message);
END Truncate_Remote_Table;
To execute the procedure, use the following from the local database:
BEGIN
Truncate_Remote_Table@db_link(‘remote_table_name’);
END;
LONG to BLOB Migration
In release 8.1, a new SQL function, TO_LOB, copies
data from a LONG column in a table to a LOB column. The datatype of the LONG and LOB must
correspond for a successful copy. For example, LONG RAW data must be copied to BLOB data,
and LONG data must be copied to CLOB data. In the next example we show how to migrate a
table with one LONG to a CLOB datatype.
CREATE TABLESPACE lob1
DATAFILE '/lh4/lob1.dbf' SIZE 2048064K REUSE
EXTENT MANAGEMENT LOCAL UNIFORM SIZE 50M
PERMANENT
ONLINE;
set feed off;
spool gen_dis_cons.sql;
SELECT 'ALTER TABLE ' || table_name ||
' DISABLE CONSTRAINT ' || constraint_name ||';'
FROM user_constraints WHERE UPPER(constraint_name) like 'FK_%'
/
spool off;
set feed on;
@gen_dis_cons.sql;
Create a temporary table with converted BLOB field.
CREATE TABLE lob_tmp
TABLESPACE tab
AS SELECT id, TO_LOB(bdata) bdata FROM document;
DROP TABLE document;
RENAME lob_tmp TO document;
set feed off;
set heading off;
spool gen_ena_cons.sql;
SELECT 'ALTER TABLE ' || table_name ||
' ENABLE CONSTRAINT ' || constraint_name ||';'
FROM user_constraints WHERE UPPER(constraint_name) like 'FK_%'
/
spool off;
set feed on;
@gen_ena_cons.sql;
How to create a LOB Table ?
If you plan to store LOB data, together with other
data in the same table, then you should store the LOB data in a separate
tablespace.
CREATE TABLE news (
id
NUMBER(12) NOT NULL,
news
NUMBER(12),
picture
BLOB DEFAULT empty_blob(),
picturetype VARCHAR2(20)
)
LOB (picture) STORE AS (
TABLESPACE lob
STORAGE (INITIAL 10M NEXT 10M PCTINCREASE 0)
CHUNK 50
PCTVERSION 10
NOCACHE LOGGING
)
PCTFREE 10
PCTUSED 40
INITRANS 2
MAXTRANS 255
TABLESPACE tab
STORAGE (INITIAL 10M
NEXT 10M
MINEXTENTS 1
MAXEXTENTS UNLIMITED
PCTINCREASE 0
FREELISTS 1);
|