If you manage a very large database (VLDB) that’s busy 24 hours a day, 7 days a week, you’re probably doing everything you can think of to make it fast and efficient. But if you’re not using Oracle’s cost-based optimizer to streamline SQL execution--or if you’re using it without maintaining the statistics it needs to operate properly--you’re missing out on one of the most helpful tools Oracle provides. This article describes how Oracle’s cost-based optimizer works and provides a method for using it wisely and efficiently. The included SQL and KSH scripts provide a method for automatically updating the statistics the optimizer needs on a nightly basis--without causing undue resource strain on your VLDB environment.
(Note: All of the scripts referenced in this article have been tested on Oracle7 Release 7.3.x, but have not been verified on later versions.)
What is Cost-Based Optimization?
The Oracle cost-based optimizer is designed to determine the most efficient way to carry out a SQL statement, but it can’t reach do this without good, up-to-date statistical information on the data being accessed. The optimizer can use a rules-based approach to work without statistical information, but this approach is less intelligent than the cost-based approach. With the rules-based approach, the optimizer chooses an execution plan based a set of rules about what types of operations usually execute faster than other types. With the cost-based approach, the optimizer factors in statistical information about the contents of the particular schema objects (tables, clusters, or indexes) being accessed.
For example, consider a table called JOBS that contains a column called job_status, which is indexed. Each of the 2 million rows in the table contains one of four values in the job_status column (the percentage of rows containing each value is shown in parentheses): ABORTED (4.7%), COMPLETE (95%), PENDING (0.2%), and RUNNING (0.1%). If you issue the SQL statement
Select * from jobs where job_status = 'COMPLETE';
and you use the rules-based mode without explicitly suppressing the use of the index, the optimizer will assume that job_status is indexed and will use the index. This doubles the I/O by reading both the index and the row ID to access the table, which means the optimizer will read around 4 million rows. The optimizer will read down the depth of the index--which is about 21 levels in the B*tree structure--and then navigate a two-way linked list of the index leaf nodes to get the row IDs.
On the other hand, if you use the cost-based mode, the optimizer will consult the available statistics and find that 95 percent of the records have the value COMPLETE in the job_status column. To minimize I/O, the optimizer will do a full table scan, which reads approximately 2 million records. If you issued the same SQL statement with job_status = ‘RUNNING,’ the optimizer would know to use an index scan rather than a full-table scan, since the number of returned rows is only 0.1 percent. In cost-based mode, the optimizer makes a better decision based on the statistics about the data contained in the table.
In this example, however, we assume that the optimizer is accessing accurate, up-to-date statistics. In the real world, these statistics can quickly become inaccurate and outdated, and frequent updates can seem daunting in a high-availability environment. The scripts in this article are designed to make these updates much more manageable, but before you use them, you need a basic understanding of what types of statistics the optimizer uses.
Histograms as Predictors
In our example, we assumed the optimizer knew the exact percentage of rows containing each value for job_status. In reality, the optimizer uses histograms to estimate the distribution of column data that isn’t evenly distributed. You create and update these histograms (which are stored in the table DBA_HISTOGRAMS), using the ANALYZE command ‘ANALYZE… FOR… SIZE $buckets’ (where $bucket has a default value of 1). The more often you update the histograms, the more accurate they will be at any given time.
The optimizer uses height-balanced histograms. If you’ve worked with histograms in other contexts, you may be more familiar with width-balanced histograms, which look like vertical bar charts. Height-balanced histograms look more like number lines, in which the numbers marked are the endpoints of ranges for the values falling between the endpoints (while vertical bars could be shown on height-balanced histograms, they would all be the same height, so they are often omitted).
Figure 1 shows an example of both types of histograms for the same data set, a 29-row, single-column table in which the column values range from 1 to 100, with the value 3 occurring most frequently. In both cases, the bucket size is 10. In the width-balanced histogram, we create ten equal-width ranges of values (1-10, 11-20, 21-30, …, 91-100) and count how many values fall into each range, shown by the height of the vertical bar. In the height-balanced histogram, we create ten ranges with an equal number of values (3) in each range (except for the last range, which has only two values, since 29 isn’t equally divisible by 10).
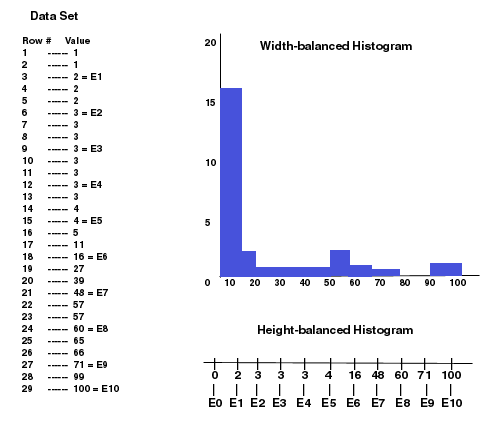 |
| FIGURE 1: Comparing a height-balanced histogram to a width-balanced histogram for the same data set, you may find the width-balanced histogram easier to understand visually; however, the height-balanced histogram provides more information to help the Oracle optimizer estimate the percentage of data with a particular value. |
While the width-balanced histogram may be easier to understand visually—at least at first glance—the height-balanced histogram provides an easier way for the optimizer to estimate the percentage of data with a particular value. For example, because three buckets in the height-balanced histogram have the endpoint value 3, you could estimate that approximately 30 percent of the rows have that value. (Be aware that the DBA_HISTOGRAMS table stores repeating endpoint values only the last time they occur, to save space; my skew-discovery script infers the endpoint values for the missing buckets based on the missing endpoint numbers.) In the width-balanced histogram, however, there is no way to determine whether 3 occurs more frequently than any other value in the range from 1 to 10. Since about 50 percent of the values are in this range, you might use one-tenth of this percentage, or 5 percent, as an estimate for the percentage of rows containing the value 3.
Of course, we could use more buckets to get a more accurate estimate from the width-balanced histogram, but this can become prohibitively resource-intensive in a table with thousands or millions of distinct values. The height-balanced approach provides a more practical way to get a reasonable estimate using less compute time and less disk space.
Still, even height-balanced histograms require time and resources to keep them up-to-date, which is why they should be used only for data with a non-uniform, or skewed, distribution. (The term skew is defined in Oracle documentation to mean uneven data distribution; in traditional statistics, the term skew has a more precise meaning pertaining to the variation of normal distribution, such as positive or negative skew.) If the data is evenly distributed--which would mean all the bars in a width-balanced histograms have essentially the same height, no matter how many buckets you used--you can estimate how many rows have a given value based simply on the range of values and the number of rows. Because Oracle assumes data is evenly distributed unless otherwise specified, you don’t need to generate histograms for evenly distributed data except to determine or verify that the data is evenly distributed.
The starting point for maintaining good statistics for the Oracle optimizer is determining which segments (objects that occupy extents, such as clusters, tables, and indexes) are skewed. You do this using my skew-discovery script.
Discovering Skewed Data
The skew-discovery scripts provided with this article (skewDSCVInst.sql and skewDscv.sql) in Listings 1 and 2 are valuable for determining which objects in your database require regular checks to see if their histograms need updating. Run the skewDsc.sql script whenever the data in a database changes its distribution behavior; in practical terms, once a month or once a quarter is usually sufficient. You can also perform ad hoc updates on tables that you know have changed dramatically. Key results from this script are put in a control table to be used by the automatic analysis process discussed in the next section. You can set this process to run automatically each night to update histograms that require maintenance (assuming you don’t analyze the data within your application after changes in data).
While the script itself determines whether data is skewed or evenly distributed, it lets you set a tolerance level for how uneven a distribution needs to be to be considered skewed. If you want to adjust this level, rather than use the defaults, you need to understand how the script measures the degree of uneven distribution.
I determine unevenness based on a measurement I call bucket density,
calculated from the endpoint values of the buckets in a height-balanced histogram (stored
in DBA_HISTOGRAMS after you run the ANALYZE command), and from the number of values in each
bucket, as follows:
bucket-density (x) = (number of values in bucket x)/((endpoint x) – (endpoint
(x-1)))
(Note: The numerator of this formula is constant for height-balanced histograms, except
where the overall number of values isn’t evenly divisible by the number of
buckets.)
This formula presents a slight problem if the data in the column is character-related rather than numeric; in this case, the strings are normalized to become floating-point numbers using scientific notation.
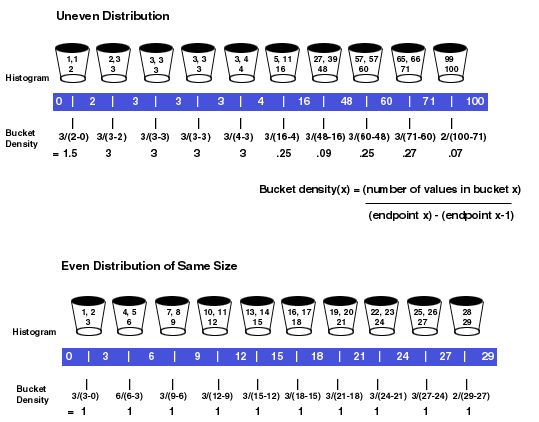 |
| FIGURE 2: Comparing bucket-density calculations for even and uneven distributions, you can see that the bucket-density values are equal for all buckets in the perfectly even distribution, while they vary for an uneven distribution. This difference makes bucket density a helpful measurement in determining whether column data is evenly distributed or skewed, which determines whether you need to maintain histogram statistics on the data. |
Figure 2 shows the results of bucket-density calculations for the table in Figure 1, compared with bucket-density calculations for a same-size table with evenly distributed values. When the column values are perfectly evenly distributed, the bucket-density values for all of the buckets are equal. When they are unevenly distributed, the values for bucket-density can fluctuate greatly. Plotting a frequency distribution of these bucket-density values provides a basis for the measurement of unevenness.
My approach for determining unevenness of distribution for the row values
in a column is essentially to measure the relative dispersion of the frequency distribution
of bucket-density values, as follows:
Relative Dispersion = Absolute Dispersion/Average ~= Population Std. Deviation/Population
Mean
Small values for relative dispersion indicate that the bucket-density values are relatively
tightly clustered around the mean value--and hence, the column values are fairly evenly
distributed. To keep this from value becoming extremely large when the mean is close to
zero, replace the denominator with the following expression:
decode( sign(mean-1), -1, 1, mean)
This expression says to use 1 instead of the mean value if the mean is less than 1.
I chose relative dispersion as a measurement partly because
Oracle’s SQL engine has standard deviation and average functions, which makes the
calculation simpler and more efficient because the average provides a close enough
approximation to the mean. I further modified the relative dispersion formula by adding
number of buckets as another denominator:
Modified Relative Dispersion (MRD) =
Population Standard Deviation of a column /
(Decode(sign(mean – 1), -1, 1, mean) * (# of buckets))
This modification adjusts statistics among different table columns, so that you can specify
a single number for the tolerance value you want used to determine unevenness. This
tolerance will be more generous when the number of buckets is large, since a larger number
of buckets tend to cause a larger standard deviation, and hence, a larger MRD value. The
default value for this tolerance in my script (0.2) works well for my databases. You may
want to increase or decrease it if it labels too many or too few of your table columns as
skewed, based on your maintenance time window or the accuracy requirements of your SQL
execution plan.
At its core, then, the skew-discovery script performs this basic task for each column of data in a database: It computes the MRD for the frequency distribution of the bucket-density values and compares it to the tolerance value. (Actually, since the frequency distribution for the denominator of bucket density is the same as that for the entire expression, my script simplifies the calculation by computing the MRD from the frequency distribution of values for the denominator, (endpoint(x) – endpoint(x-1)), which I refer to as x_length.). If the MRD is greater than the tolerance value, the distribution is considered skewed and you need to maintain a histogram for Oracle’s cost-based optimizer to use.
There are a few special cases where the script deviates from the basic task noted above. In cases where the distribution can quickly be determined as equal, for example, the script does not bother to calculate the MRD There are also some cases where the data from DBA_HISTOGRAMS require some modification before calculating the MRD, either to reconstruct missing buckets (since repeating endpoints are stored only once in DBA_HISTOGRAMS) or to correct erroneous bucket numbers (which are reported as impossibly large when each record is a bucket). These cases are explained in more detail in comments within the script; you can also find examples of data meeting these conditions, which shows endpoint numbers, endpoint values, bucket counts, MRD values (called "S_M_B_R"), skew determinations, and other information for two actual tables.
Ten Steps to Optimizer Maintenance
The skew-discovery script works hand-in-hand with the Conditional Analyzer script (condiAnal.prc, installed by condiAnalyze.install; see Listing 8 and Listing 4), which runs automatically each night to update the histograms used by the cost-based optimizer. To get the process started, just follow these steps:
Note: In cases where the database is small and your maintenance window includes sufficient time to run a procedure that selects all the objects in the database, you may choose to run the Oracle-supplied analyzer (called by my analyzeSchema.ksh script; see Listing 3) instead of my Conditional Analyzer. The Oracle analyzer is significantly more time-consuming, but it’s easier to set up and run. If you choose to use Oracle’s analyzer, go directly to step 10 to set up analyzeSchema.ksh to run nightly.
Step 1. Customize and run skewDscvInst.sql (Listing 1), which generates the script histAnalyzeProbe.sql. Set the number of histogram buckets between 75 (the default) and 254. A higher number of buckets requires more computation time, use the lowest number that provides the optimizer enough information to generate a good execution plan. Start at 75, then increase as seems necessary. If you increase the number and find that the returned value for num_buckets in DBA_TAB_COLUMNS (generated by the ANALYZE command in the histAnalyzeProbe.sql script) doesn’t increase, the increase is unnecessary.
Step 2. Execute histAnalyzeProbe.sql during an off-peak time to perform the initial statistical analysis of the database. Results will appear in the tables updated by the ANALYZE command, which include DBA_HISTOGRAMS, DBA_TABLES, DBA_INDEXES, and DBA_TAB_COLUMNS, among others.
Step 3. Prepare data for loading into the condi_analyze_ctrl table
(to be loaded in the last step of the condiAnalyze.install script, see Listing 4). Retrieve the table names from DBA_TABLES into a spreadsheet;
then add the columns referenced in the following select statement from the condiAnalyze
procedure, populating them as needed. If you don’t supply values, the default values
in the nvl(c.xxx, …) functions will apply when you invoke the condiAnalyze
procedure.
select c.object_name, nvl(t.num_rows, 0), c.action,
nvl(c.hstgrm_buckets, 1), nvl(c.check_days,
0),
nvl(c.pct_diff, 5), c.lvl, c.day_of_week,
c.day_of_month, c.month
from condi_analyze_ctrl.c, dba_tables t
For more information about the values appropriate for these columns, see
Listing 4. Listing 13, condiAnalyze1db.sh,
includes information about how to group the tables in order to expedite the execution
time.
Step 4. Customize and run Listing 4, which installs all the scripts needed for recurring analysis and histogram updates. These include—in order of execution—upAnaObj.prc, execAnalNlog.prc, condiAnal.prc, and reCondiAnal.prc (Listings 5, 6, 7, and 8, respectively).
Step 5. Customize and run the skew-discovery script in Listing 2.
Step 6. Check the skew-discovery script’s output in the SKEW_DISCOVERY table. Pay particular attention to the values for MRD (called S_M_B_R, for ratio of standard deviation to (mean * number of buckets)) and Distribution (either blank or skew). If you feel that too many or too few columns have skewed data, modify the bucket size (v_bucket_size, default value 75) and the tolerance value for determining unevenness (v_threshold, default value 0.2) and rerun the script. Higher bucket sizes and lower tolerance values are more accurate and more restrictive--resulting in more columns marked as skewed--but they require more time in running the Conditional Analyzer each night.
Step 7. Optionally, test the sufficiency of the histogram you’ve generated by checking the execution plans for a few complicated SQL statements, using the EXPLAIN PLAN command. If you’re not satisfied that the histogram is producing optimum execution plans, rerun the skew-discovery script with an increased bucket size or reduced skew tolerance.
Step 8. When you’re satisfied with the results, uncomment the final lines of the Skew-discovery script (to put results in the table condi_analyze_ctrl) and rerun it (or just execute the final SQL statements independently, to save time).
Step 9. Set up (by customizing pathnames and user names) the
following files to be used by the cron job (Listing 15) that will
run the Conditional Analyzer each night:
dbAdmCron.sh calls condiAnalyze1db.sh to spawn group concurrent background jobs for
parallel analysis (Listing 10) godb changes the IPC connection to
the target database if there are multiple databases on the same UNIX host (Listing 11) dbMajor.usr is a configuration file that provides a list of
major database users and information about how they want various database administration
utilities to be executed (Listing 12) condiAnalyze1db.sh invokes
stored procedure condiAnalyze(); (Listing 13).
Step 10. Add cron job for dbAdmCron.sh. Create the cron job by
modifying the sample crontab (Listing 15), using the following
three commands:
crontab -l > oracle.cron
vi oracle.cron
crontab oracle.cron
You have to perform this process only once to get your optimizer-maintenance program
started.
Of course, if you’re not already using cost-based optimization, you’ll need to start doing so--consult the Oracle Server Reference and Administrator’s guides for information on the init.ora parameter OPTIMIZER_MODE (to optimize for the entire database) or the SQL command ALTER SESSION SET OPTIMIZER_GOAL (for more detail control on a session base).
While maintaining up-to-date statistics isn’t the only way you can get more out of Oracle’s cost-based optimizer (for example, you can also try reorganizing your tables to reduce fragmentation or to minimize I/O for frequently-used queries), it’s certainly one of the best ways. The maintenance program described here should bring you a performance boost that’s well worth the minimal time it takes to set it up.