Using Oracle as a Backend DB for a Radius Server
Content
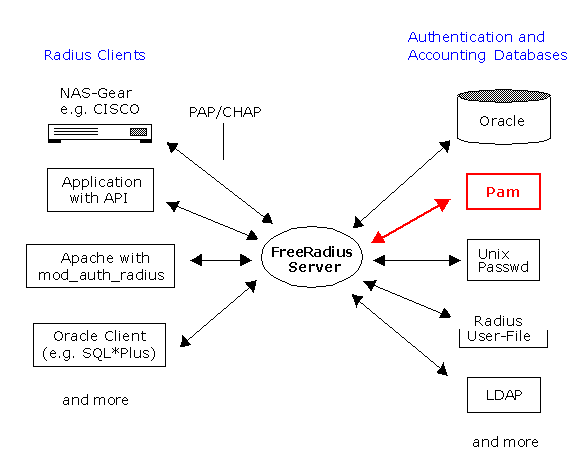
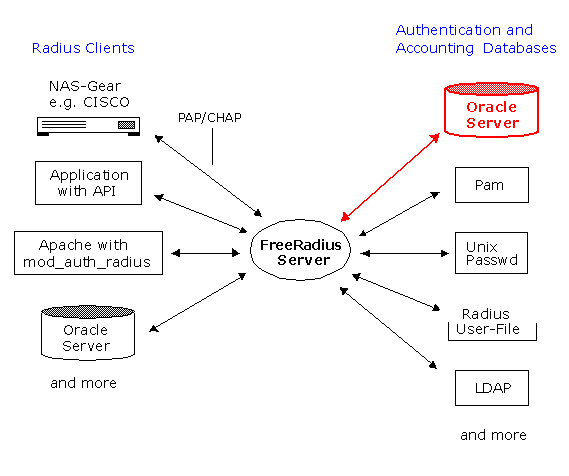
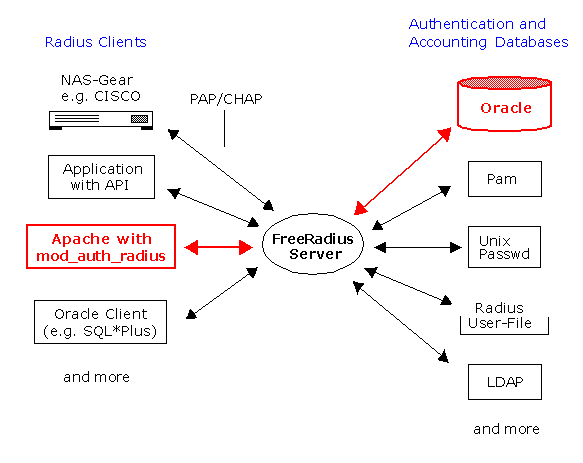
Network Access Server (NAS)
RADIUS enabled client application
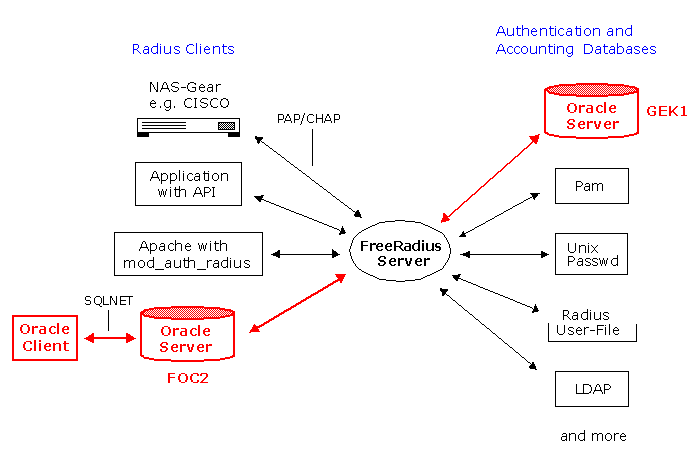
Apache Web-Server with mod_auth_radiusAuthentication and Accounting Databases
Radius User Authorization File
Unix Passwd / Shadow Files
PAM authentication
LDAP Database
SQL Database (Oracle, MySQL, etc)Other Authentication Systems (Kerberos)
Installing FreeRADIUS
Authentication using the Radius User Authorization File
Authentication using Unix Passwd / Shadow Files
Authentication using PAM (Pluggable Authentication Model)Build the Oracle Libraries (RLM's)
Create the needed Tables
Instruct FreeRADIUS to use SQL
Instruct FreeRADIUS how to connect to Oracle
Populate Database Tables
Test the Authentication MethodWeb Authentication with Apache 2
The Functionality
Configuring the Module
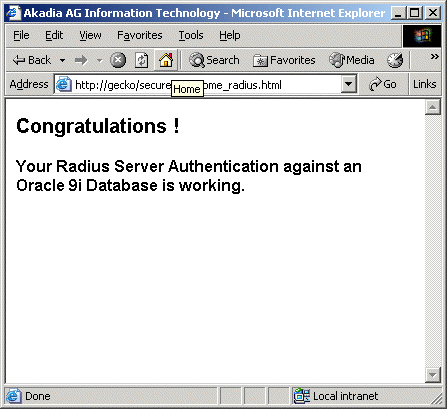
Test the Web AuthenticationConfigure Oracle Clients to use RADIUS for Authentication
Installation and Configuration (Oracle Advanced Security Option)
Oracle Client Configuration
Oracle Server ConfigurationCreate the RADIUS Secret Key File on the Oracle Database Server
Configure RADIUS Parameters on the Oracle Database Server
Set Oracle Database Server Initialization Parameters
Create a User and Grant Access
Setup the service name in your TNSNAMES.ORA File
Overview
Radius stands for Remote Authentication Dial In User Service - it is a software package that provides the AAA-Framework. This framework, consisting of authentication,
authorization, and accounting. While there's nothing specific to RADIUS in the AAA model, a general background is needed to justify most of RADIUS's behavior. RADIUS was created before the AAA model was developed, but it was the first real AAA-based protocol exhibiting the AAA functionality to earn industry acceptance and widespread use.
To begin, let's look at why the AAA architecture is a better overall strategy than others. Before AAA was introduced, individual equipment had to be used to authenticate users. Without a formal standard, each machine likely had a different method of authentication—some might have used profiles, while others might have used Challenge/Handshake Authentication Protocol (CHAP) authentication, and still others might have queried a small internal database with SQL. The AAA model focuses on the three crucial aspects of user access control: authentication, authorization, and accounting, respectively.
In this article we show how to use FreeRADIUS together with an Oracle Database. The FreeRADIUS Server Project is a free RADIUS server. FreeRADIUS includes more than 40 vendor-specific dictionary files. It ships with support for LDAP, MySQL, PostgreSQL and Oracle databases. The FreeRADIUS Server is a daemon for the Unix operating system. To use the server, you also need a correctly setup of a client which will talk to it, usually a terminal server or a PC with appropriate software which emulates the Radius Protocol (PortSlave, radiusclient etc).
The AAA-model manages and reports all transactions from start to finish. The following questions serve well as a mimicking of the functionality of the AAA-model by asking:
- Who are you?
- What services am I allowed to give you?
- What did you do with my services while you were using them?
The AAA-Framework
Authentication is the process of verifying a person's ( or machine's ) declared identity. You're familiar with the most common form of authentication, using a combination of logon ID and a password, in which the knowledge of the password is a representation that the user is authentic.
RADIUS supports a variety of different protocol mechanisms to transmit sensitive user-specific data to and from the authentication server. The two most common are the Password Authentication Protocol (PAP) and the CHAP. RADIUS also allows for more attributes and methods developed by vendors, including support for features peculiar to Windows NT, Windows 2000, and other popular network operating systems and directory services. The following section explores the three most common methods in greater detail.
The User-Password attribute in a requesting packet signals to the RADIUS server that the PAP protocol will be used for that transaction. It's important to note that the only mandatory field in this case is the User-Password field. The User-Name field does not have to be included in the requesting packet, and it's entirely possible that a RADIUS server along a proxy chain will change the value in the User-Name field.
The algorithm used to hide the original user's password is composed of many elements. First, the client detects the identifier and the shared secret for the original request and submits it to an MD5 hashing sequence. The client's original password is put through the XOR process and the result coming from these two sequences is then put in the User-Password field. The receiving RADIUS server then reverses these procedures to determine whether to authorize the connection. The very nature of the password-hiding mechanism prevents a user from determining if, when the authentication fails, the failure was caused by an incorrect password or an invalid secret. Most commercial RADIUS servers, though, include logic that looks at the series of packets previously transmitted from the same client. If a number passes through the connection correctly, most likely the few packets that failed did so because of an incorrect password.
CHAP is based on the premise that the password should never be sent in any packet across a network. CHAP dynamically encrypts the requesting user's ID and password. The user's machine then goes through its logon procedure, having obtained a key from the RADIUS client equipment of at least 16 octets in length. The client then hashes that key and sends back a CHAP ID, a CHAP response, and the username to the RADIUS client. The RADIUS client, having received all of the above, places the CHAP ID field into the appropriate places in the CHAP-Password attribute and then sends a response. The challenge value originally obtained is placed in either the CHAP-Challenge attribute or in the authenticator field in the header—this is so the server can easily access the value in order to authenticate the user.
To authenticate the user, the RADIUS server uses the CHAP-Challenge value, the CHAP ID, and the password on record for that particular user and submits it to another MD5 hashing algorithm. The result of this algorithm should be identical to the value found in the CHAP-Password attribute. If it's not, the server must deny the request; otherwise, the request is granted.
The fact that the password in a CHAP transaction is never passed across the network is just one reason why CHAP is an appealing authentication protocol. How does this work? The user data against which the hashing routine is run returns a one-way value that does not contain the password. So the server must have the current user's password stored in clear text in its own records in order to create a hash with which to compare. CHAP IDs are also non-persistent, which reduces the possibility of a third party sniffing or otherwise intruding on the transaction. Additionally, the CHAP protocol supports challenging the client anytime during the user's session, which increases the likelihood that invalid users are kept out of the system.
The Extensible Authentication Protocol (EAP), described in RFC 2284, provides a standard mechanism for support of additional authentication protocols within PPP. Through the use of EAP, support for a number of authentication schemes may be added, including smart cards, Kerberos, Public Key, One Time Passwords, and others.
The RADIUS server is used to shuttle RADIUS-encapsulated EAP Packets between the NAS and a backend security server. While the conversation between the RADIUS server and the backend security server will typically occur using a proprietary protocol developed by the backend security server vendor, it is also possible to use RADIUS-encapsulated EAP via the EAP-Message attribute. This has the advantage of allowing the RADIUS server to support EAP without the need for authentication-specific code, which can instead reside on the backend security server.
Authorization involves using a set of rules or other templates to decide what an authenticated user can do on a system. For example, in the case of an Internet service provider, it may decide whether a static IP address is given as opposed to a DHCP-assigned address. The system administrator defines these rules.
Rounding out the AAA framework is accounting, which measures and documents the resources a user takes advantage of during access. This can include the amount of system time or the amount of data a user has sent and/or received during a session. Accounting is carried out by the logging of session statistics and usage information and is used for authorization control, billing, trend analysis, resource utilization, and capacity-planning activities.
The Radius Architecture
RADIUS, was built from a need. In this case, the need was to have a method of authenticating, authorizing, and accounting for users needing access to heterogeneous computing resources.
- The RFC specifications for the RADIUS protocol dictate that RADIUS:
Is a UDP-based connectionless protocol that doesn't use direct connections- Uses a hop-by-hop security model.
- Is a stateless protocol.
- Supports PAP and CHAP authentication via PPP.
- Uses MD5 for password-hiding algorithms.
- Provides over 50 attribute/value pairs with the ability to create vendor-specific pairs.
- Supports the authentication-authorization-accounting model.
When a user logs on to the network, the Network Access Server (NAS) with RADIUS enabled (for example, a LanRover™ Access Switch or LanRover™ D56) prompts the user for their user name and password. The NAS then sends the request to the RADIUS security server. In addition, it may include a proposed configuration and additional attributes for the user. For example, the NAS may propose that the user goes into the Point-to-Point Protocol (PPP) mode immediately upon login and be assigned a certain IP address and subnet mask. The NAS request may also include attributes telling the security server the user's caller ID, the port they are using, or other attributes.
RADIUS enabled client application
A RADIUS enabled client application can be an ActiveX/COM Object that provides developers the ability to add to their applications Radius authentication capability. This way, the Application can check the validity of a user by querying a remote Radius server. If the authentication request fails, you can keep the user from accessing the facilities your program is protecting.
Some RADIUS enabled clients are created in VC++ using the ATL (Active Template Library) from Microsoft. It allows you to send authentication requests to a Radius server and retrieve the authentication reply (access granted or denied). You can also send accounting packets to the Radius server as well. The functionality is identical to that of a NAS/RAS (Terminal Servers) when requesting access for a dial-up user or sending accounting information on behalf of that user.
Ready to use Radius clients API’s exists today, for example the VOPCOM RADIUS client (see: http://www.vircom.com/Products/Vop_Com )
Apache Web-Server with mod_auth_radius
It's possible to instruct Apache to authenticate against an existing RADIUS database of users, thereby protecting the area of your web site from unknown users and allowing access to those you trust.
This authentication is done using a module called mod_auth_radius. In effect, Apache becomes a RADIUS client—occupying the traditional position of the NAS in the authentication chain—and hits off the RADIUS server for authentication and accounting requests.
Authentication and Accounting Databases
Radius User Authorization File
The users file resides in the RADIUS database directory (/usr/local/freeradius/etc/raddb). It contains a series of configuration directives which are used by the files module to decide how to authorize and authenticate each user request.
The user's login and password are stored in /etc/passwd and /etc/shadow on the server, they are «normal» UNIX users on the system.
User is authenticated via PAM (Pluggable Authentication Module) framework. Basically, it is a flexible mechanism for authenticating users.
PAM provides a way to develop programs that are independent of authentication scheme. These programs need «authentication modules» to be attached to them at run-time in order to work. Which authentication module is to be attached is dependent upon the local system setup and is at the discretion of the local system administrator.
The ever-present complaint of systems administrators who deal with multiple user databases across multiple platforms is that of efficiency. Why can't all of my users be listed, configured, and managed from one set of tools? Why can't my various application servers—secured Web, email, newsgroups, and others—all tie into that one database and use its list? Without a centralized repository for user information, the effort of simply changing a password is multiplied by the number of systems on which a unique copy of the password is stored.
Fortunately, there is an answer, and better yet, it's standards based. The Lightweight Directory Access Protocol, or LDAP, is a directory-based database of information about users of a particular network. LDAP is a protocol that uses standard queries, much like SQL, to talk with a compliant backend. Most Radius Servers can talk to LDAP Databases.
SQL Database (Oracle, MySQL, etc)
By using Oracle or MySQL, you put the contents of the users file inside the database, and instead of storing all of the user information in one file, with separate stanzas for each user, the data will now exist in several different database tables.
Other Authentication Systems (Kerberos)
RADIUS, enables to authenticate, authorize and account (AAA-Framework) for remote users who want access to a system or service from a central network server. Originally developed for dial-up remote access, RADIUS is now used by virtual private network (VPN) servers, wireless access points, authenticating Ethernet switches, Digital Subscriber Line (DSL) access, and other network access types. Extensible, easy to implement, supported, and actively developed, RADIUS is currently the de facto standard for remote authentication.
Kerberos, the single sign-on authentication system originally developed at MIT, deserves its name. It's a faithful watchdog that keeps intruders out of your networks. But it has been equally fierce to system administrators, for whom the complexity of Kerberos is legendary. Microsoft, by integrating Kerberos into Active Directory in Windows 2000 and 2003, has extended the reach of Kerberos to all networks large or small: One username; one password; one login is all you need.
Introduction to FreeRADIUS
FreeRADIUS ( http://www.freeradius.org ) is a complete rewrite, ground-up compilation of a RADIUS server. The product includes support for:
- Limiting the maximum number of simultaneous logons, even on a per-user basis.
- More than one DEFAULT entry, with each being capable of "falling through" to the next.
- Permitting and denying access to users based on the huntgroup to which they are connected.
- Setting certain parameters to be huntgroup specific.
- Intelligent «hints» files that select authentication protocols based on the syntax of the username.
- Executing external programs upon successful login.
- Using the $INCLUDE filename format with configuration, users, and dictionary files.
- Vendor-specific attributes.
- Acting as a proxy RADIUS server.
Next, we will show a basic Installation of FreeRADIUS on GENTOO Linux 2004.0
At present, the FreeRADIUS team doesn't offer precompiled binaries. The best way to start off is to grab the latest source code, compressed using tar and gzip, from the FreeRADIUS web site at http://www.freeradius.org.
Unpack and Compile
# tar -zxvf freeradius-1.0.0-pre3.tar.gz
# cd freeradius-1.0.0-pre3
# ./configure --help
# ./configure --prefix=/usr/local/freeradius --enable-shared=NO
# make
# make installAt this point, the base FreeRADIUS software is installed. Before you begin, though, you'll need to customize some of the configuration files so that they point to machines and networks specific to your configuration. Most of these files are located in /usr/local/freeradius/etc/raddb. The following files are contained:
-rw-r--r-- 1 root root 422 Jul 20 08:35 acct_users
-rw-r--r-- 1 root root 3454 Jul 20 08:35 attrs
drwxr-xr-x 3 root root 4096 Jul 20 08:35 certs/
-rw-r----- 1 root root 189 Jul 20 08:35 clients
-rw-r----- 1 root root 3006 Jul 20 13:51 clients.conf
-rw-r--r-- 1 root root 946 Jul 20 08:35 dictionary
-rw-r--r-- 1 root root 9080 Jul 20 08:35 eap.conf
-rw-r--r-- 1 root root 2396 Jul 20 08:35 hints
-rw-r--r-- 1 root root 1604 Jul 20 08:35 huntgroups
-rw-r--r-- 1 root root 2333 Jul 20 08:35 ldap.attrmap
-rw-r--r-- 1 root root 9330 Jul 20 08:35 mssql.conf
-rw-r--r-- 1 root root 1020 Jul 20 08:35 naslist
-rw-r----- 1 root root 856 Jul 20 08:35 naspasswd
-rw-r--r-- 1 root root 12256 Jul 21 15:11 oraclesql.conf
-rw-r--r-- 1 root root 14108 Jul 20 08:35 postgresql.conf
-rw-r--r-- 1 root root 531 Jul 20 08:35 preproxy_users
-rw-r--r-- 1 root root 8862 Jul 20 08:35 proxy.conf
-rw-r--r-- 1 root root 57097 Jul 21 15:37 radiusd.conf
-rw-r--r-- 1 root root 187 Jul 20 08:35 realms
-rw-r--r-- 1 root root 1405 Jul 20 08:35 snmp.conf
-rw-r--r-- 1 root root 13893 Jul 23 08:45 sql.conf
-rw-r--r-- 1 root root 7182 Jul 26 11:02 users
-rw-r--r-- 1 root root 7267 Jul 20 08:35 x99.conf
-rw-r--r-- 1 root root 4165 Jul 20 08:35 x99passwd.sample
Create Radius Unix User and Group
# groupadd -g 403 radius
# useradd -u 420 -g 403 -c "Radius Server Owner" -d \
/usr/local/freeradius -s /bin/false radius
Change Access Rights on /etc/shadow
# chmod 640 /etc/shadow
# chown root:radius /etc/shadow
-rw-r----- 1 root radius 890 Jul 21 14:12 /etc/shadow
The clients.conf File
This file lists the hosts authorized to hit the FreeRADIUS server with requests and the secret key those hosts will use in their requests. Make sure the secret key that is listed in the this file is the same as that programmed into your RADIUS client equipment. Also, add the IP address of a desktop console machine with which you can test your setup using a RADIUS ping utility.
# cd /usr/local/freeradius/etc/raddb
# vi clients.confclient 192.168.136.0/24 {
secret = enter-a-secret-word
shortname = akadia
}
FreeRADIUS allows several modifications to the original RADIUS server's style of treating users unknown to the users file. In the past, if a user wasn't configured in the users file, the server would look in the Unix password file, and then deny him access if he didn't have an account on the machine. There was only one default entry permitted. In contrast, FreeRADIUS allows multiple default entries and can «fall through» each of them to find an optimal match. The entries are processed in the order they appear in the users file, and once a match is found, RADIUS stops processing it. The Fall-Through = Yes attribute can be set to instruct the server to keep processing, even upon a match. The new FreeRADIUS users file can also accept spaces in the username attributes, either by escaping the space with a backslash (\) or putting the entire username inside quotation marks.
Since we won't add any users to the users file for our testing purposes, FreeRADIUS will fall back to accounts configured locally on the Unix machine. However, if you want to add a user to the users file to test that functionality, a sample users file looks like this:
# This is a complete entry for "martin". Note that there is
# no Fall-Through entry so that no DEFAULT entry will be used,
# and the user will NOT get any attributes in addition to the
# ones listed here.
Martin Auth-Type := Local, User-Password == "hello"
Reply-Message = "Hello, %u"
The radiusd.conf File
This file is much like Apache's httpd.conf file in that it lists nearly every directive and option for the basic functionality of the FreeRADIUS product. For an initial test, adjust the following directives.
# user/group: The name (or #number) of the user/group to run radiusd as.
user = radius
group = radius
Authentication using the Radius User Authorization File
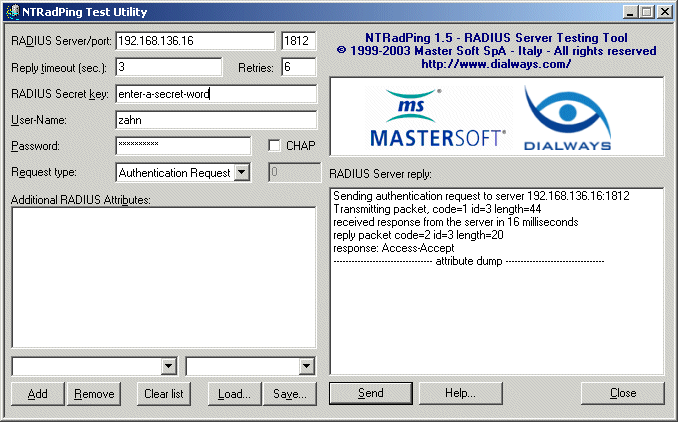
Once you have FreeRADIUS running, you need to test the configuration to make sure it is responding to requests. FreeRADIUS starts up listening, by default, on the port specified either in the local /etc/services file or in the port directive in radiusd.conf. RFC 2138 defines the standard RADIUS port to be 1812. For this test, we use the user «Martin» with his password «hello», which we defined in our Users File (see above: The Users File)
Test the Authentication Method
# /usr/local/freeradius/sbin/radiusd -X
The server is now running; it is listening for and accepting requests on port 1812.
So, what is an easy way to test your configuration to see if it functions properly? It's easier than you might think, in fact. MasterSoft, Inc. has released a Windows desktop RADIUS server testing tool called NTRadPing, available at http://www.dialways.com. Download and install this utility on a Windows machine, and then run it.
To do a quick test, follow these steps:
- Enter the IP address of your FreeRADIUS machine in the RADIUS Server/port box, and then the port number in the adjacent box. For this example, we've used IP address 192.168.136.16 and port 1812.
- Type in the secret key you added in the clients.conf file for this Windows console machine. For this example, we used the key enter-a-secret-word.
- In the User-Name field, enter Martin, and in the Password field, enter hello.
- Select Authentication Request from the Request Type drop-down list box.
- Click Send.
If your server is working properly, you should see the reply in the RADIUS Server reply box to the right of the NTRadPing window.
Check the Log Output of /usr/local/freeradius/sbin/radiusd -X
rad_recv: Access-Request packet from host 192.168.136.35:1689
User-Name = "Martin"
User-Password = "hello"
......
......
rad_check_password: Found Auth-Type Local
auth: type Local
auth: user supplied User-Password matches local User-Password
......
......
Authentication using Unix Passwd / Shadow Files
If you want to use the user's login and password in the traditional /etc/passwd and /etc/shadow files on the server enter the following lines in users.
DEFAULT Auth-Type = System
Fall-Through = 1
Test the Authentication Method
# /usr/local/freeradius/sbin/radiusd -X
The server is now running; it is listening for and accepting requests on port 1812.
Check the Log Output of /usr/local/freeradius/sbin/radiusd -X
rad_recv: Access-Request packet from host 192.168.136.35:1556
User-Name = "zahn"
User-Password = "xxxxxxxxx"
Processing the authorize section of radiusd.conf
......
......
rad_check_password: Found Auth-Type System
auth: type "System"
Processing the authenticate section of radiusd.conf
modcall: entering group authenticate for request 2
modcall[authenticate]: module "unix" returns ok for request 2
modcall: group authenticate returns ok for request 2
......
......
Authentication using PAM (Pluggable Authentication Model)
FreeRADIUS supports the pluggable authentication model, or PAM, but that must be enabled at compile time. (http://www.kernel.org/pub/linux/libs/pam/FAQ) However, the current support for PAM is rather non-standard. In most RADIUS distributions, to enable PAM in transactions, enter User-Password = PAM in the users file; this is not supported in FreeRADIUS. You must instead use Auth-Type = Pam.
DEFAULT Auth-Type := Pam
Fall-Through = 1
Now open the radiusd.conf file and scroll to the modules section. Enable PAM functionality by examining the pam section inside the modules divider. The value for the pam_auth string corresponds with a file in the /etc/pam.d directory on your Linux system.
# MODULE CONFIGURATION
modules {
.........
.........
pam {
#
# The name to use for PAM authentication.
# PAM looks in /etc/pam.d/${pam_auth_name}
# for it's configuration. See 'redhat/radiusd-pam'
# for a sample PAM configuration file.
#
# Note that any Pam-Auth attribute set in the 'authorize'
# section will over-ride this one.
#
pam_auth = radiusd
}
.........
.........
}In the same file, scroll down to the authentication section and make sure the pam line is not commented out:
authenticate {
    .......
    .......   #  Pluggable Authentication Modules.
   pam
    .......
    .......
}
Now, navigate to the /etc/pam.d directory on your system and create a file with the same name you specified in the pam section inside radiusd.conf. (In the previous example, we used radiusd.) Insert the following lines into this new file:
# cd /etc/pam.d
# cat radiusd#%PAM-1.0
auth required /lib/security/pam_unix_auth.so shadow md5 nullok
auth required /lib/security/pam_nologin.so
account required /lib/security/pam_unix_acct.so
password required /lib/security/pam_cracklib.so
password required /lib/security/pam_unix_passwd.so shadow md5 nullok use_authtok
session required /lib/security/pam_unix_session.soNext, make sure that the group under which the radiusd process is running can read the /etc/shadow file. Unless you're running as root, PAM won't be able to read the file otherwise and will subsequently malfunction. You also need to specify the user and group with read permissions to /etc/shadow in the radiusd.conf file.
Test the Authentication Method

Check the Log Output of /usr/local/freeradius/sbin/radiusd -X
rad_recv: Access-Request packet from host 192.168.136.35:2018
User-Name = "zahn"
User-Password = "xxxxxxxxxx"
......
......
rad_check_password: Found Auth-Type Pam
auth: type "PAM"
Processing the authenticate section of radiusd.conf
modcall: entering group authenticate for request 4
pam_pass: using pamauth string <radiusd> for pam.conf lookup
pam_pass: authentication succeeded for <zahn>
modcall[authenticate]: module "pam" returns ok for request 4
modcall: group authenticate returns ok for request 4
......
......
Authentication using Oracle
Build the Oracle Libraries (RLM's)
This section describes one possible setup to allow FreeRADIUS to authenticate against a user database held inside Oracle 9i (Version 9.2.0.4).
By using Oracle, you put the contents of the users file inside the database, and instead of storing all of the user information in one file, with separate stanzas for each user, the data will now exist in several different database tables. This improves speed and scalability and offers a modicum of flexibility, too.
First, download, compile, and install Oracle for your RADIUS machine, more Info's can be found here. When you compile FreeRadius, check that the Oracle RLM's are built as well. We used the following Oracle environment:
Oracle Environment
ORACLE_HOME=/opt/oracle/product/9.2.0; export ORACLE_HOME
ORACLE_SID=GEK1; export ORACLE_SID
TNS_ADMIN=/home/oracle/config/9.2.0 export TNS_ADMIN
LD_ASSUME_KERNEL=2.4.1; export LD_ASSUME_KERNEL
ORA_NLS33=$ORACLE_HOME/ocommon/nls/admin/data; export ORA_NLS33
CLASSPATH=$ORACLE_HOME/jdbc/lib/classes111.zip
Logfiles of configure and make
In configure.log
....
configuring in ./drivers/rlm_sql_oracle
....In make.log
....
Making static in rlm_sql_oracle...
gmake[10]: Entering directory `/root/freeradius-1.0.0-pre3/
src/modules/rlm_sql/drivers/rlm_sql_oracle'
gcc -g -O2 -D_REENTRANT -D_POSIX_PTHREAD_SEMANTICS -DOPENSSL_NO_KRB5 -Wall
-D_GNU_SOURCE -DNDEBUG -I../.. -I../../..
/../include -I/opt/oracle/product/9.2.0/rdbms/demo
-I/opt/oracle/product/9.2.0/rdbms/public -I/opt/oracle/product/9.2.0/
plsql/public -I/opt/oracle/product/9.2.0/network/public
-I/opt/oracle/product/9.2.0/oci/include -c sql_oracle.c
-o sql_oracle.o
sql_oracle.c: In function `sql_select_query':
sql_oracle.c:342: warning: dereferencing type-punned pointer will
break strict-aliasing rules
/root/freeradius-1.0.0-pre3/libtool --mode=link ld -module -static
-g -O2 -D_REENTRANT -D_POSIX_PTHREAD_SEMANTICS -DOPE
NSSL_NO_KRB5 -Wall -D_GNU_SOURCE -DNDEBUG -I../.. -I../../../../
include -I/opt/oracle/product/9.2.0/rdbms/demo -I/opt
/oracle/product/9.2.0/rdbms/public -I/opt/oracle/product/9.2.0/plsql/
public -I/opt/oracle/product/9.2.0/network/public
-I/opt/oracle/product/9.2.0/oci/include sql_oracle.o -o rlm_sql_oracle.a
mkdir .libs
ar cru rlm_sql_oracle.a sql_oracle.o
ranlib rlm_sql_oracle.a
gmake[10]: Leaving directory `/root/freeradius-1.0.0-pre3/
src/modules/rlm_sql/drivers/rlm_sql_oracle'
....Finally check the /usr/local/freeradius/lib directory for the created Oracle RLM's
# cd /usr/local/freeradius/lib
# ls -l | grep oracle-rw-r--r-- 1 root root 82440 Jul 20 08:35 rlm_sql_oracle.a
-rwxr-xr-x 1 root root 730 Jul 20 08:35 rlm_sql_oracle.la
Once Oracle is installed, create the schema for your user database. There exists within the standard FreeRADIUS distribution a command script file that will easily create the schema and populate it with the necessary tables. You can find this script, db_oracle.sql, in the {unpacked}/src/modules/rlm_sql/drivers/rlm_sql_oracle directory, where {unpacked} is the location in your file system where the unpacked distribution files reside.
# cd {unpacked}/src/modules/rlm_sql/drivers/rlm_sql_oracle
# ls -l-rw-r--r-- 1 root root 1717 Jul 20 08:31 config.log -rwxr-xr-x 1 root root 5750 Jul 20 08:31 config.status* -rwxr-xr-x 1 500 504 42824 May 31 16:20 configure* -rw-r--r-- 1 500 504 4129 Jul 20 2001 configure.in -rw-r--r-- 1 500 504 4456 Aug 25 2003 db_oracle.sql -rw-r--r-- 1 root root 470 Jul 20 08:31 Makefile -rw-r--r-- 1 500 504 201 Jul 30 2002 Makefile.in -rw-r--r-- 1 root root 82440 Jul 20 08:34 rlm_sql_oracle.a -rw-r--r-- 1 root root 729 Jul 20 08:34 rlm_sql_oracle.la -rw-r--r-- 1 500 504 16295 Apr 15 23:19 sql_oracle.c -rw-r--r-- 1 root root 10 Jul 20 08:34 sql_oracle.lo -rw-r--r-- 1 root root 82288 Jul 20 08:34 sql_oracle.o# sqlplus system/manager
SQL> CREATE USER radius IDENTIFIED BY radius
TEMPORARY TABLESPACE TEMP
DEFAULT TABLESPACE TAB;
SQL> GRANT CONNECT,RESOURCE TO radius;# sqlplus radius/radius
SQL> start db_oracle.sql
Instruct FreeRADIUS to use SQL
Next, instruct FreeRADIUS that you intend to use SQL for all RADIUS functions. Open radiusd.conf and make the following changes:
Add sql to the authorize section, after the files entries.
In the accounting section, after radutmp, add sql to the file.
The authorize section
authorize {
preprocess
# auth_log
# attr_filter
chap
mschap
# digest
# IPASS
suffix
# ntdomain
eap
files
sql
# etc_smbpasswd
# ldap
# daily
# checkval
}
The accounting section
accounting {
detail
# daily
unix
radutmp
# sradutmp
# main_pool
sql
# pgsql-voip
}
Instruct FreeRADIUS how to connect to Oracle
Next, add the username, password and connect string for the Oracle database to /usr/local/freeradius/etc/raddb/oraclesql.conf. This file is referenced in radiusd.conf with $INCLUDE ${confdir}/oraclesql.conf. You may want to turn sqltrace on to see the various communications between radiusd and Oracle. The following reflects these modifications to oraclesql.conf:
sql {
# Database type
# Current supported are: rlm_sql_mysql, rlm_sql_postgresql,
# rlm_sql_iodbc, rlm_sql_oracle, rlm_sql_unixodbc, rlm_sql_freetds
driver = "rlm_sql_oracle"
# Connect info
server = "gecko"
login = "radius"
password = "radius"
# Database table configuration
radius_db = "(DESCRIPTION=(ADDRESS=(PROTOCOL=TCP)(HOST=gecko)(PORT=1521))
(CONNECT_DATA=(SID=GEK1)))"
# If you want both stop and start records logged to the
# same SQL table, leave this as is. If you want them in
# different tables, put the start table in acct_table1
# and stop table in acct_table2
acct_table1 = "radacct"
acct_table2 = "radacct"
authcheck_table = "radcheck"
authreply_table = "radreply"
groupcheck_table = "radgroupcheck"
groupreply_table = "radgroupreply"
usergroup_table = "usergroup"
# Remove stale session if checkrad does not see a double login
deletestalesessions = yes
# Print all SQL statements when in debug mode (-x)
sqltrace = yes
sqltracefile = ${logdir}/sqltrace.sql
.....
.....
}
The configuration is almost complete. For any testing of the new database setup to work, you need to add user information so that there is data to authenticate against. Follow these steps to add some general user information with which to test.
- In the usergroup table, create entries matching user account names to group names.
- In the radcheck table, create entries for each of the usernames you created in Step 1 and specify their passwords in the Password attribute. You may leave the Op field empty.
- In the radreply table, match the usernames to the specific attributes to be returned when FreeRADIUS replies to an authentication request.
- Finally, inside the radgroupreply, create replies to be matched when requests are made from users inside certain groups. This step is optional, additionally, you may leave the Op field empty.
@ sqlplus radius/radius
DELETE FROM usergroup;
DELETE FROM radcheck;
DELETE FROM radreply;
DELETE FROM radgroupreply;
COMMIT;
INSERT INTO usergroup (id,username,groupname)
VALUES (1,'Mueller','Atax');
INSERT INTO usergroup (id,username,groupname)
VALUES (2,'Meier','Atax');
INSERT INTO usergroup (id,username,groupname)
VALUES (3,'Zahn','Akadia');
INSERT INTO usergroup (id,username,groupname)
VALUES (4,'Gaechter','Akadia');
INSERT INTO usergroup (id,username,groupname)
VALUES (5,'RADTEST','Akadia');
INSERT INTO radcheck (id,username,attribute,value,op)
VALUES (1,'Mueller','Password','Changeme','==');
INSERT INTO radcheck (id,username,attribute,value,op)
VALUES (2,'Meier','Password','Thewb','==');
INSERT INTO radcheck (id,username,attribute,value,op)
VALUES (3,'Zahn','Password','Sarah','==');
INSERT INTO radcheck (id,username,attribute,value,op)
VALUES (4,'Gaechter','Password','Moo','==');
INSERT INTO radcheck (id,username,attribute,value,op)
VALUES (5,'RADTEST','Password','radtest','==');
INSERT INTO radreply (id,username,attribute,value,op)
VALUES (1,'Mueller','Framed-IP-Address','66.26.224.46','==');
INSERT INTO radreply (id,username,attribute,value,op)
VALUES (2,'Meier','Auth-Type','Reject','==');
INSERT INTO radgroupreply (id,groupname,attribute,value,op)
VALUES (34,'Atax','Framed-Compression','Van-Jacobsen-TCP-IP','==');
INSERT INTO radgroupreply (id,groupname,attribute,value,op)
VALUES (33,'Soris','Framed-Protocol','PPP','==');
INSERT INTO radgroupreply (id,groupname,attribute,value,op)
VALUES (32,'Akadia','Service-Type','Framed-User','==');
INSERT INTO radgroupreply (id,groupname,attribute,value,op)
VALUES (31,'Kern','Auth-Type','Local',':=');
INSERT INTO radgroupreply (id,groupname,attribute,value,op)
VALUES (35,'Novartis','Framed-MTU','1500','==');
INSERT INTO radgroupreply (id,groupname,attribute,value,op)
VALUES (36,'Roche','Auth-Type','Local',':=');
INSERT INTO radgroupreply (id,groupname,attribute,value,op)
VALUES (37,'Migros','Framed-Protocol','PPP','==');
INSERT INTO radgroupreply (id,groupname,attribute,value,op)
VALUES (38,'Studer','Service-Type','Framed-User','==');
INSERT INTO radgroupreply (id,groupname,attribute,value,op)
VALUES (39,'Schaller','Framed-Compression','Van-Jacobsen-TCP-IP','==');
COMMIT;
Test the Authentication Method

Check the Log Output of /usr/local/freeradius/sbin/radiusd -X
rad_recv: Access-Request packet from host 192.168.136.35:2417
User-Name = "Gaechter"
User-Password = "Moo"
Processing the authorize section of radiusd.conf
modcall: entering group authorize for request 0
modcall[authorize]: module "preprocess" returns ok for request 0
modcall[authorize]: module "chap" returns noop for request 0
modcall[authorize]: module "mschap" returns noop for request 0
rlm_realm: No '@' in User-Name = "Gaechter", looking up realm NULL
rlm_realm: No such realm "NULL"
modcall[authorize]: module "suffix" returns noop for request 0
rlm_eap: No EAP-Message, not doing EAP
modcall[authorize]: module "eap" returns noop for request 0
modcall[authorize]: module "files" returns notfound for request 0
radius_xlat: 'Gaechter'
rlm_sql (sql): sql_set_user escaped user --> 'Gaechter'
radius_xlat: 'SELECT id,UserName,Attribute,Value,op
FROM radcheck
WHERE Username = 'Gaechter'
ORDER BY id'
rlm_sql (sql): Reserving sql socket id: 4
SELECT id,UserName,Attribute,Value,op
FROM radcheck
WHERE Username = 'Gaechter'
ORDER BY id
radius_xlat: 'SELECT radgroupcheck.id,radgroupcheck.GroupName,
radgroupcheck.Attribute,radgroupcheck.Value,
radgroupcheck.op
FROM radgroupcheck,usergroup
WHERE usergroup.Username = 'Gaechter'
AND usergroup.GroupName = radgroupcheck.GroupName
ORDER BY radgroupcheck.id'
SELECT radgroupcheck.id,radgroupcheck.GroupName,
radgroupcheck.Attribute,radgroupcheck.Value,
radgroupcheck.op
FROM radgroupcheck,usergroup
WHERE usergroup.Username = 'Gaechter'
AND usergroup.GroupName = radgroupcheck.GroupName
ORDER BY radgroupcheck.id
radius_xlat: 'SELECT id,UserName,Attribute,Value,op
FROM radreply
WHERE Username = 'Gaechter'
ORDER BY id'
SELECT id,UserName,Attribute,Value,op
FROM radreply WHERE Username = 'Gaechter'
ORDER BY id
radius_xlat: 'SELECT radgroupreply.id,radgroupreply.GroupName,
radgroupreply.Attribute,radgroupreply.Value,
radgroupreply.op
FROM radgroupreply,usergroup
WHERE usergroup.Username = 'Gaechter'
AND usergroup.GroupName = radgroupreply.GroupName
ORDER BY radgroupreply.id'
SELECT radgroupreply.id,radgroupreply.GroupName,
radgroupreply.Attribute,radgroupreply.Value,
radgroupreply.op
FROM radgroupreply,usergroup
WHERE usergroup.Username = 'Gaechter'
AND usergroup.GroupName = radgroupreply.GroupName
ORDER BY radgroupreply.id
rlm_sql (sql): Released sql socket id: 4
modcall[authorize]: module "sql" returns ok for request 0
modcall: group authorize returns ok for request 0
auth: type Local
auth: user supplied User-Password matches local User-Password
Processing the post-auth section of radiusd.conf
modcall: entering group post-auth for request 0
rlm_sql (sql): Processing sql_postauth
radius_xlat: 'Gaechter'
rlm_sql (sql): sql_set_user escaped user --> 'Gaechter'
modcall[post-auth]: module "sql" returns noop for request 0
modcall: group post-auth returns noop for request 0
Sending Access-Accept of id 12 to 192.168.136.35:2417
Service-Type == Framed-User
Finished request 0
Web Authentication with Apache 2
Chances are good that you have an area of your web site that needs to be protected from general public access. If you use the Apache web server, you may be familiar with the various methods by which this can be done: using an .htaccess and .htpasswd combination, setting Unix file system permissions, using Allow and Deny directives inside the Apache configuration file, and others. However, it's now possible to instruct Apache to authenticate against an existing RADIUS database of users, thereby protecting the area of your web site from unknown users and allowing access to those you trust.
This authentication is done using a module developed for Apache 2, called mod_auth_radius-2.0. In effect, Apache becomes a RADIUS client—occupying the traditional position of the NAS in the authentication chain—and hits off the RADIUS server for authentication and accounting requests.
The mod_radius_auth-2.0 module follows a predictable pattern in its use. A typical transaction occurs like this:
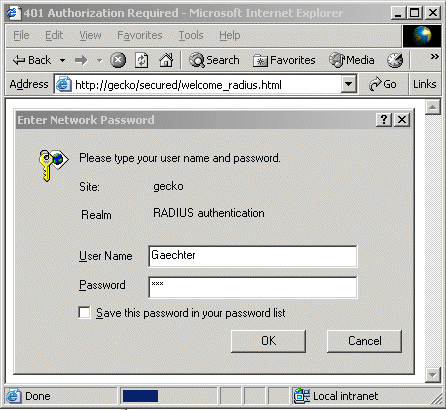
- The browser submits a page request for e.g. http://gecko/secured/welcome_radius.html.
- Apache sees that the directory is secured and sends an Authorization Required prompt (with spaces for the username and password) to the end user.
- The user responds to the authentication request with his credentials. The browser sends the response, and the same page request once again, to Apache.
- Apache receives the user's response and hands it off to mod_radius_auth-2.0. The module sees that a cookie is not present (since this is the user's first request.) It constructs a RADIUS request and transmits it to the RADIUS server.
- The RADIUS server performs the authentication and sends its response back to mod_radius_auth-2.0.
- mod_radius_auth-2.0 interprets the RADIUS server's decision. If the authentication was deemed successful, the module sends a cookie with the public and private information hidden using MD5. If the authentication was unsuccessful, the module returns an Access Denied message.
- The web browser sends the cookie with any other request. As long as mod_radius_auth-2.0 recognizes the cookie as valid, it will not send another request to the RADIUS server.
The cookies that are set on the end user's computer are valid for the lesser of the two values specified in the module's configuration and the secured area's configuration. The cookies also are killed when the browser ends, either by crash or via a user-initiated exit. The module will attempt to make cookies expire that, in its opinion, are too mature. However, if the browser does not acknowledge or follow through with the cookie expiration requests, the authentication prompt will appear repeatedly until the user reloads the browser and the site.
First, compile the module into Apache or use the apxs utility to instruct Apache to use mod_radius_auth-2.0 as a dynamic module. You can obtain the module from its home page at:
ftp://ftp.freeradius.org/pub/radius/mod_auth_radius.tar# tar xvf mod_auth_radius.tar
# cd mod_auth_radius-1.5.7
# apxs2 -i -a -c mod_auth_radius-2.0.c/usr/lib/apache2/build/libtool --silent --mode=compile
gcc -prefer-pic -O2 -march=i686 -fomit-frame-pointer -DAP_HAVE_DE
SIGNATED_INITIALIZER -DLINUX=2 -D_REENTRANT -D_XOPEN_SOURCE=500
-D_BSD_SOURCE -D_SVID_SOURCE -D_GNU_SOURCE -pthread -I/usr/include/apache2
-I/usr/include/apache2 -I/usr/include/apache2 -c -o mod_auth_radius-2.0.lo
mod_auth_radius-2.0.c && touch mod_auth_radius-2.0.slo
mod_auth_radius-2.0.c:560: warning: initialization from incompatible pointer type
/usr/lib/apache2/build/libtool --silent --mode=link gcc -o
mod_auth_radius-2.0.la -rpath /usr/lib/apache2 -module -avoi
d-version mod_auth_radius-2.0.lo
/usr/lib/apache2/build/instdso.sh SH_LIBTOOL='/usr/lib/apache2/build/libtool'
mod_auth_radius-2.0.la /usr/lib/apache2
/usr/lib/apache2/build/libtool --mode=install cp mod_auth_radius-2.0.la
/usr/lib/apache2/
cp .libs/mod_auth_radius-2.0.so /usr/lib/apache2/mod_auth_radius-2.0.so
cp .libs/mod_auth_radius-2.0.lai /usr/lib/apache2/mod_auth_radius-2.0.la
cp .libs/mod_auth_radius-2.0.a /usr/lib/apache2/mod_auth_radius-2.0.a
ranlib /usr/lib/apache2/mod_auth_radius-2.0.a
chmod 644 /usr/lib/apache2/mod_auth_radius-2.0.a
PATH="$PATH:/sbin" ldconfig -n /usr/lib/apache2
----------------------------------------------------------------------
Libraries have been installed in:
/usr/lib/apache2
If you ever happen to want to link against installed libraries
in a given directory, LIBDIR, you must either use libtool, and
specify the full pathname of the library, or use the `-LLIBDIR'
flag during linking and do at least one of the following:
- add LIBDIR to the `LD_LIBRARY_PATH' environment variable
during execution
- add LIBDIR to the `LD_RUN_PATH' environment variable
during linking
- use the `-Wl,--rpath -Wl,LIBDIR' linker flag
- have your system administrator add LIBDIR to `/etc/ld.so.conf'
See any operating system documentation about shared libraries for
more information, such as the ld(1) and ld.so(8) manual pages.
----------------------------------------------------------------------
chmod 755 /usr/lib/apache2/mod_auth_radius-2.0.so
[activating module `radius_auth' in /etc/apache2/conf/apache2.conf]Next, edit the Apache httpd.conf (apache2.conf on GENTOO Linux) file to instruct Apache to load the module. Include a line in the LoadModule section like this:
LoadModule radius_auth_module modules/mod_auth_radius-2.0.so
Now you need to create a section with specific configuration directives for the mod_auth_radius-2.0 module. At the end of httpd.conf (commonapache2.conf on GENTOO Linux), create a section like the following example and configure it as explained next:
# Authentication done by the FreeRadius Server
<IfModule mod_auth_radius-2.0.c>
#
# AddRadiusAuth server[:port] <shared-secret> [ timeout [ : retries ]]
#
# Use localhost, the new RADIUS port, secret 'enter-a-secret-word',
AddRadiusAuth localhost:1812 enter-a-secret-word 5:3
#
# AuthRadiusBindAddress <hostname/ip-address>
#
# Bind client (local) socket to this local IP address.
# The server will then see RADIUS client requests will come from
# the given IP address.
#
# By default, the module does not bind to any particular address,
# and the operating system chooses the address to use.
#
#
# AddRadiusCookieValid <minutes-for-which-cookie-is-valid>
#
# the special value of 0 (zero) means the cookie is valid forever.
#
AddRadiusCookieValid 5
</IfModule>The AddRadiusAuth directive tells Apache to authenticate against RADIUS. You specify the name of the RADIUS server, the port to use, the shared secret for the web client, and the timeout period Apache should wait before giving up and assuming no response will be sent. The AuthRadiusBindAddress directive specifies the local interface on which requests should be sent. The RADIUS server can then be set to accept requests only from this address for added security. (This directive is not required, since by default the module lets the underlying operating system choose the interface to use.) The AddRadiusCookieValid directive specifies the minutes for which the cookie sent in the response to the end user from the web client is valid. Setting this value to zero (0) signifies that the cookie will be valid forever.
The next step is to define the areas of the web site that need protection. There are two ways to do this: (a) you can use an .htaccess file placed in the directory to be protected, or (b) you can define the locations inside httpd.conf. In this example, we'll assume that you've decided to define the locations inside httpd.conf.
# A sample per-directory access-control configuration. This may
# go into httpd.conf. When used in an '.htaccess' file, the
# text BETWEEN the <Location /secured/> </Location> directives
# should go into the .htaccess file.
#
# If you want to be sure it only applies when mod_auth_radius is used,
# you can also wrap it in an <IfModule> directive, as above.
<Location /secured/>
#
# Use basic password authentication.
# AuthType Digest won't work with RADIUS authentication.
#
AuthType Basic
#
# Tell the user the realm to which they're authenticating.
# This string should be configured for your site.
#
AuthName "RADIUS Authentication @ Akadia Ltd"
#
# Don't use 'mod_auth'.
# You might want to disable other authentication types here.
# You can get a similar effect by commenting out the
# 'AddModule mod_auth_*' lines, previously in httpd.conf
#
AuthAuthoritative off
#
# Use mod_auth_radius for all authentication, and make the responses
# from it authoritative.
#
AuthRadiusAuthoritative on
#
# Make a local variation of AddRadiusCookieValid. The server will choose
# the MINIMUM of the two values.
#
# AuthRadiusCookieValid <minutes-for-which-cookie-is-valid>
#
AuthRadiusCookieValid 5
#
# Set the use of RADIUS authentication at this <Location>"
#
# Globally set the RADIUS authentication active.
#
#
# If there is a directory which you do NOT want to have RADIUS
# authentication for, then use a <Directory> or <Location> directive,
# and set "AuthRadiusActive Off". The default is "On".
#
AuthRadiusActive On
#
# require that mod_auth_radius return a valid user, otherwise
# access is denied.
#
require valid-user
</Location>The following definitions provide an explanation of each of these directives.
AuthType
This module requires basic authentication since digest authentication won't work correctly.
AuthName
The contents of this string are included in the password prompt presented to the end user. It simply serves to inform the user of which protected area he's attempting to enter.
AuthAuthoritative
This directive ensures that other authentication types are not used for this particular site area. You can net the same effect by commenting out other authentication types appearing previously in httpd.conf, but that is only recommended if this server is used only for this protected site.
AuthRadiusAuthoritative
This tells Apache to consider all RADIUS responses authoritative—that is, the RADIUS responses are «the final answer».
AuthRadiusCookieValid
This is the same directive as the cookie setting globally set in the module configuration section. The server will choose the lower of the two values and set the cookie to expire at that interval. This value is in minutes.
AuthRadiusActive
This turns on RADIUS authentication globally. If there's an area of the site for which you want to use some other authentication method than RADIUS, set this directive to Off for that particular section. The default, if this directive is not included, is On.
Require valid-user
This directive ensures that only valid users can access the site. If the RADIUS server returns anything but a valid user, access will not be permitted.
Enter the URL in the Browser:
Enter the User and Password:
Check the Log Output of /usr/local/freeradius/sbin/radiusd -X
rad_recv: Access-Request packet from host 127.0.0.1:1026, id=254, length=78
User-Name = "Gaechter"
User-Password = "Moo"
Service-Type = Authenticate-Only
NAS-Identifier = "gecko.akadia.com"
NAS-IP-Address = 127.0.0.1
Processing the authorize section of radiusd.conf
.........
.........
rlm_sql (sql): sql_set_user escaped user --> 'Gaechter'
modcall[post-auth]: module "sql" returns noop for request 0
modcall: group post-auth returns noop for request 0
Sending Access-Accept of id 254 to 127.0.0.1:1026
Service-Type == Framed-User
Finished request 0
Configure Oracle Clients to use RADIUS for Authentication
You can configure any Oracle Client Software (SQL*Plus, Toad, etc) to authenticate against a Radius Server as shown in the figure below. You want to connect to the Oracle Server FOC2 (located on Windows 2000) using Radius Authentication. The FreeRadius Server contacts the FreeRadius schema on the Oracle Server GEK1 (located on GENTOO Linux) to authenticate the Oracle Client User. To enable Radius you have to install the Oracle Advanced Security Option for both the Oracle Client and Oracle Server (FOC2).
From the user's perspective, the entire authentication process is transparent. When the user wants access to the Oracle database server (FOC2), this Oracle database server, acting as the RADIUS client. The Radius Server:
- Looks up the user's security information (in GEK1 in our Example).
- Passes authentication and authorization information and the Oracle database server (FOC2).
- Grants the user access to the Oracle database server (FOC2).
Installation and Configuration (Oracle Advanced Security Option)
Make sure, that you install the Oracle Advanced Security Option on the Oracle Client and Oracle Server (FOC2).
Use Oracle Net Manager to configure RADIUS on the Oracle client or simply add the following entry in ORACLE_HOME\network\admin\SQLNET.ORA.
SQLNET.AUTHENTICATION_SERVICES = RADIUS
Oracle Server Configuration (FOC2)
Create the RADIUS Secret Key File on the Oracle Database Server (FOC2)
- Obtain the RADIUS secret key from the FreeRadius Server. In our Example, the secret key can be found in the
clients.conf File in /usr/local/freeradius/etc/raddb)# cd /usr/local/freeradius/etc/raddb
# vi clients.confclient 192.168.136.0/24 {
secret = enter-a-secret-word <==== secret key
shortname = akadia
}
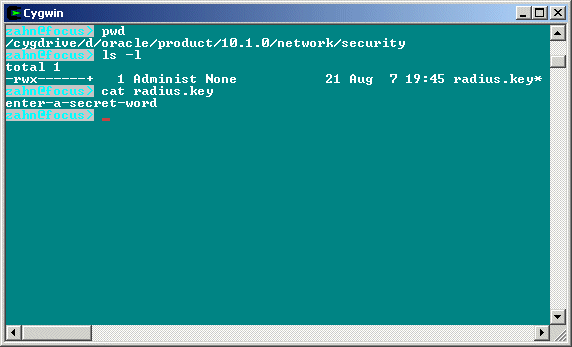
- On the Oracle Database Server (FOC2), create a directory: ORACLE_HOME\network\security.
- Create the file radius.key to hold the shared secret copied from the FreeRadius server. Place the file in the directory you just created in Step 2. Copy the secret key: enter-a-secret-word and paste it (and nothing else) into the radius.key file.
Configure RADIUS Parameters on the Oracle Database Server (FOC2)
Enter the following parameters to your ORACLE_HOME\network\admin\SQLNET.ORA
SQLNET.AUTHENTICATION_SERVICES = RADIUS
SQLNET.RADIUS_AUTHENTICATION_PORT = 1812
SQLNET.RADIUS_SECRET = D:\Oracle\Product\10.1.0\network\security\radius.key
SQLNET.RADIUS_DEFAULT_CHALLENGE_KEYWORD = challenge
SQLNET.RADIUS_CHALLENGE_RESPONSE = OFF
SQLNET.RADIUS_SEND_ACCOUNTING = OFF
SQLNET.RADIUS_AUTHENTICATION = gecko <== This is the FreeRadius Server Host!
SQLNET.RADIUS_AUTHENTICATION_RETRIES = 3
AUTHENTICATION_SERVICES
Select RADIUS as the authentication service. AUTHENTICATION_PORT
Specifies the listening port of the primary RADIUS server. RADIUS_SECRET
Specifies the location of the secret key on the Oracle database server. The field specifies the location of the secret key file, not the secret key itself. RADIUS_DEFAULT_CHALLENGE_KEYWORD
The challenge-response in asynchronous mode presents the user with a graphical interface requesting first a password, then additional information--for example, a dynamic password that the user obtains from a token card. If you are using the synchronous authentication mode, you connect with e.g. SQL*Plus as follows:
sqlplus username/password@service_name
Note that you can log in with this command only when challenge-response is turned OFF.
If you are using the asynchronous authentication mode, you connect with e.g. SQL*Plus as follows:
sqlplus /@service_name
Note that you can log in with this command only when challenge-response is turned to ON.
RADIUS_CHALLENGE_RESPONSE
Enter OFF to disable challenge-response. RADIUS_SEND_ACCOUNTING
Enter OFF to disable accounting (see Oracle Database Advanced Security Administrator's Guide for more Information). RADIUS_AUTHENTICATION
Enter the host name of the RADIUS Server RADIUS_AUTHENTICATION_RETRIES
Specifies the number of times the Oracle database server resends messages to the primary RADIUS server. SQLNET.RADIUS_AUTHENTICATION_TIMEOUT
Specifies the time (seconds) the Oracle database server waits for a response from the primary RADIUS server.
Set Oracle Database Server Initialization Parameters
Configure the initialization parameter file, with the following values. Setting REMOTE_OS_AUTHENT to TRUE can enable a security breach because it lets someone using a non-secure protocol, such as TCP, perform an operating system-authorized login (formerly called an OPS$ login).
REMOTE_OS_AUTHENT=FALSE
OS_AUTHENT_PREFIX=""
Create a User and Grant Access
To grant user access for the Oracle Database on FOC2, create the user as follows:
SQL> CONNECT system/manager@FOC2;
SQL> CREATE USER radtest IDENTIFIED EXTERNALLY;
SQL> GRANT CREATE SESSION TO USER radtest;
SQL> EXIT
Setup the service name in your TNSNAMES.ORA File
We used the following entry in the TNSNAMES.ORA File on the Orcale Client:
FOC2 =
(DESCRIPTION =
(ADDRESS_LIST =
(ADDRESS = (PROTOCOL = TCP)(HOST = focus)(PORT = 1521))
)
(CONNECT_DATA =
(SID = FOC2)
(SERVER = DEDICATED)
)
)
Using RADIUS to log in to the Database (FOC2)
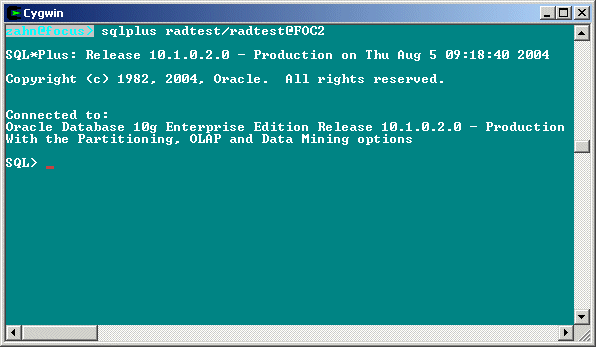
In synchronous authentication mode, launch SQL*Plus as follows:
sqlplus radtest/radtest@FOC2
Check the Log Output of /usr/local/freeradius/sbin/radiusd -X
rad_recv: Access-Request packet from host 192.168.136.35:2398, id=55, length=47
User-Name = "RADTEST"
User-Password = "radtest"
Processing the authorize section of radiusd.conf
modcall: entering group authorize for request 1
modcall[authorize]: module "preprocess" returns ok for request 1
modcall[authorize]: module "chap" returns noop for request 1
modcall[authorize]: module "mschap" returns noop for request 1
rlm_realm: No '@' in User-Name = "RADTEST", looking up realm NULL
rlm_realm: No such realm "NULL"
modcall[authorize]: module "suffix" returns noop for request 1
rlm_eap: No EAP-Message, not doing EAP
modcall[authorize]: module "eap" returns noop for request 1
modcall[authorize]: module "files" returns notfound for request 1
radius_xlat: 'RADTEST'
rlm_sql (sql): sql_set_user escaped user --> 'RADTEST'
radius_xlat: 'SELECT id,UserName,Attribute,Value,op
FROM radcheck WHERE Username = 'RADTEST' ORDER BY id'
rlm_sql (sql): Reserving sql socket id: 3
SELECT id,UserName,Attribute,Value,op
FROM radcheck WHERE Username = 'RADTEST' ORDER BY id
radius_xlat: 'SELECT radgroupcheck.id,radgroupcheck.GroupName,radgroupcheck.Attribute,
radgroupcheck.Value,radgroupcheck.op FROM radgroupcheck,usergroup
WHERE usergroup.Username = 'RADTEST' AND usergroup.GroupName = radgroupcheck.GroupName
ORDER BY radgroupcheck.id'
SELECT radgroupcheck.id,radgroupcheck.GroupName,radgroupcheck.Attribute,
radgroupcheck.Value,radgroupcheck.op FROM radgroupcheck,usergroup
WHERE usergroup.Username = 'RADTEST'
AND usergroup.GroupName = radgroupcheck.GroupName ORDER BY radgroupcheck.id
radius_xlat: 'SELECT id,UserName,Attribute,Value,op
FROM radreply WHERE Username = 'RADTEST' ORDER BY id'
SELECT id,UserName,Attribute,Value,op FROM radreply
WHERE Username = 'RADTEST' ORDER BY id
radius_xlat: 'SELECT radgroupreply.id,radgroupreply.GroupName,radgroupreply.Attribute,
radgroupreply.Value,radgroupreply.op
FROM radgroupreply,usergroup WHERE usergroup.Username = 'RADTEST'
AND usergroup.GroupName = radgroupreply.GroupName ORDER BY radgroupreply.id'
SELECT radgroupreply.id,radgroupreply.GroupName,radgroupreply.Attribute,
radgroupreply.Value,radgroupreply.op
FROM radgr oupreply,usergroup WHERE usergroup.Username = 'RADTEST'
AND usergroup.GroupName = radgroupreply.GroupName ORDER BY radgroupreply.id
rlm_sql (sql): Released sql socket id: 3
modcall[authorize]: module "sql" returns ok for request 1
modcall: group authorize returns ok for request 1
auth: type Local
auth: user supplied User-Password matches local User-Password
Processing the post-auth section of radiusd.conf
modcall: entering group post-auth for request 1
rlm_sql (sql): Processing sql_postauth
radius_xlat: 'RADTEST'
rlm_sql (sql): sql_set_user escaped user --> 'RADTEST'
modcall[post-auth]: module "sql" returns noop for request 1
modcall: group post-auth returns noop for request 1
Sending Access-Accept of id 55 to 192.168.136.35:2398
Service-Type == Framed-User
If you want to use other Authentication methods (NTS, KERBEROS, etc), then enter these methods to the SQLNET.AUTHENTICATION_SERVICES parameter, for example:
SQLNET.AUTHENTICATION_SERVICES = (RADIUS,NTS)
SQLNET.RADIUS_AUTHENTICATION_PORT = 1812
SQLNET.RADIUS_SECRET = D:\Oracle\Product\10.1.0\network\security\radius.key
SQLNET.RADIUS_DEFAULT_CHALLENGE_KEYWORD = challenge
SQLNET.RADIUS_CHALLENGE_RESPONSE = OFF
SQLNET.RADIUS_SEND_ACCOUNTING = OFF
SQLNET.RADIUS_AUTHENTICATION = gecko
SQLNET.RADIUS_AUTHENTICATION_RETRIES = 3
NAMES.DIRECTORY_PATH= (TNSNAMES)
SQLNET.CRYPTO_SEED = 4fhfguweotcadsfdsafjkdsfqp5f201p45mxskdlfdasf
AUTOMATIC_IPC = ON
NAMES.DEFAULT_DOMAIN = WORLD
BEQUEATH_DETACH = NO
SQLNET.EXPIRE_TIME = 10
NAME.DEFAULT_ZONE = WORLD
USE_DEDICATED_SERVER = ONNow you can connect for example to the SCOTT/TIGER account which is not authenticated by RADIUS.
sqlplus scott/tiger@FOC2
SQL*Plus: Release 10.1.0.2.0 - Production on Thu Aug 5 10:07:02 2004
Copyright (c) 1982, 2004, Oracle. All rights reserved.
Connected to:
Oracle Database 10g Enterprise Edition Release 10.1.0.2.0 - Production
With the Partitioning, OLAP and Data Mining options
SQL>
Automatically Start / Stop Freeradius
We use the following script to start / stop Freeradius on our GENTOO Linux Machine:
# rc-update add radiusd default
#!/sbin/runscript
# Akadia AG, Arvenweg 4, CH-3604 Thun
# ----------------------------------------------------------------------
# File: radiusd
#
# Autor: Martin Zahn / 30.07.2004
#
# Purpose: Start the FreeRadius daemon
# ----------------------------------------------------------------------
prefix=/usr/local/freeradius
exec_prefix=${prefix}
sbindir=${exec_prefix}/sbin
localstatedir=${prefix}/var
logdir=${localstatedir}/log/radius
logfile=${logdir}/radius.log
rundir=${localstatedir}/run/radiusd
sysconfdir=${prefix}/etc
# Radius Server must know location of Oracle Libs
source /root/.bash_profile 1>/dev/null 2>&1
RADIUSD=$sbindir/radiusd
RADDBDIR=${sysconfdir}/raddb
DESC="FreeRADIUS"
ARGS=""
test -f $RADIUSD || exit 0
test -f $RADDBDIR/radiusd.conf || exit 0
depend() {
need net
use dns
after all
}
start() {
ebegin "Starting $DESC"
$RADIUSD -Ayz -l $logfile $ARGS 1>$logfile 2>&1
eend $? "Failed to start $DESC."
}
stop() {
ebegin "Stopping $DESC"
[ -f $rundir/radiusd.pid ] && kill -TERM `cat $rundir/radiusd.pid`
eend $? "Failed to stop $DESC."
}
Download
Here, you will find our configuration files.